 Akasi
Meet Akasi
About Akasi
Akasi is an AI agent designed for personal growth. It brings personal knowledge management, AI conversations, task planning, and desktop companionship into one workspace, helping you turn scattered information into understanding, action, and lasting knowledge.
Akasi may be especially useful if you want to:
Keep notes, documents, links, and ideas together, and quickly find connections between them.
Use AI grounded in your personal Library to help you read, summarize, write, and think, while drawing inspiration from what you already know and discovering new perspectives, connections, and possibilities.
Break the plans and ideas in your notes into tasks, calendar events, and practical next steps.
Have a personal AI companion with its own personality, a sense of growth, and a presence in your everyday life.
Quick start
Core features
Library: Keep notes, documents, links, and other personal resources together to build a lasting foundation of knowledge.
Knowledge graph: See connections between notes, discover isolated content, revisit forgotten information, and uncover potential relationships.
AI Chat & Tools: Summarize, ask questions, continue writing, organize content, and extract tasks using your current note or personal Library.
Tasks & calendar: Put your knowledge to work by turning ideas into tasks, plans, and a schedule.
Companion: Meet Akasi through a personal AI companion that stays with you across different activities and offers help through right-click menus, speech bubbles, animations, and shortcuts.
Feature walkthroughs
Sign-in & registration
Open Akasi to reach the sign-in page. Verification code sign-in is selected by default.
New users: Select “Create an account” and complete the invite-only registration process. You can then sign in with your account.
Existing users: Enter your phone number or email and a verification code to sign in. Select “Sign in with password” to use your password, or select WeChat to sign in with a QR code.
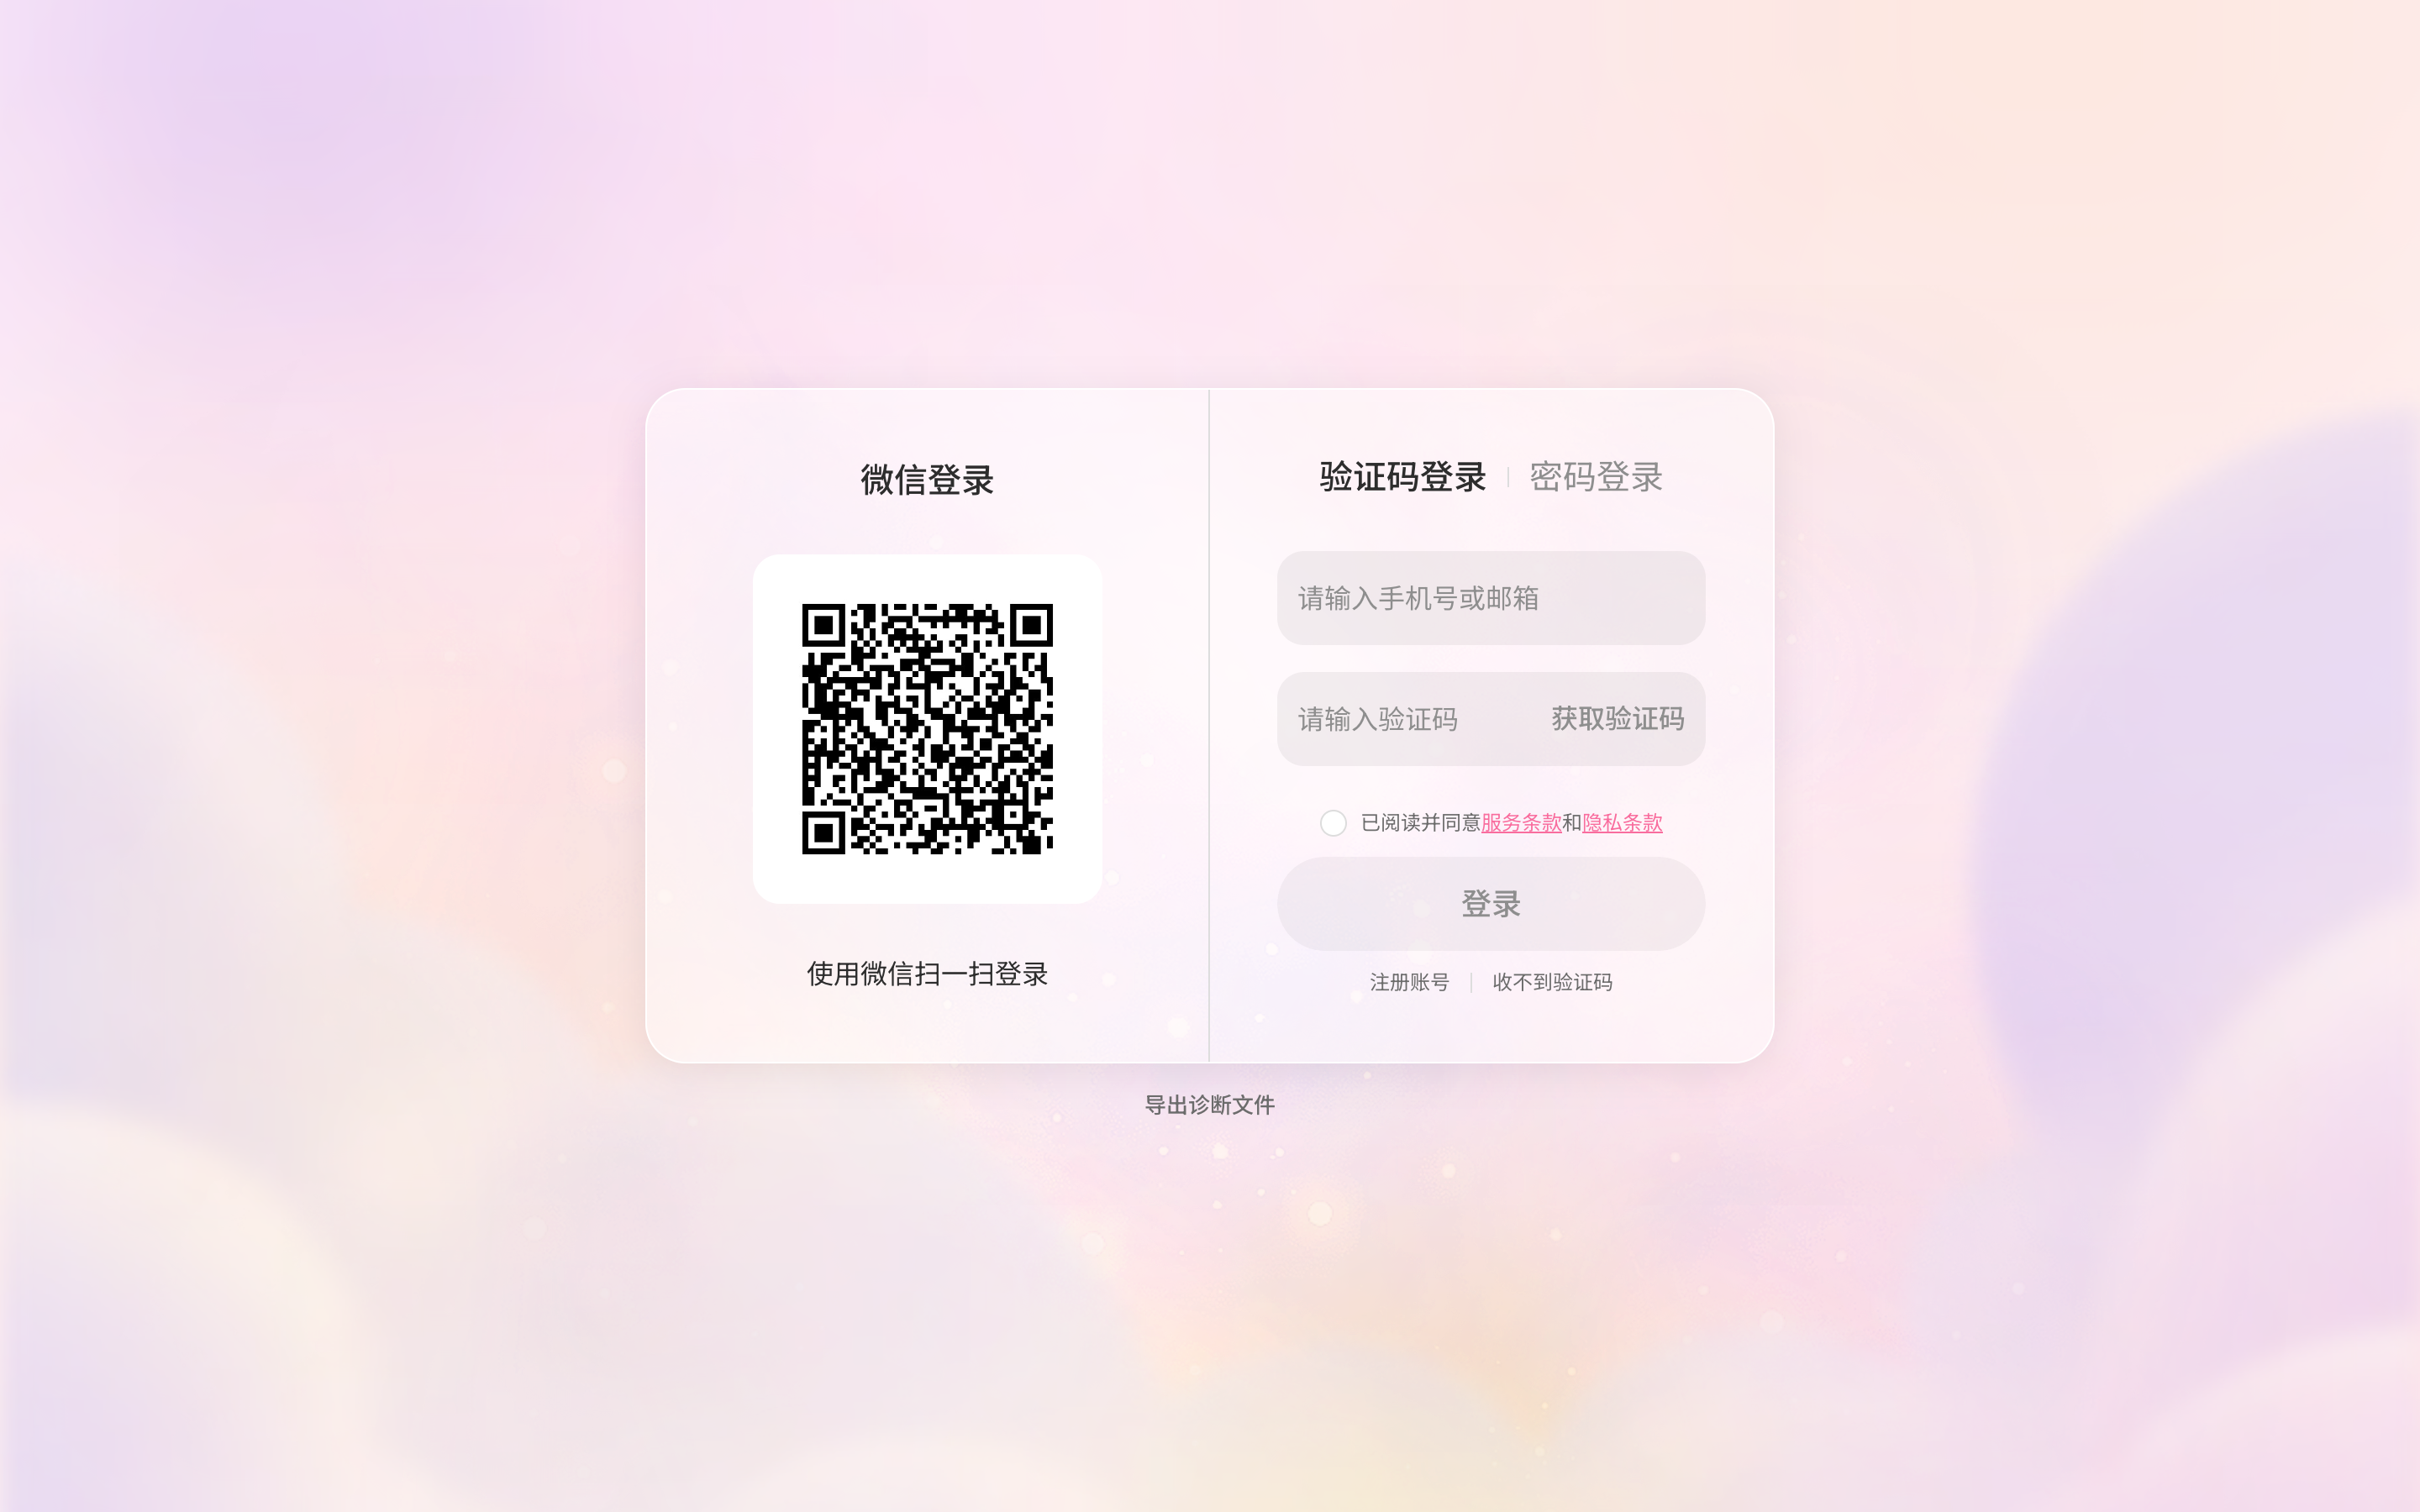
Sign in with a verification code (default)
Enter your phone number or email in the account field; the same field recognizes either format. Select “Get code.” Sign-in is submitted automatically when you enter all six digits of the code.
You must wait 60 seconds before requesting another code. Each phone number or email can receive up to five codes per day; no more can be sent that day after the limit is reached.
Five consecutive incorrect codes trigger a 30-second lockout. The field unlocks automatically when the countdown ends.
Sign in with a password
Select “Sign in with password,” enter your phone number or email and password, then select the sign-in button.
If either credential is incorrect, you will see “Incorrect account or password.” Too many consecutive failures show “Too many attempts. Please try again later.” Wait before trying again.
Select “Forgot password?” to start account recovery.
Sign in with a WeChat QR code
Select WeChat to display a QR code. Scan it in WeChat and confirm to sign in. The code expires after 300 seconds; select “Refresh QR code” to get a new one.
The first time you scan with a WeChat account that is not linked, you will see two choices. Select “Link an existing account” and verify its account and password to link it and sign in. Select “Create an account” to register; WeChat is linked automatically when registration succeeds.

Create an account (invite-only)
Select “Create an account” at the bottom of the sign-in card.
Enter a phone number or email; the field recognizes either format and sends the code by SMS or email accordingly. Select “Get code” and enter it, choose a nickname of up to 20 characters, set and confirm a password of 6–64 characters, accept the User Agreement and Privacy Policy, then select the registration button.
Next, complete two dialogs in order: (1) Enter an invite code. This is required and provided through official channels. Each code can be used once; an invalid or used code must be replaced. (2) Confirm “I am at least 18 years old.” Registration then completes, Home opens, and the new-user questionnaire starts automatically.
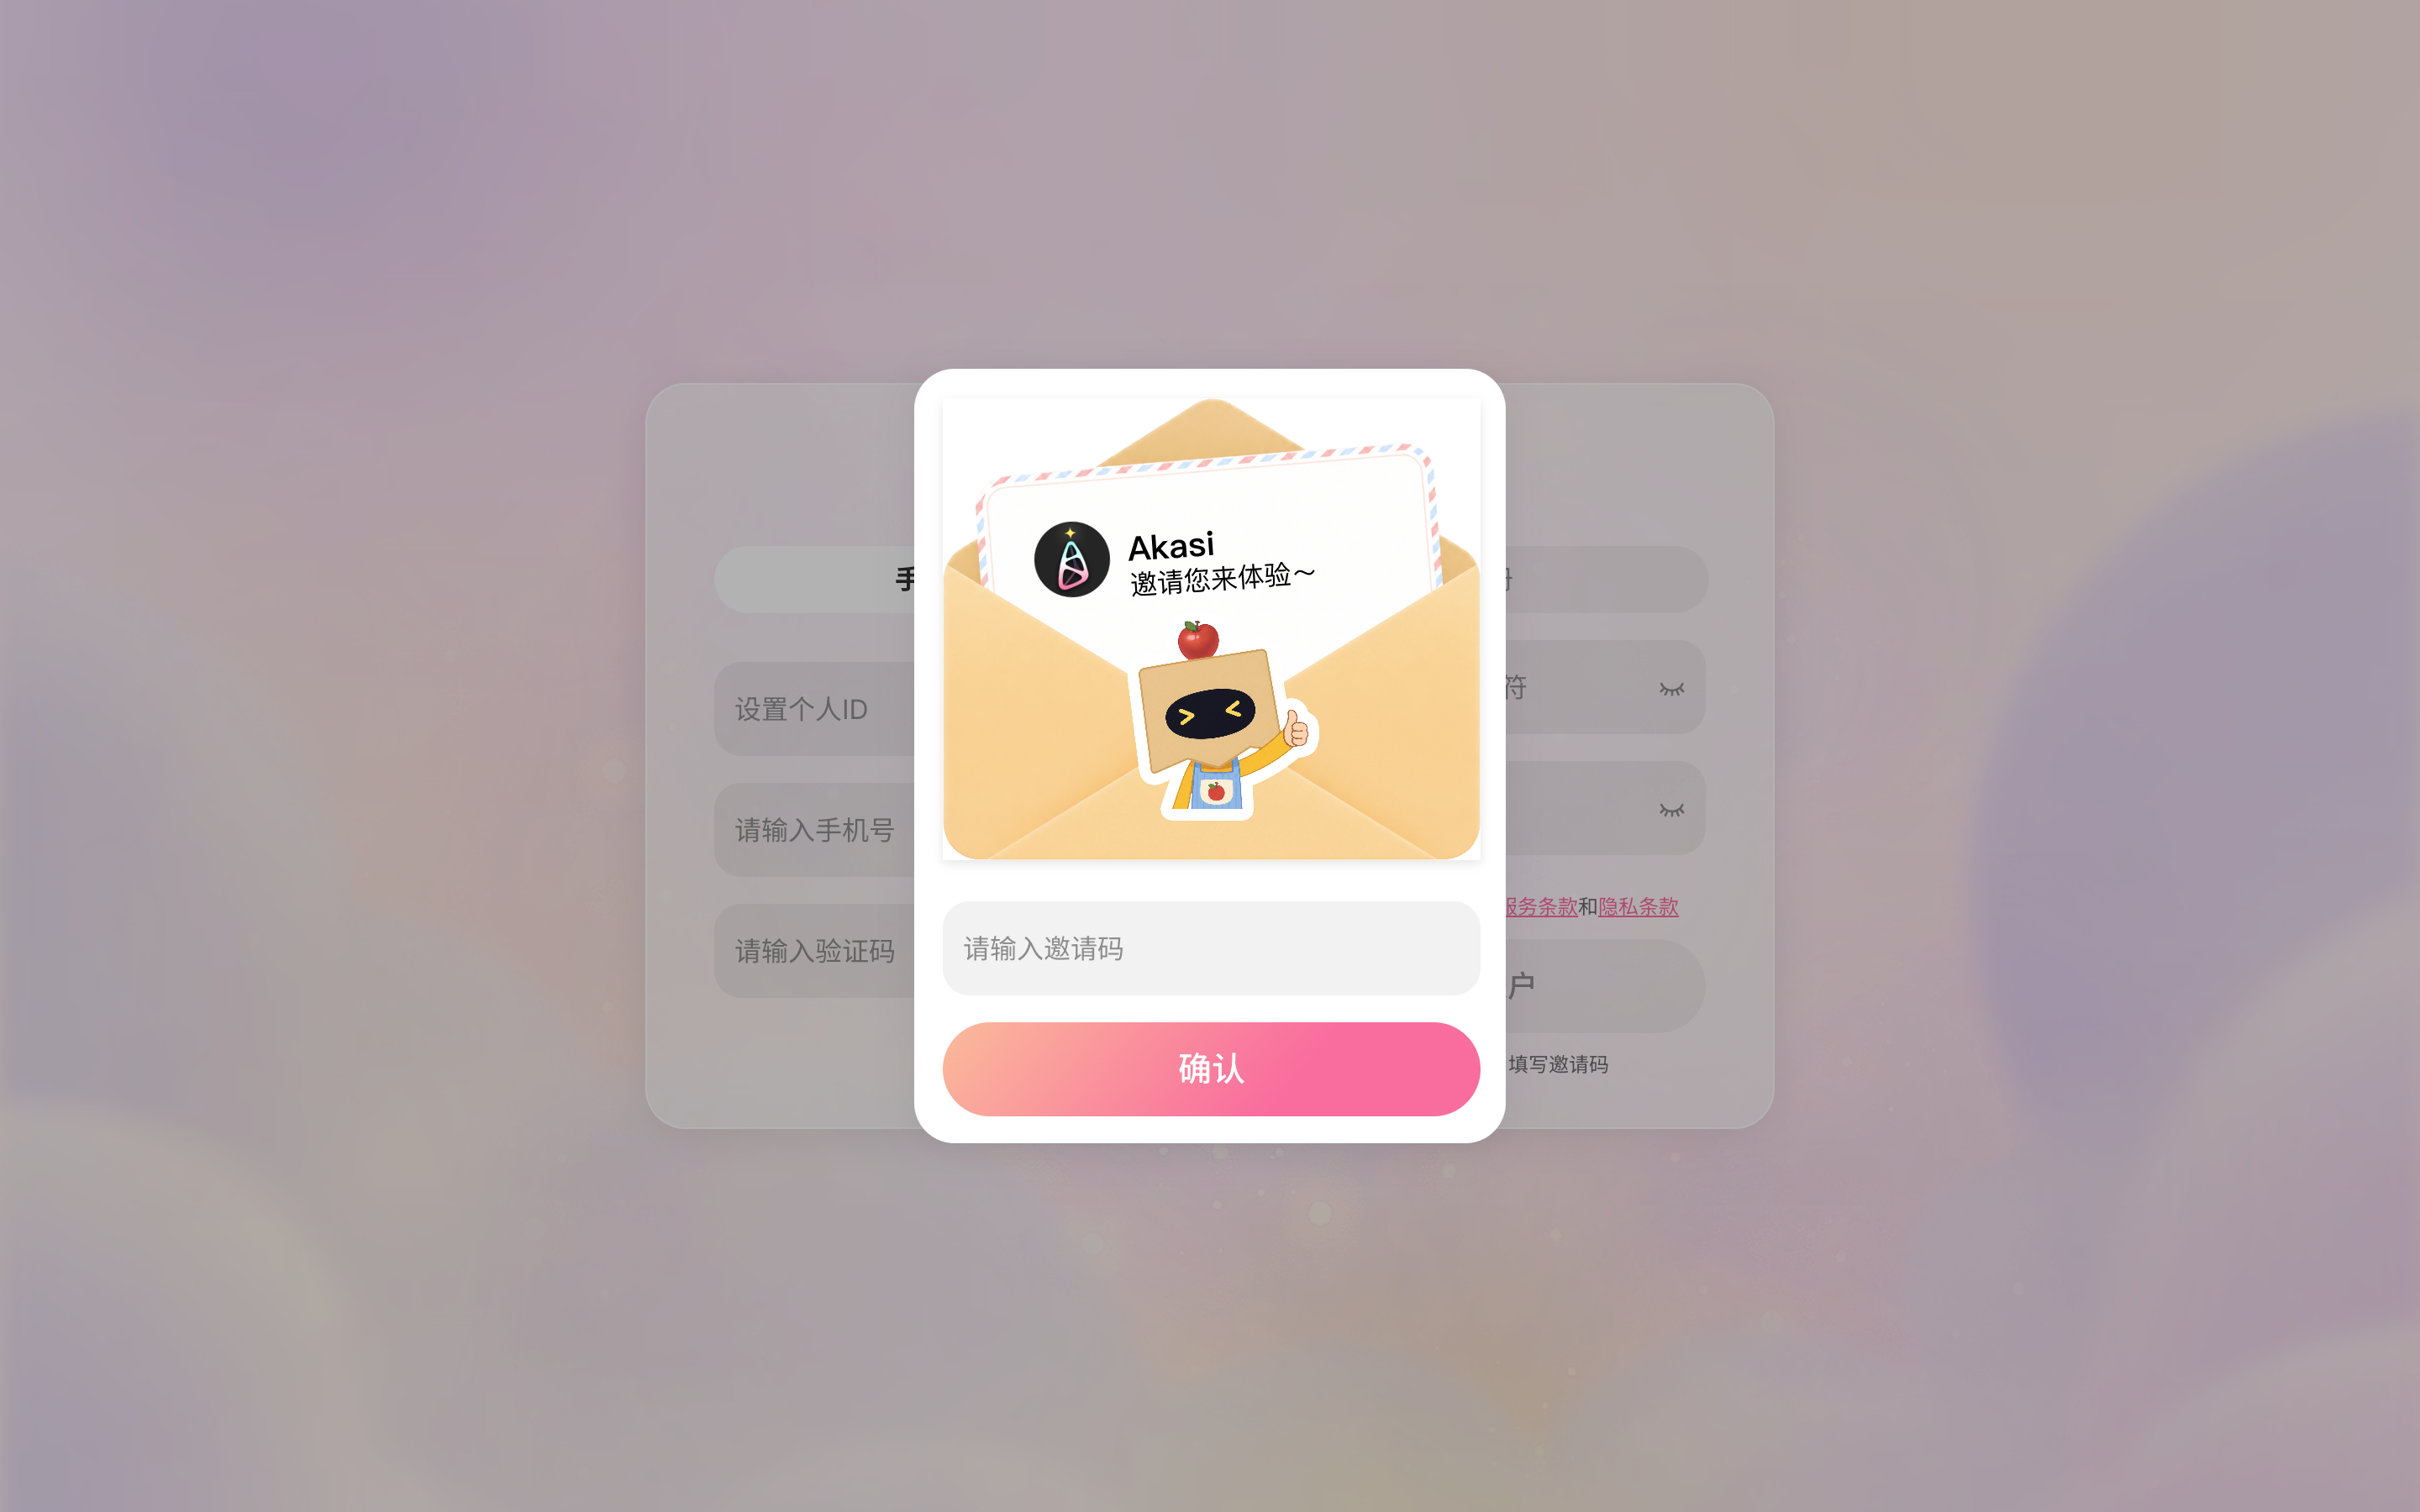
Forgot password
On the password sign-in page, select “Forgot password?”, enter your account, request and enter a verification code, and set a new password after verification. Once the reset succeeds, return to sign-in and use your new password.
A “Contact support for recovery” option appears at the bottom of the recovery flow. Use it if your phone number is inactive or you can no longer access any of your contact methods; a support agent will handle the request.
Home
- After sign-in, you arrive at Home. It includes a central knowledge graph, a Quick Note field at the top, an information panel on the left (mood check-in, calendar, and tasks), a Personal Radio sidebar on the right, and the navigation dock and companion at the bottom.
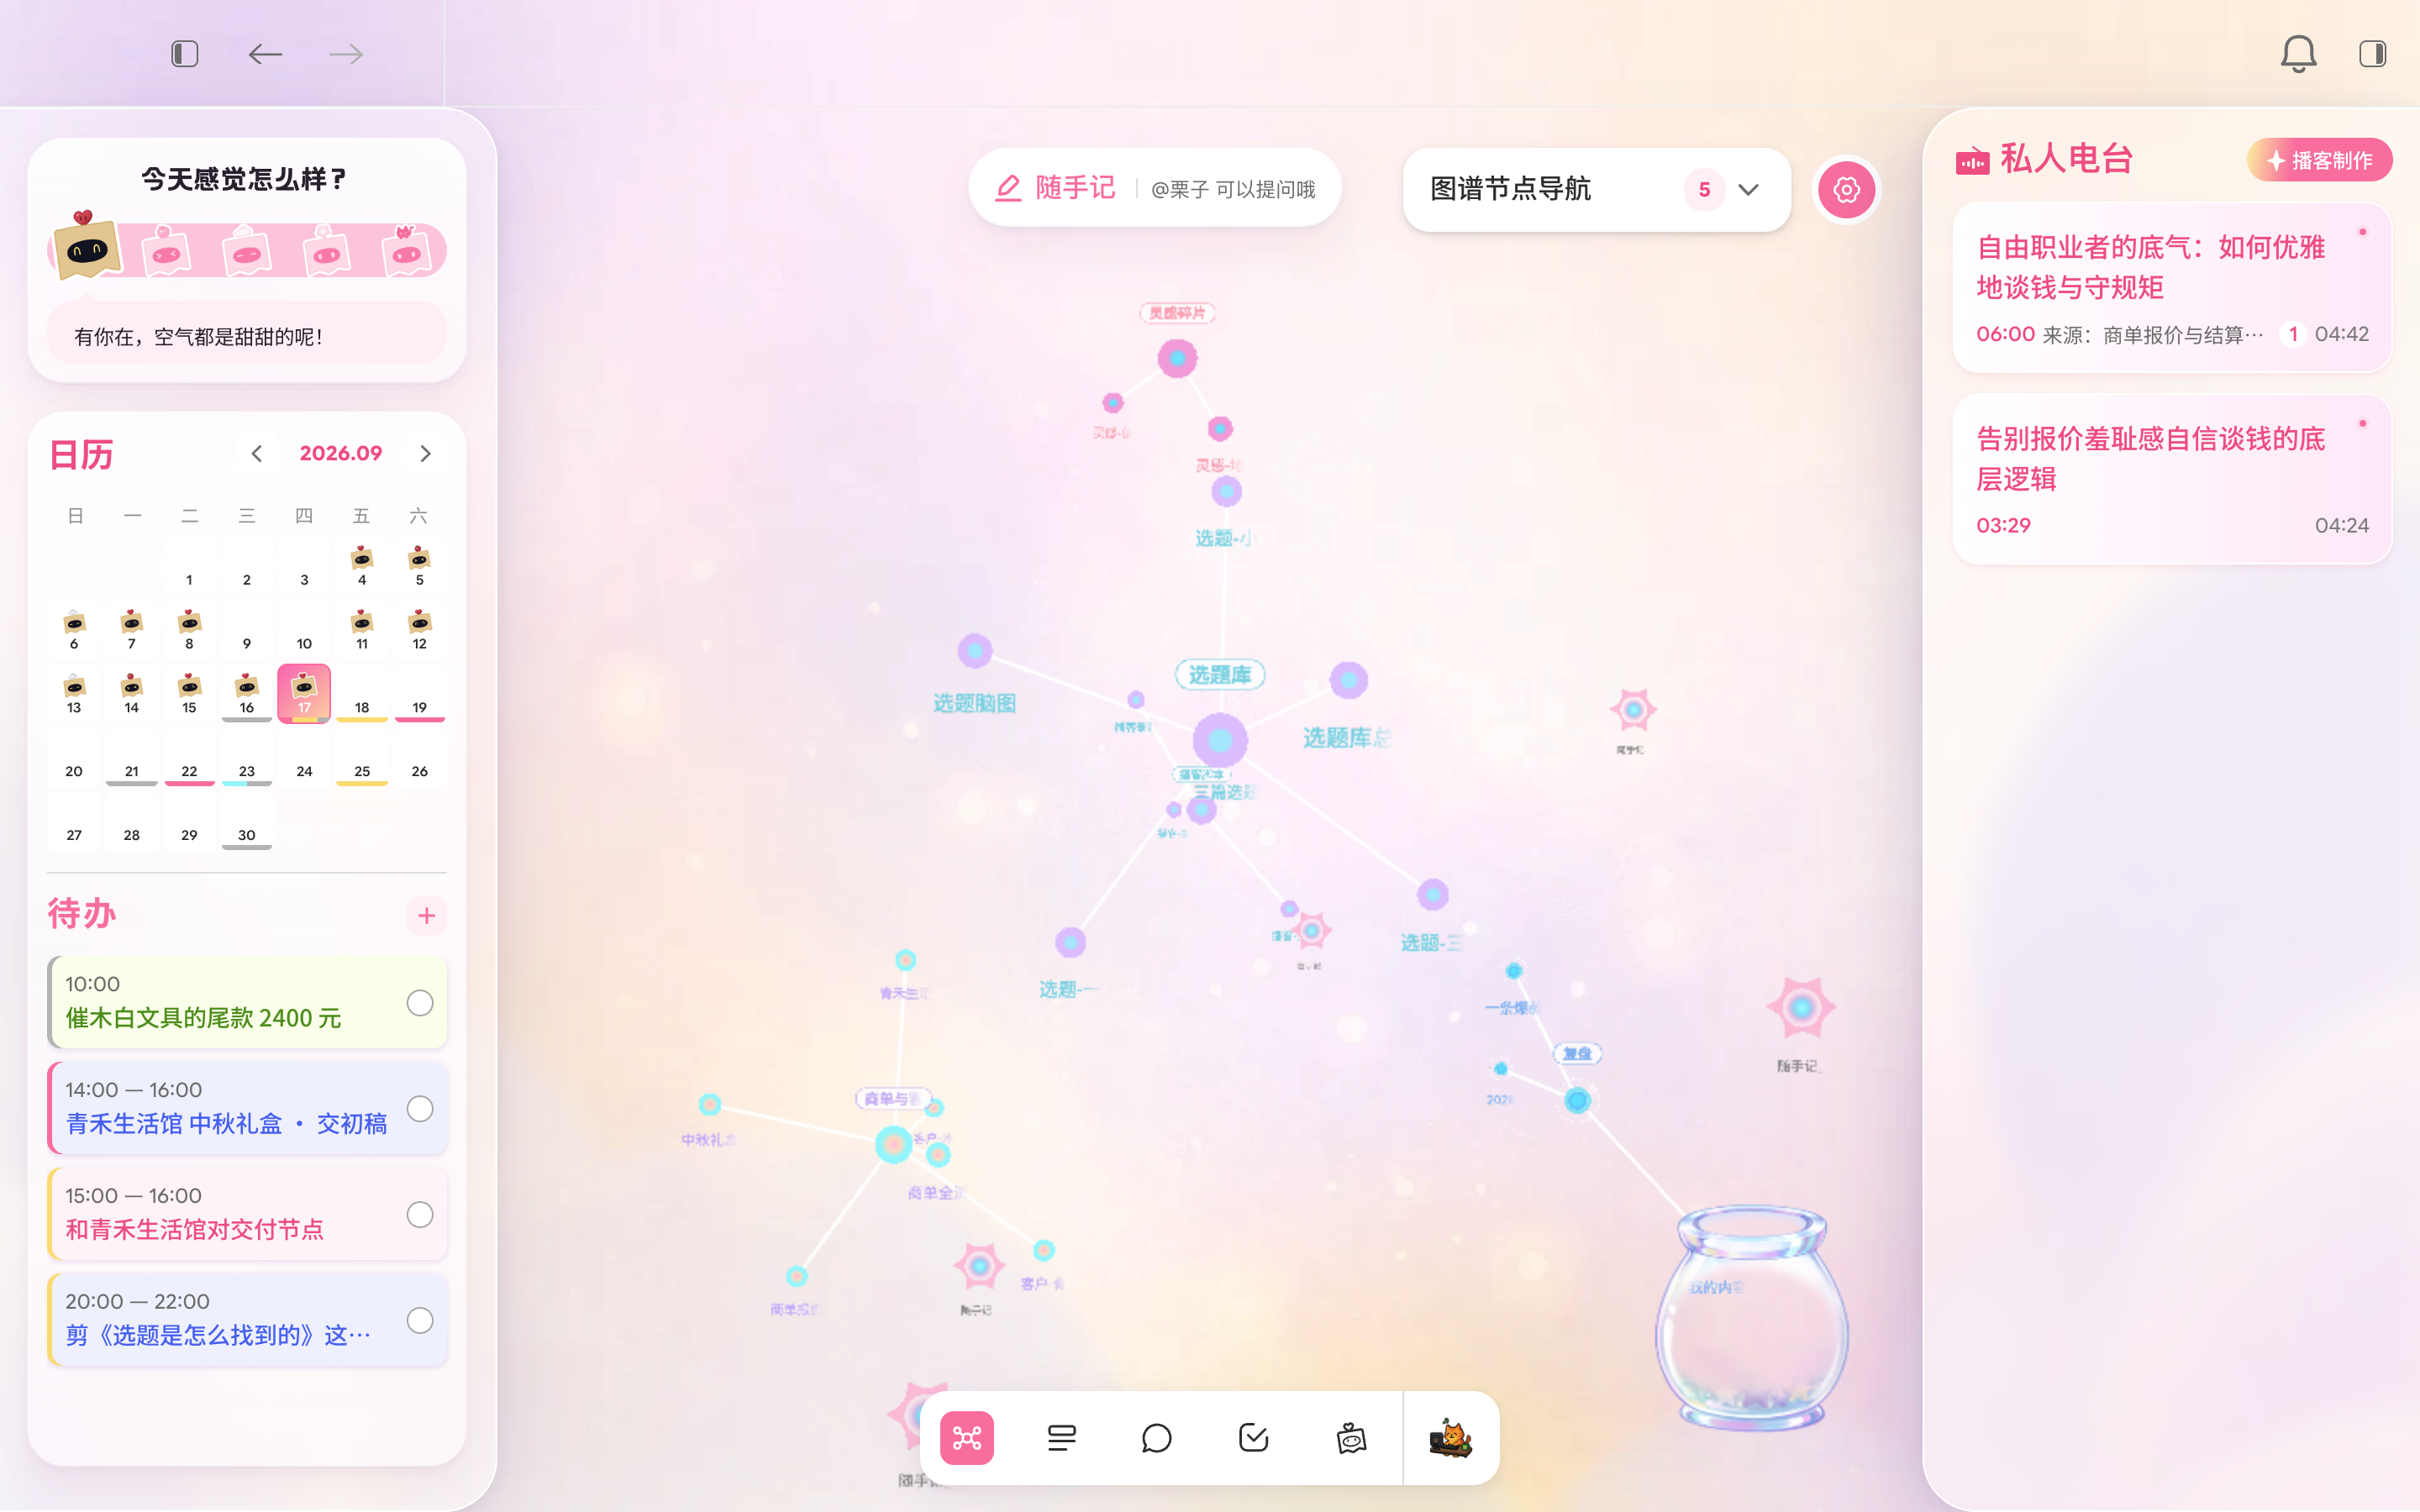
Knowledge graph & node navigation
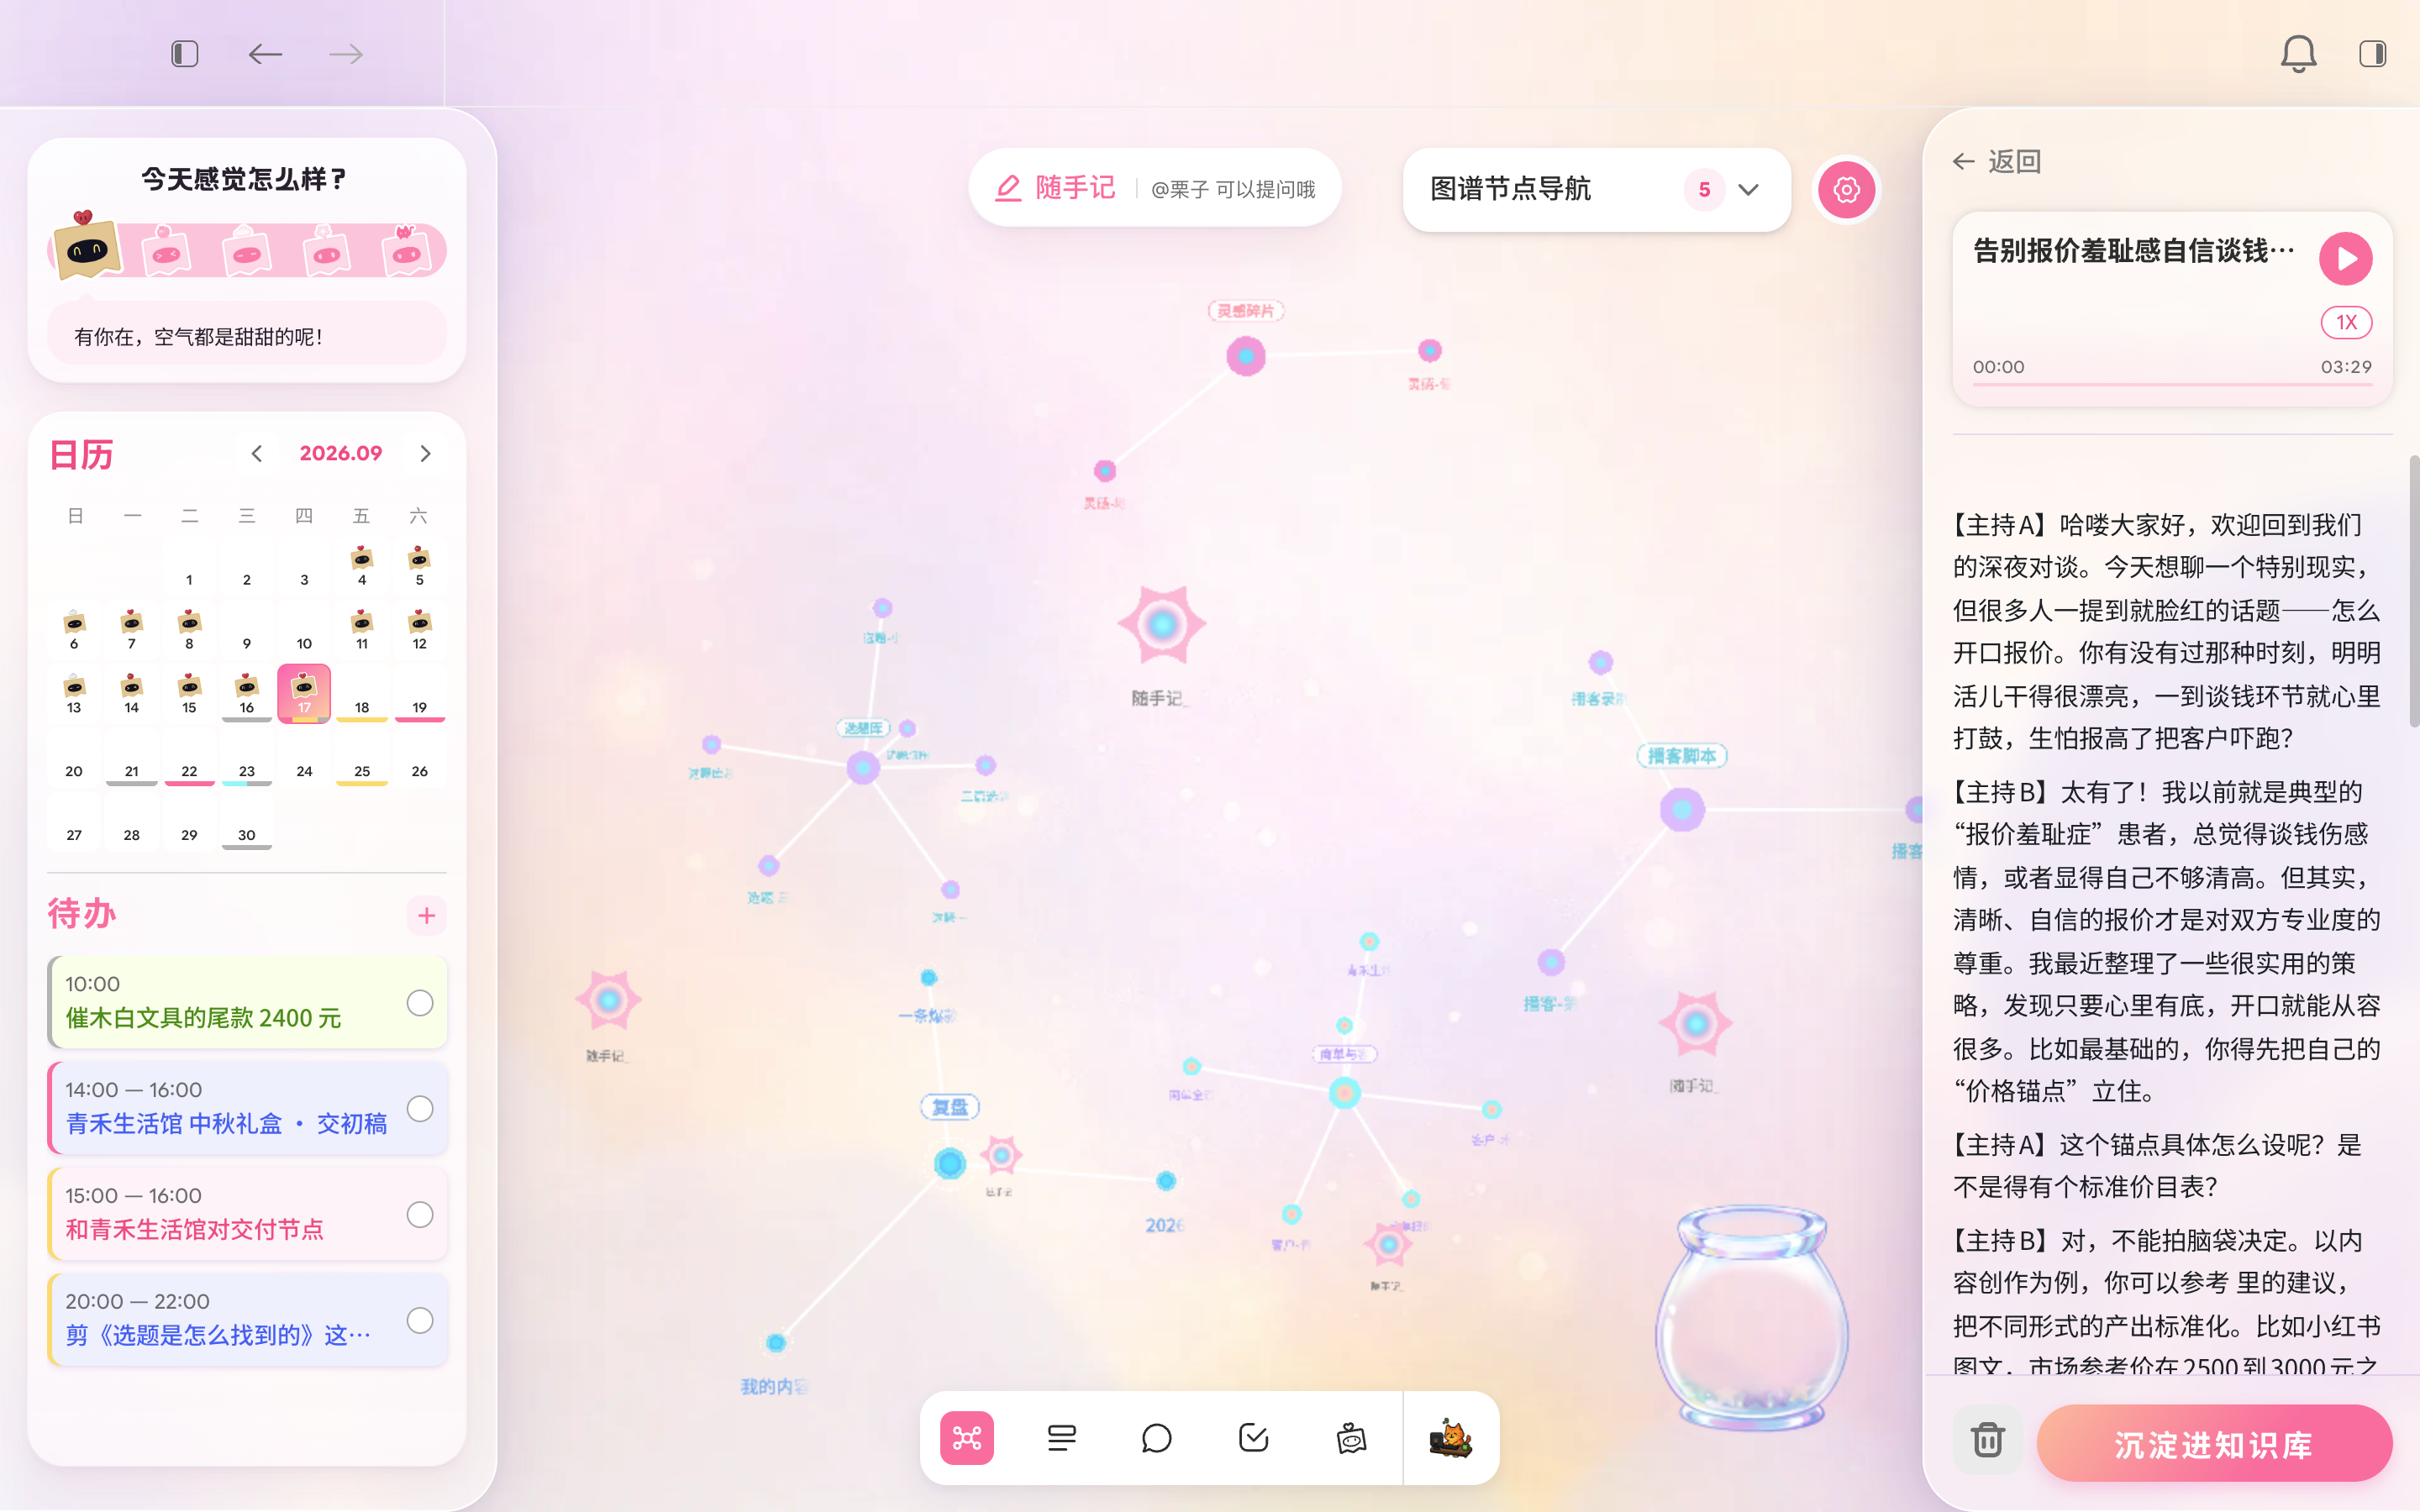
Each dot in the graph represents a note or canvas. Select a dot to view its content in the right sidebar. Canvas nodes show a read-only preview; use the link in the preview to open the canvas for editing in the Library.
Nodes cluster by folder, with a folder label beside each cluster. Use the “Graph node navigation” dropdown at the top to find a specific node. The adjacent gear adjusts the graph’s display settings.
If you have no notes yet, a “Capture your first idea” button appears in the center of the graph. Select it to begin.
Quick Note
Select “Quick Note” at the top, write an idea, and send it. The content is automatically saved as a quick note in your Library, with no need to choose a folder.
You can @ your companion while typing to ask a question directly. The conversation continues on the Chat page.
Spark Jar
Akasi occasionally generates Sparks of inspiration from your knowledge graph. They drop into view, and your companion collects them in the Spark Jar at the bottom right. You can also select a falling Spark to open its card and act on it.
Select the Spark Jar to open it. The title shows how many items it contains. Each Spark has three actions: Save to Library (save it in your Library) / Insert into note (add it to a note) / Delete.
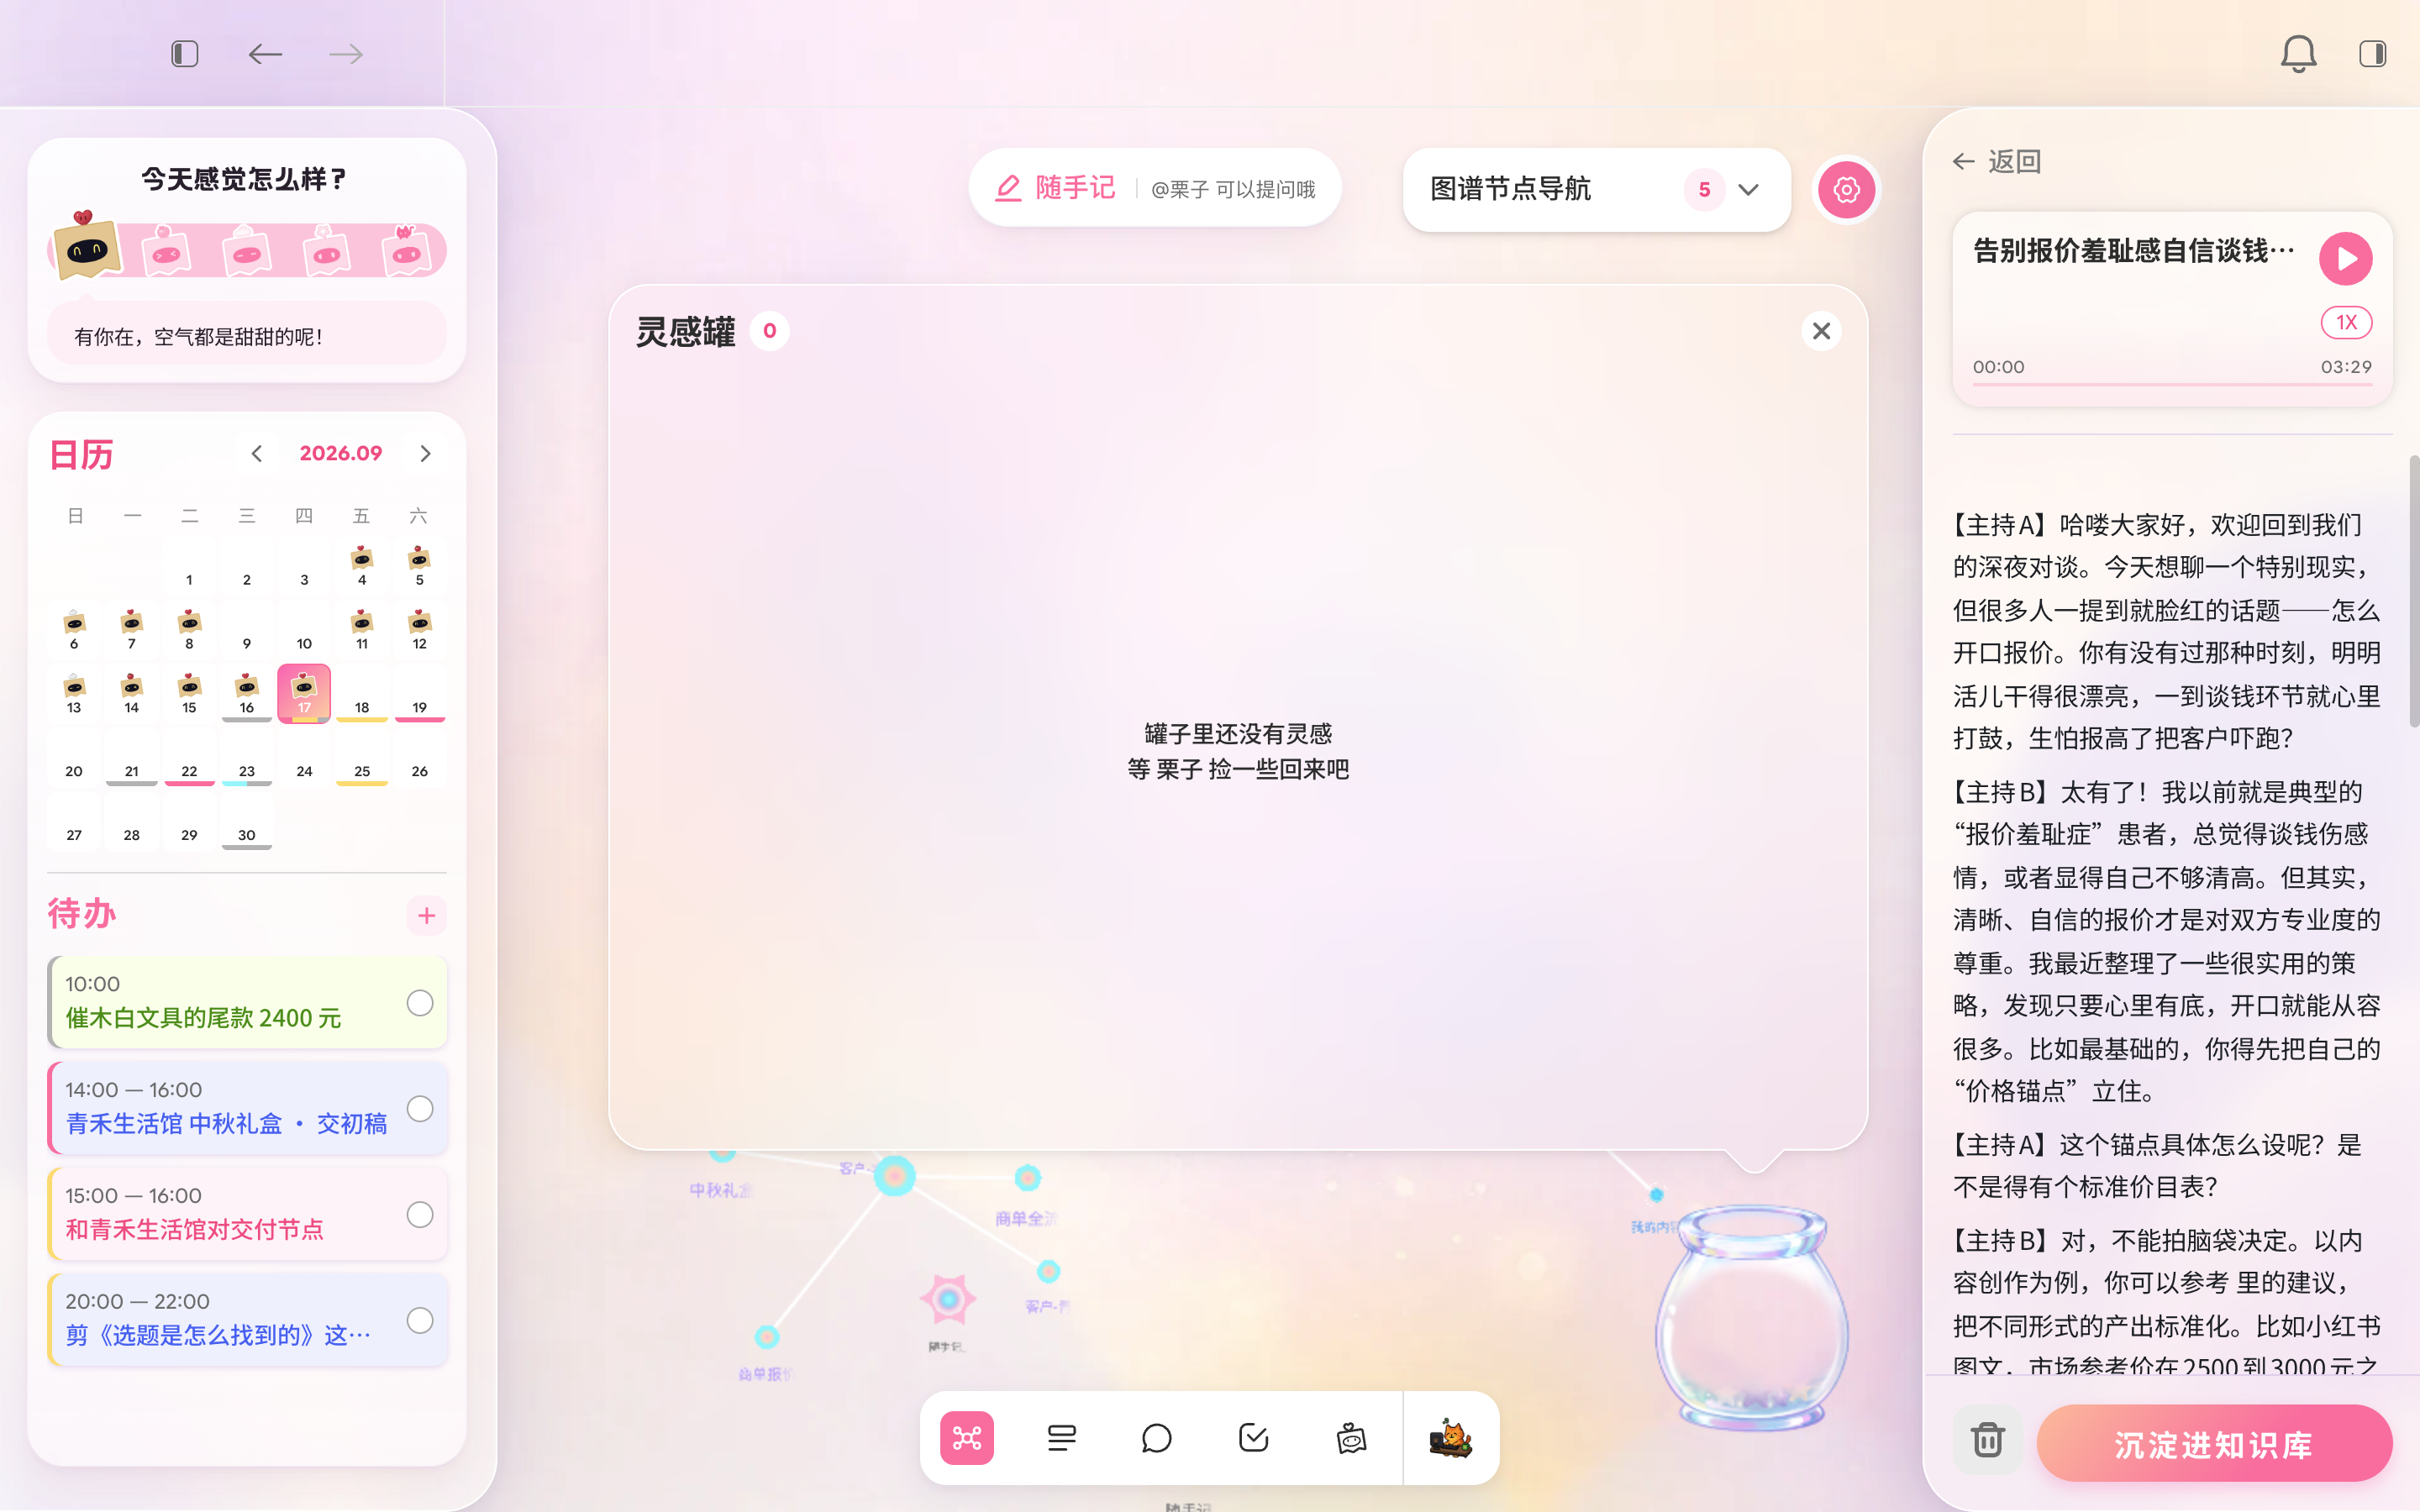
Mood check-in, calendar & tasks
Use the “How are you feeling today?” card on the left to choose one of five mood expressions. After you check in, a message from your companion appears below the card, and the expression appears on that date in the calendar.
Select a date in the calendar to see its tasks. Use the plus icon at the end of the task module’s header to add a task for that date, select a circle to mark a task complete, or hover over a task to delete it.
Personal Radio (podcasts)
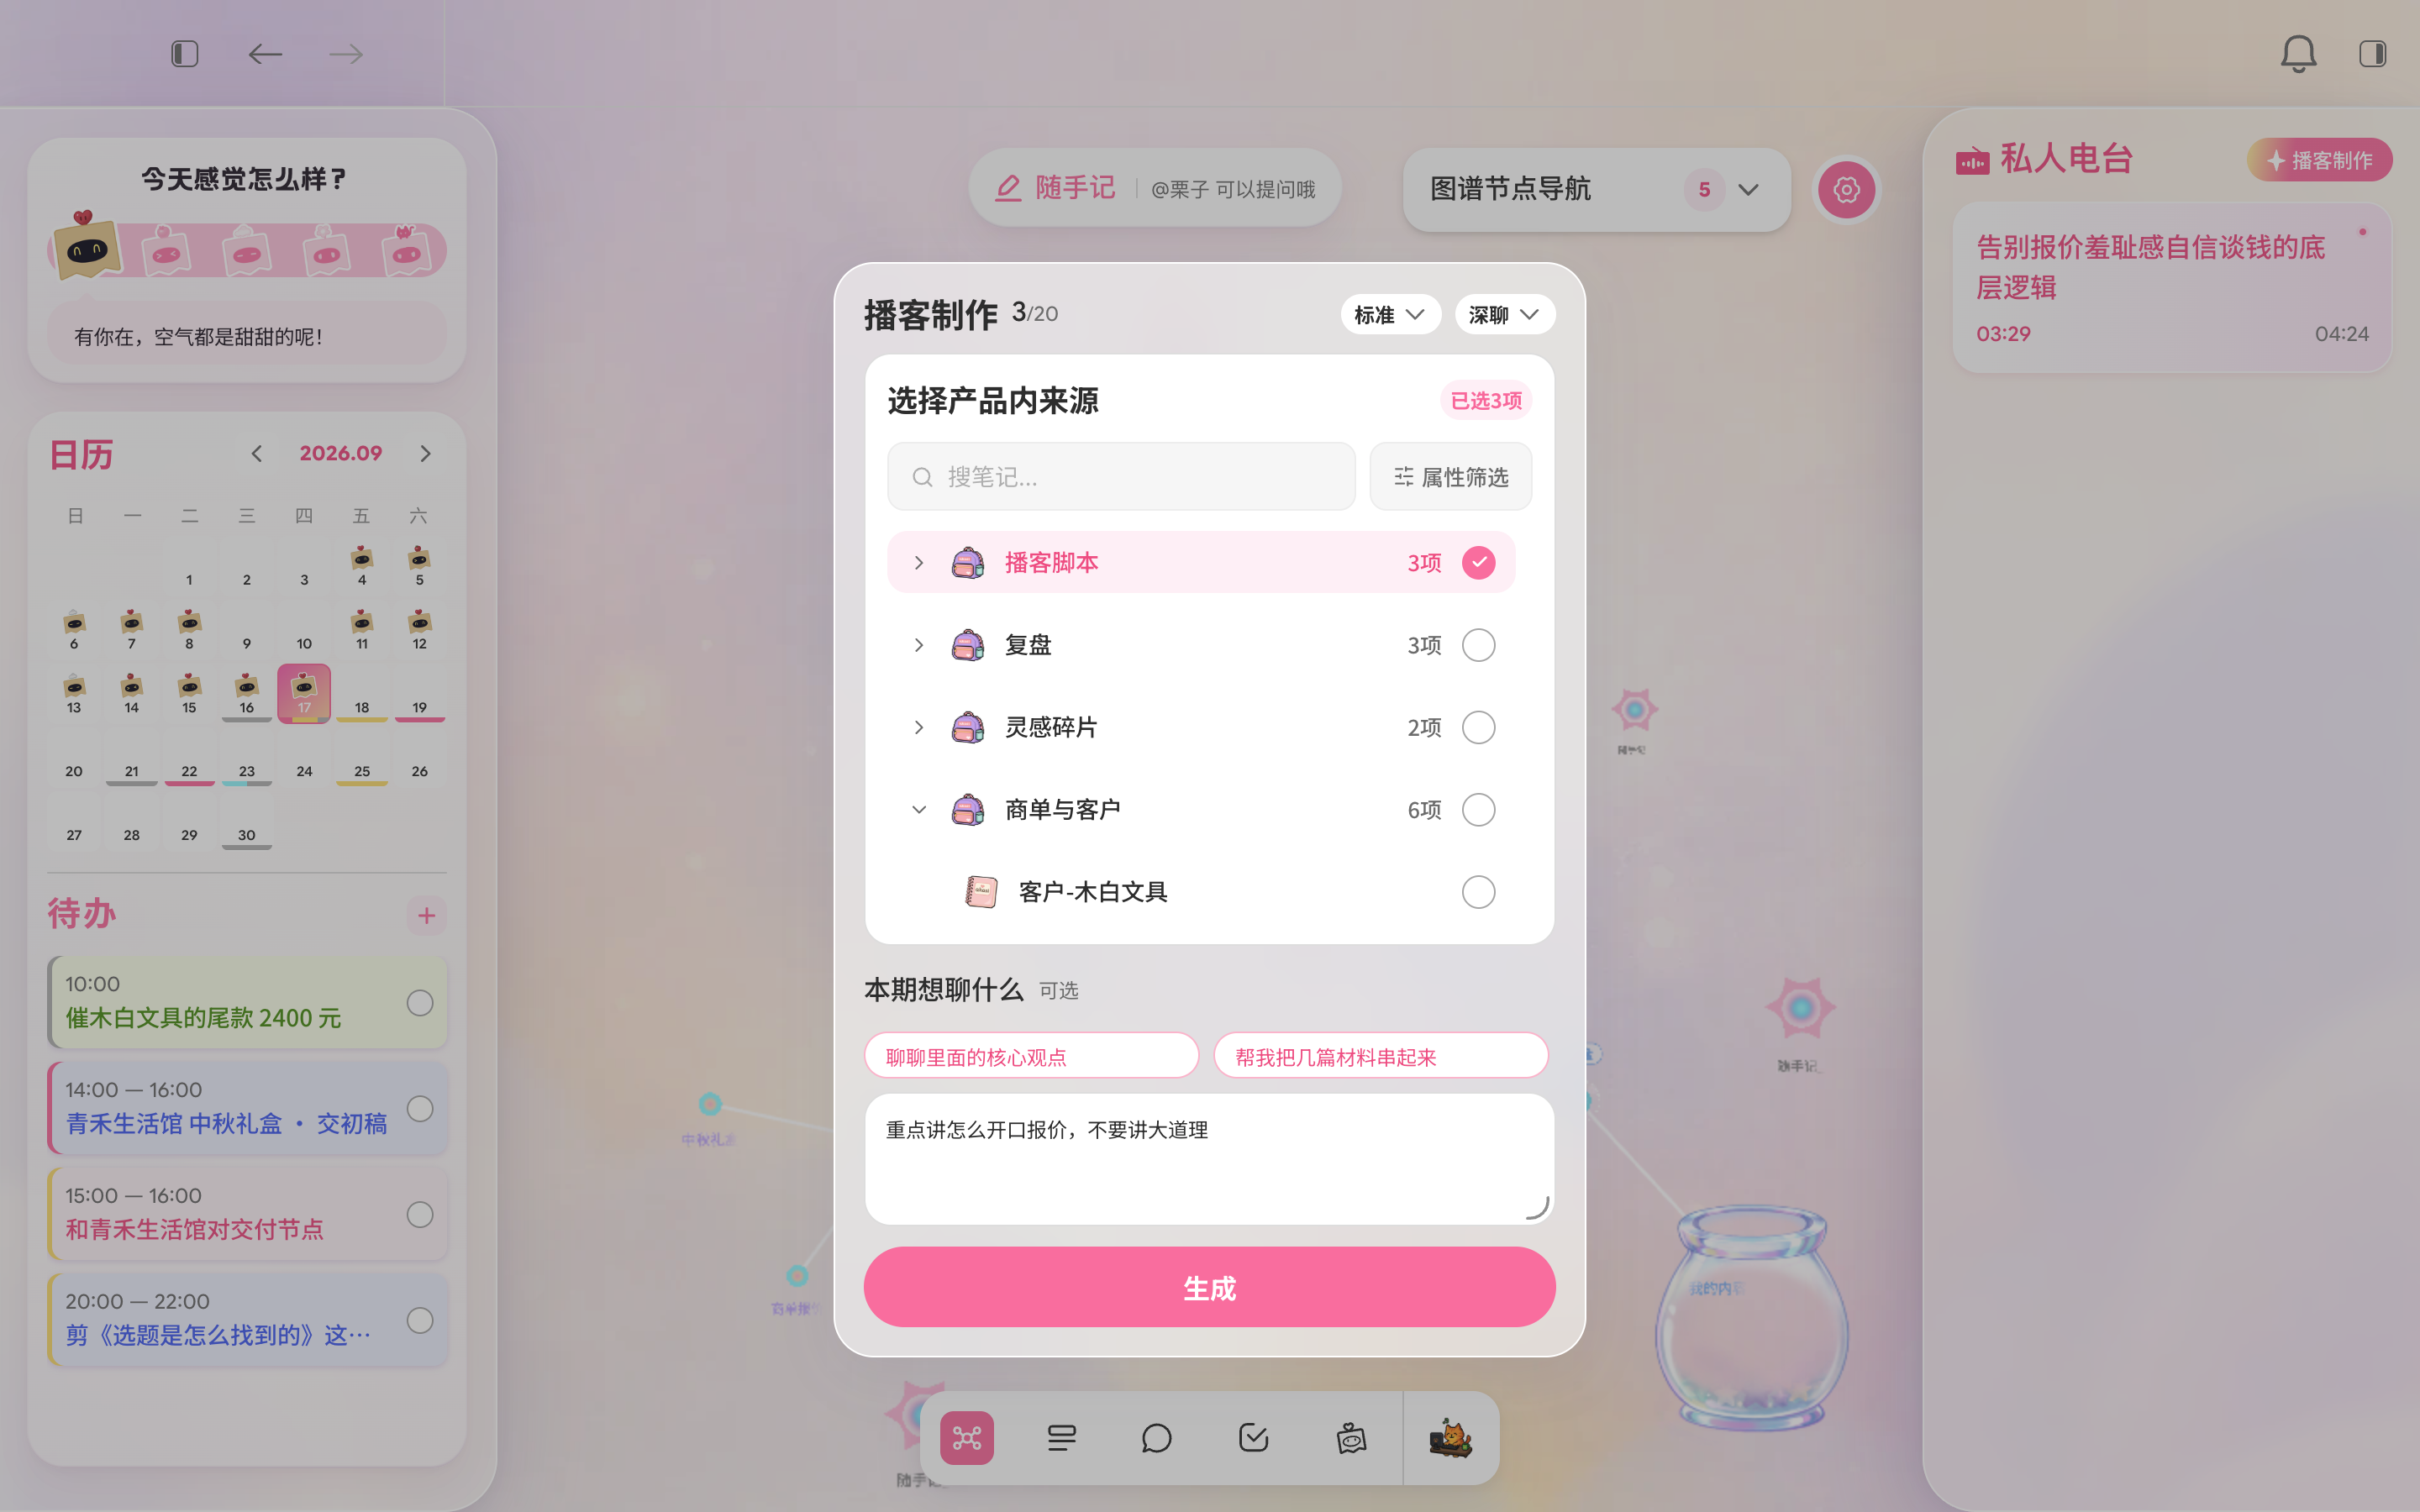
Personal Radio in the right sidebar manages podcasts from across Akasi. Select “Create podcast” to open the creation dialog.
In the creation dialog, choose: Format (Deep Dive: two hosts in conversation; Quick Take: key points in a few minutes; Commentary: an expert perspective; or Debate: two opposing views), Length (short, standard, or long), Sources in Akasi (select multiple items in the tree), and optionally fill in “What should this episode cover?” with a focus for the hosts or a link. Select “Generate” to start production.
Two suggested prompts appear above “What should this episode cover?” Select one to fill in the field.
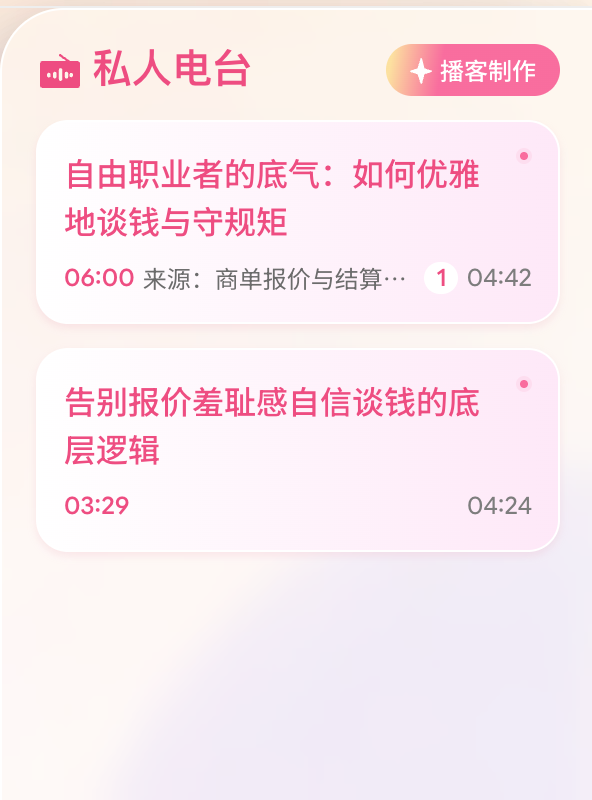
A task card shows generation progress. Closing the dialog or switching pages does not interrupt production. If generation fails, the card shows “Generation failed. Please check and try again.” You can retry or delete it.
Once generation succeeds, the card becomes playable. Select Play to listen, or select the card to open details in the right sidebar and read the full transcript. Select “Save to Library” at the bottom to save the episode.
Library
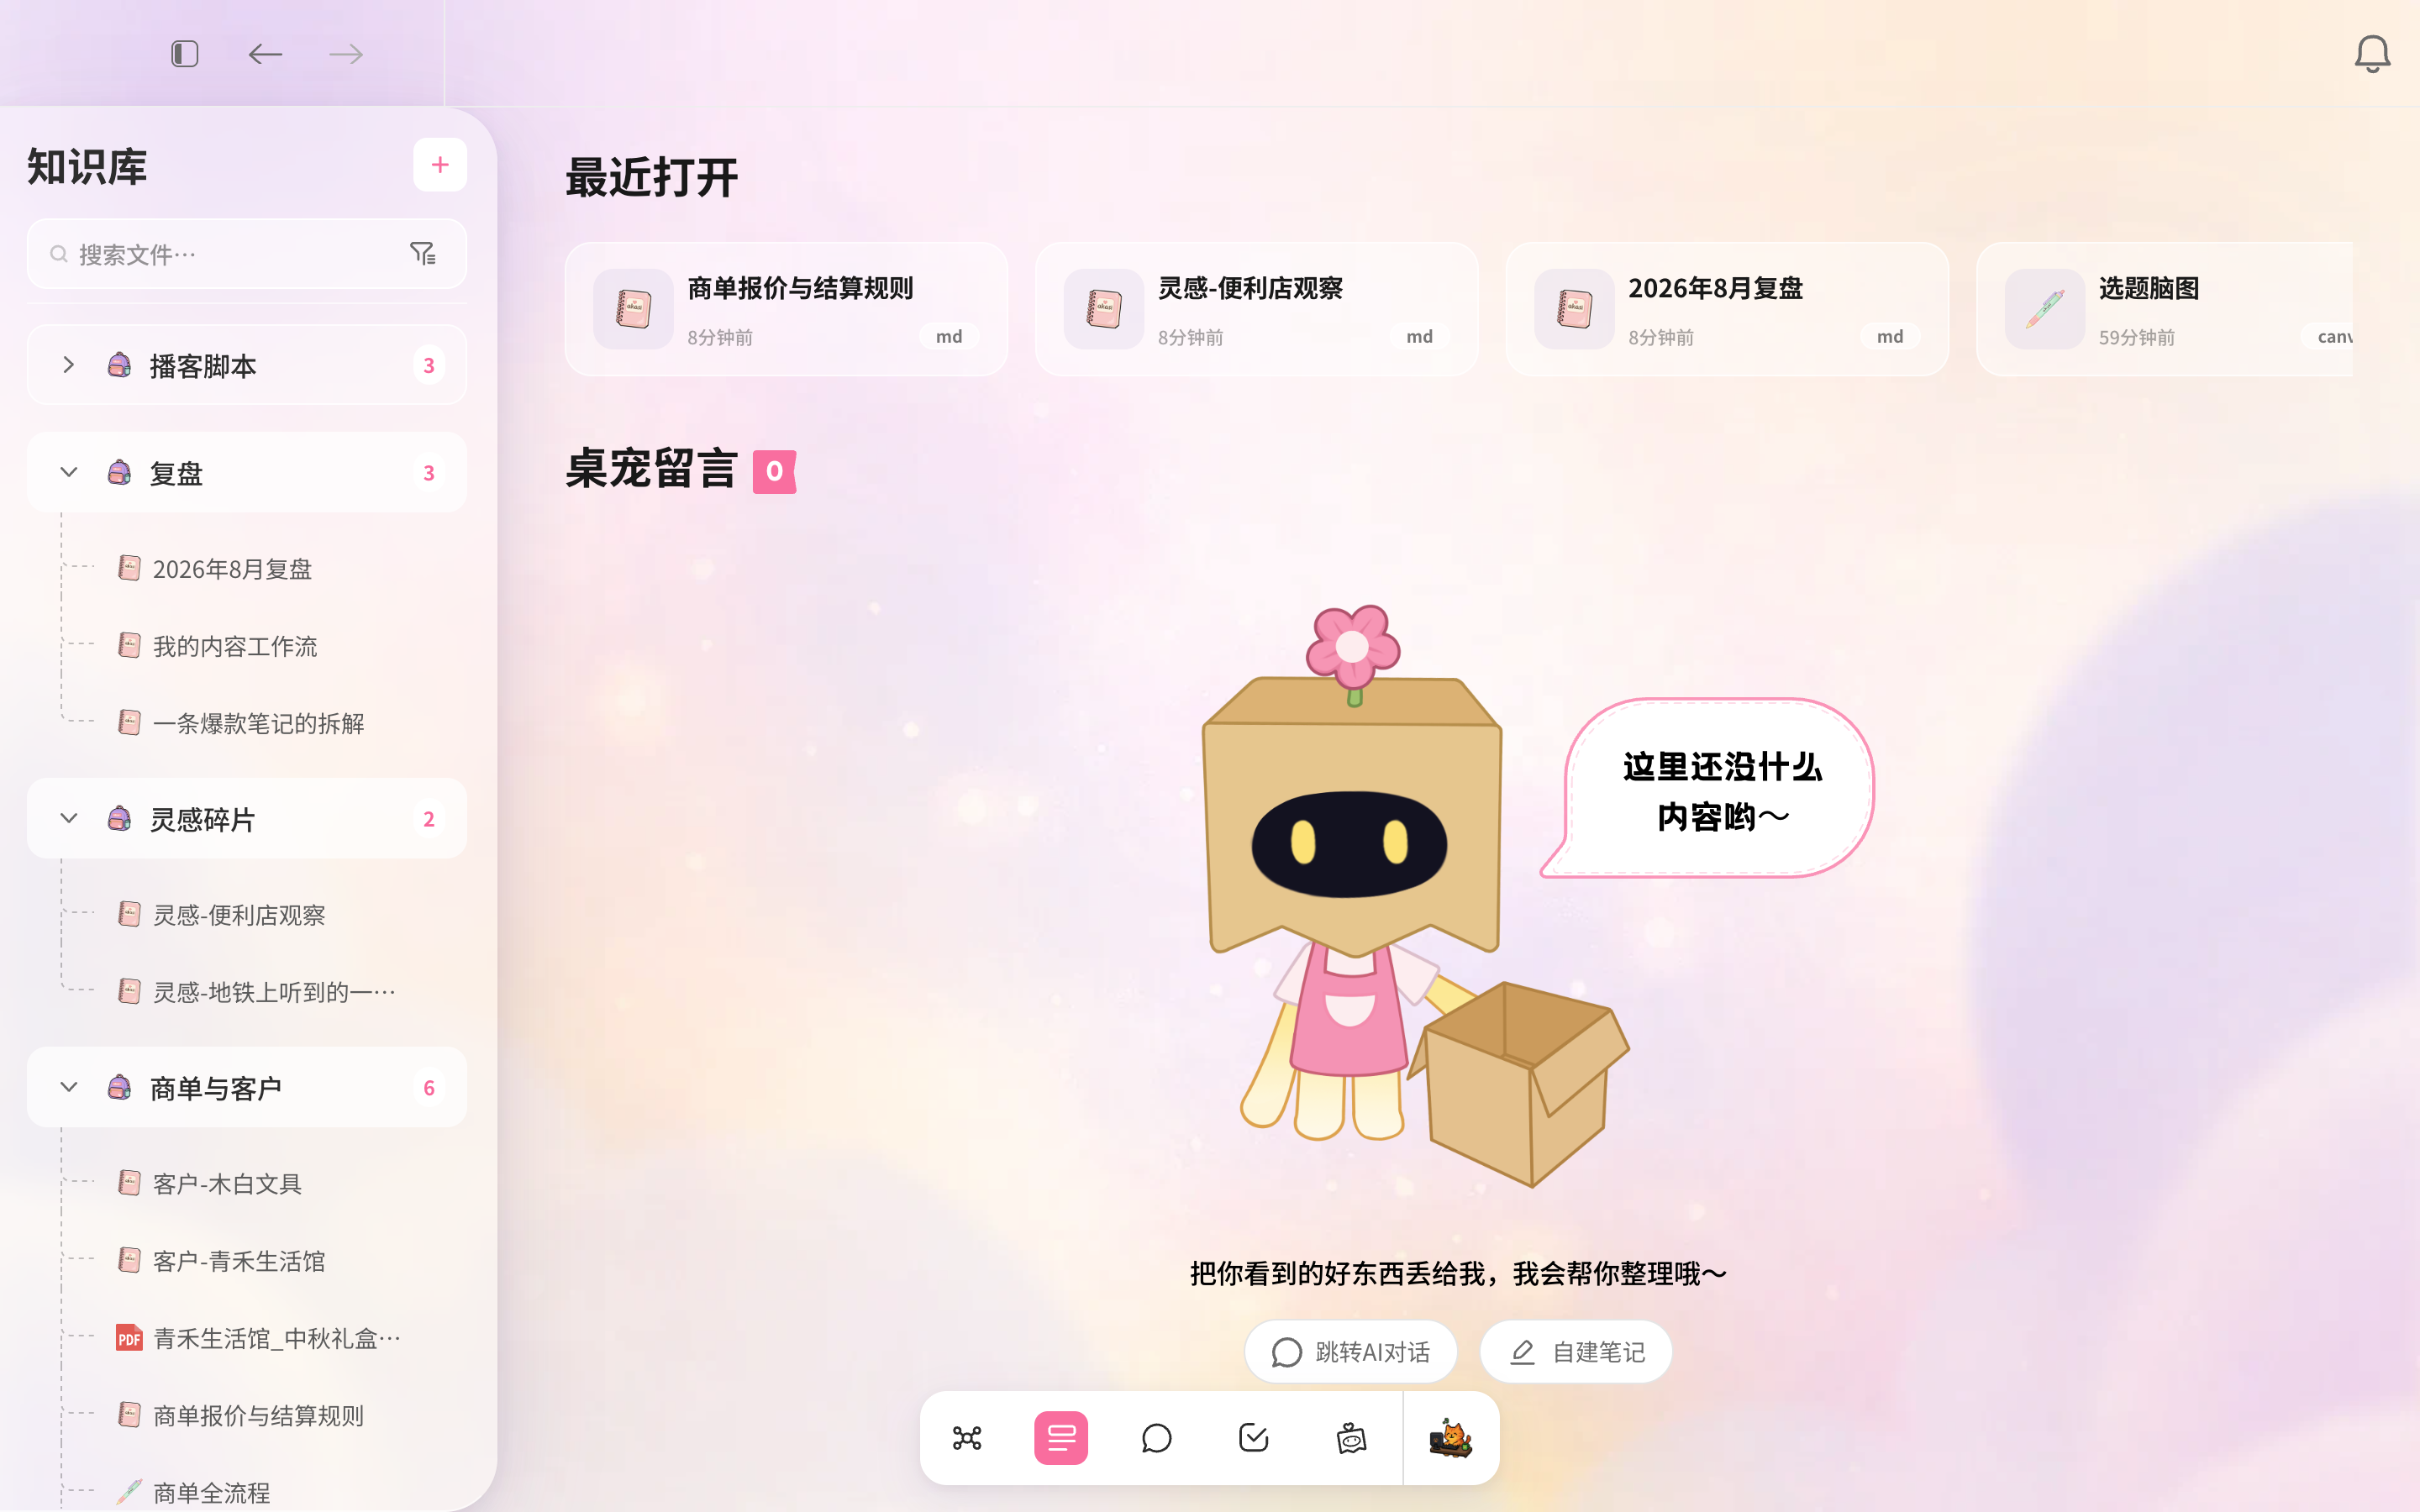
The Library brings all your notes and sources together. It has two views: Library Home shows the knowledge tree on the left and content on the right; opening a note switches to note focus view, with the tree on the left, editor in the center, and AI sidebar on the right. Select the Library icon in the bottom dock to open it.
Library Home & knowledge tree
The knowledge tree on the left lists all notes and folders. Enter a keyword in the search field to find files by name. The adjacent funnel opens filters for tags, creation date, and file type, which can be combined with keywords. If nothing matches, an empty-state message appears. Selecting a folder expands its directory without changing the content area. The content area shows recently opened notes so you can pick up where you left off.
Companion suggestions
The suggestions area on Library Home shows advice your companion leaves after reviewing notes. Pending suggestions are grouped into cards by note. Select “Accept” to apply a suggestion or “Reject” to dismiss it; processed items disappear immediately. If a note has more than five suggestions, scroll within its card. When there are no suggestions, an illustration appears with two buttons: “Go to AI Chat” opens Chat, and “Create a note” creates and opens a new note.
If individual items fail during bulk processing, they return to the list with a message such as “N suggestions could not be processed. Please try again later.” You can retry those items.
Open a note in focus view
Select a note in the knowledge tree to enter focus view. The editor appears in the center, with the AI sidebar on the right. The tree stays in place so you can switch notes at any time. Open notes remain in tabs at the top; select a tab to return to that note.
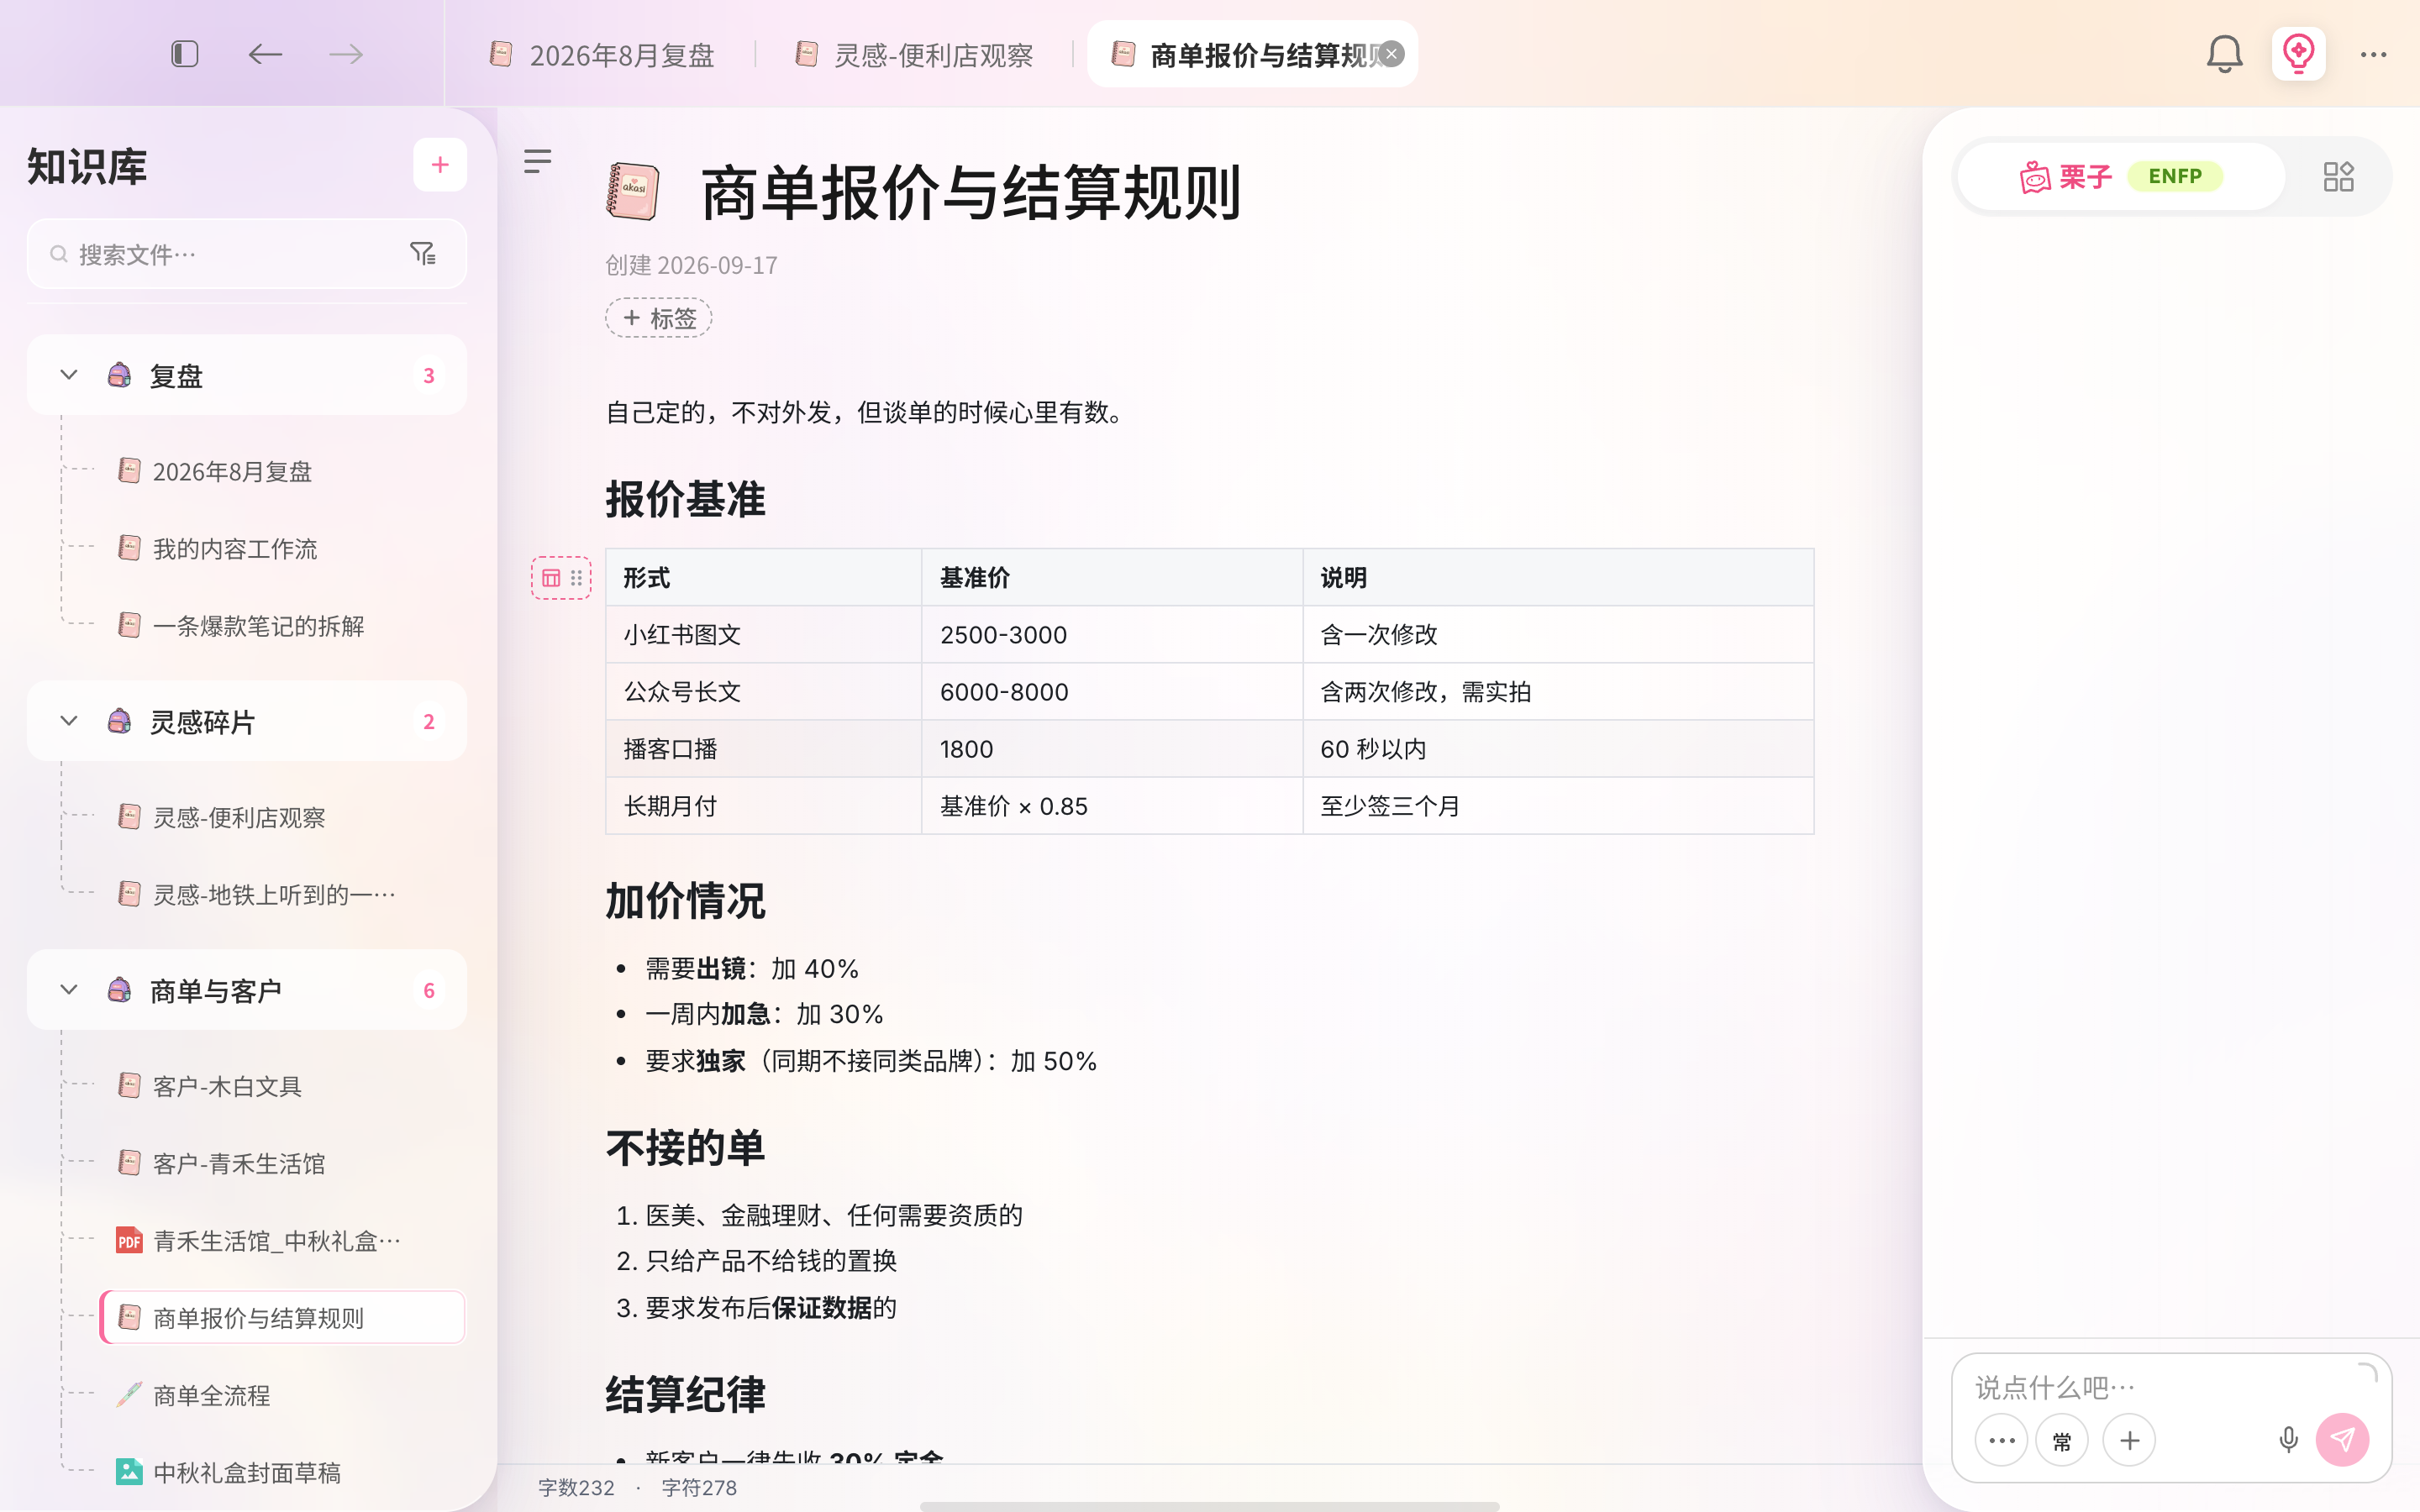
AI sidebar: ask your companion
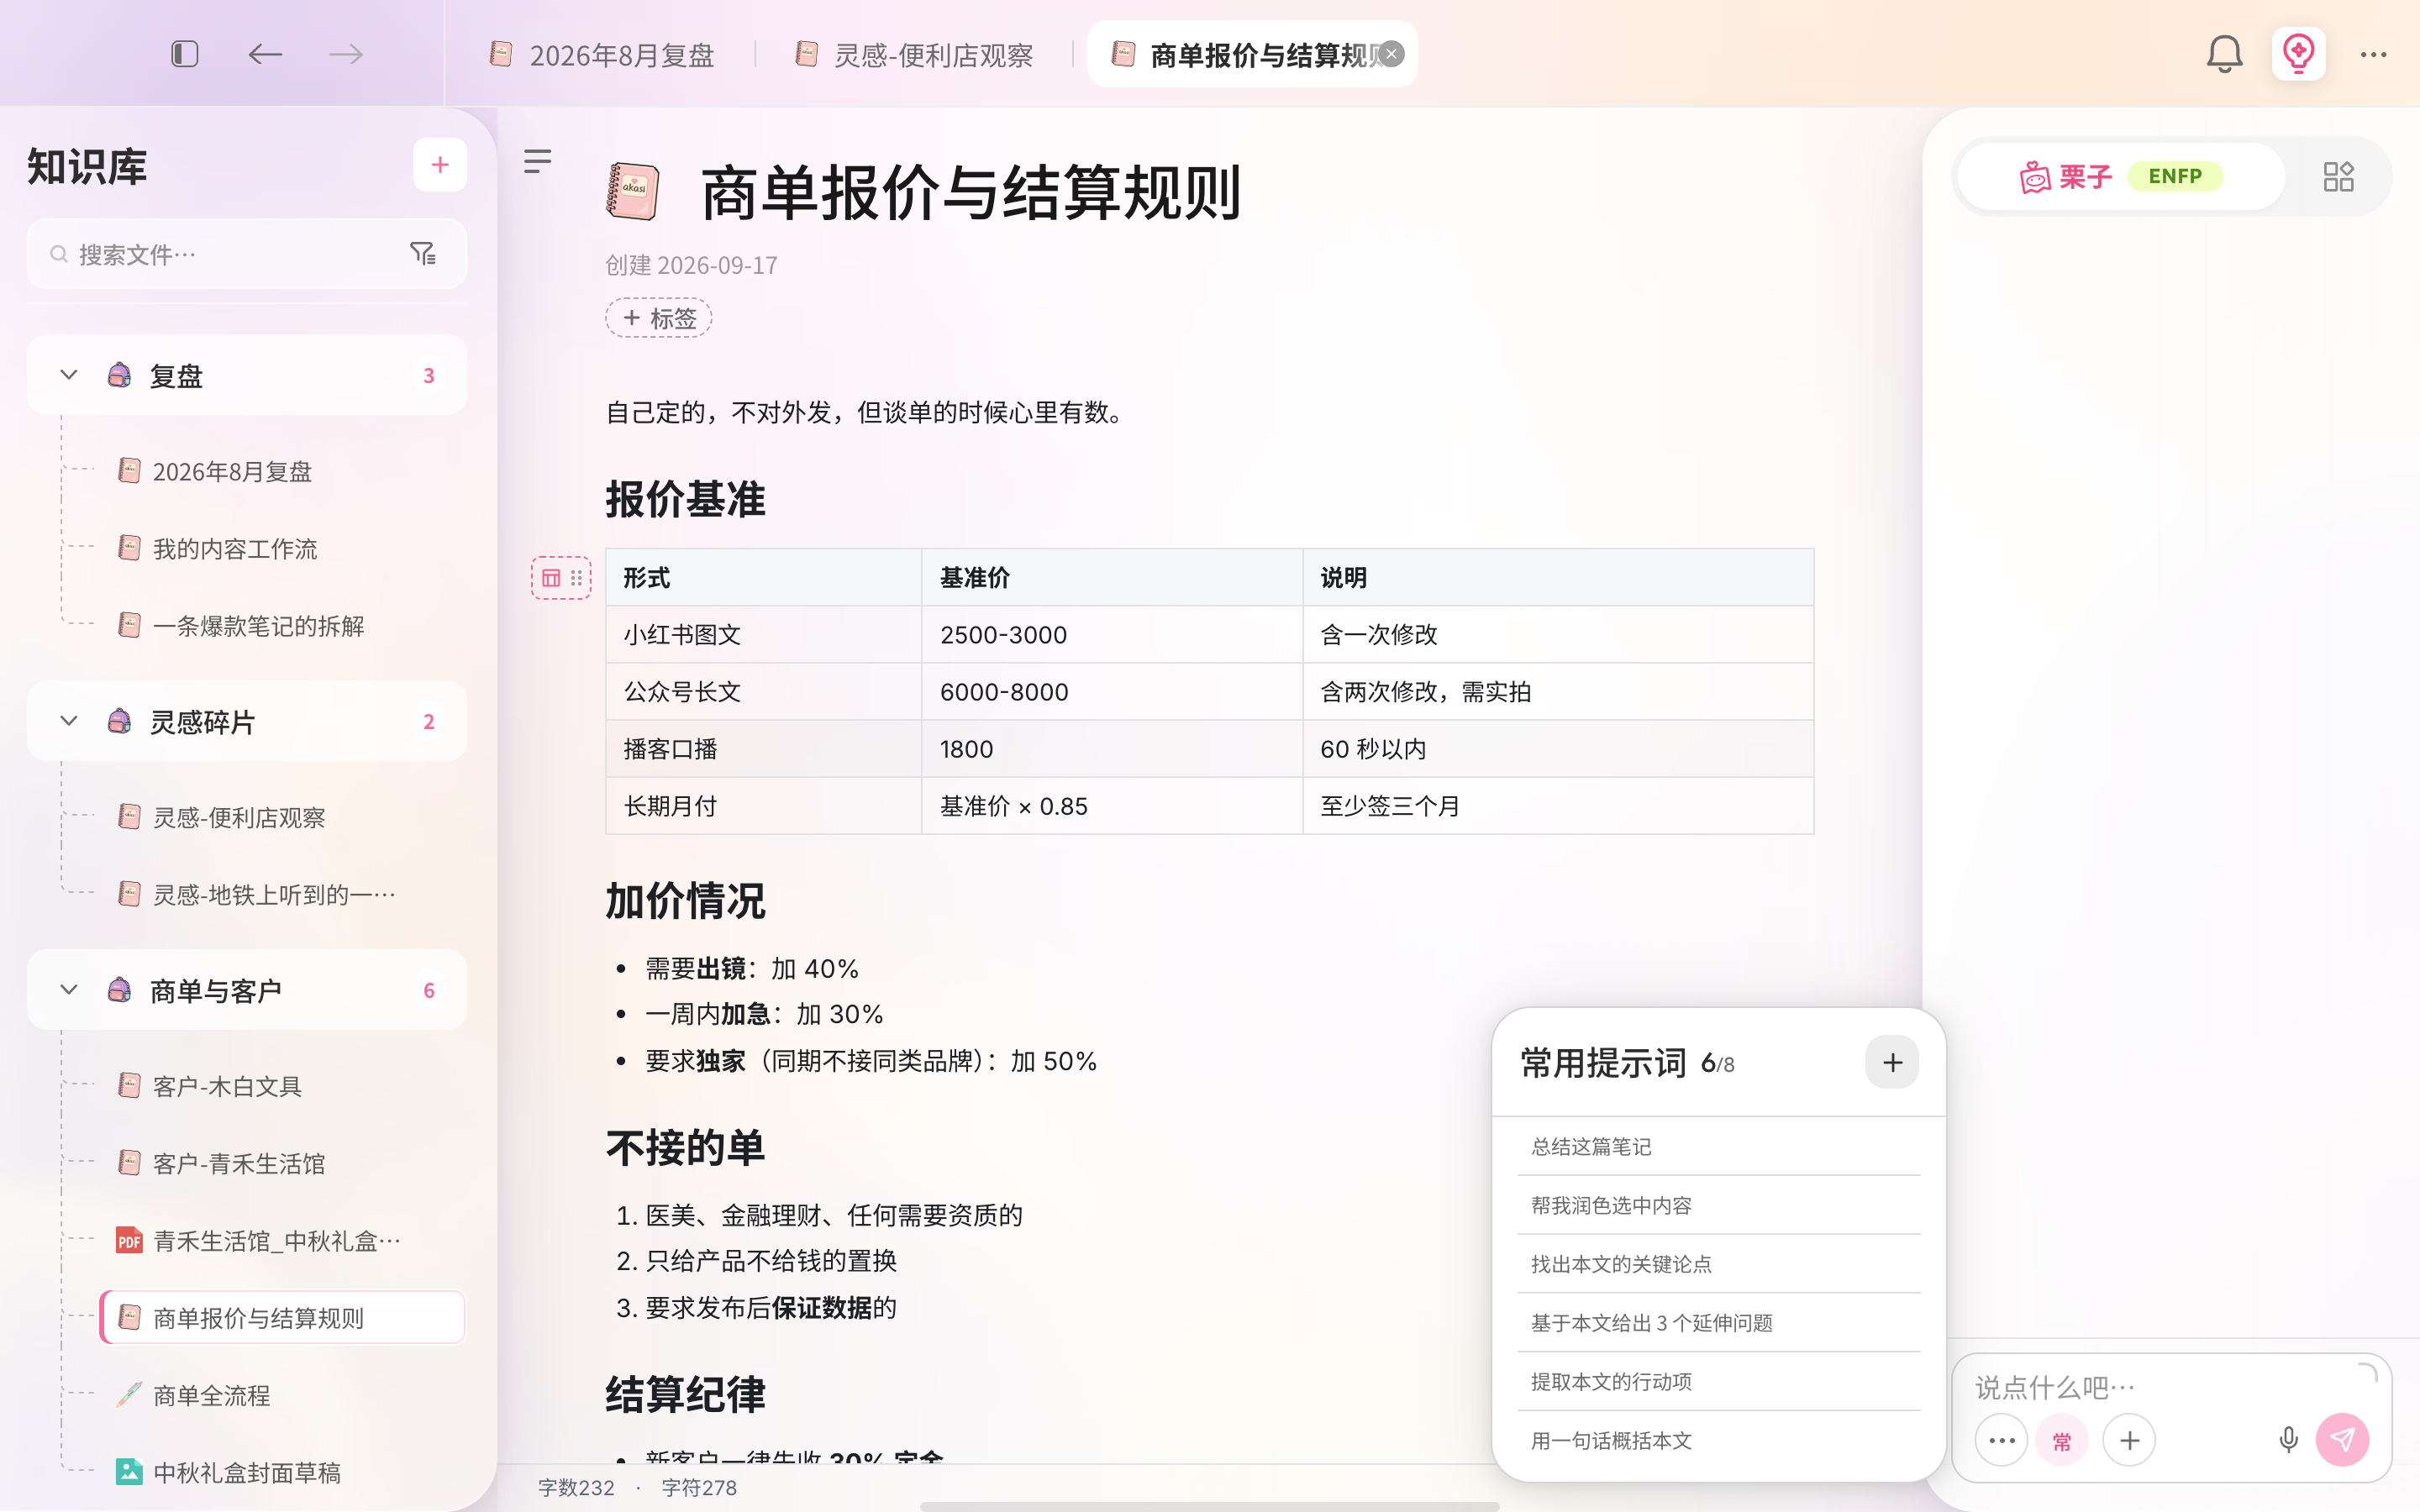
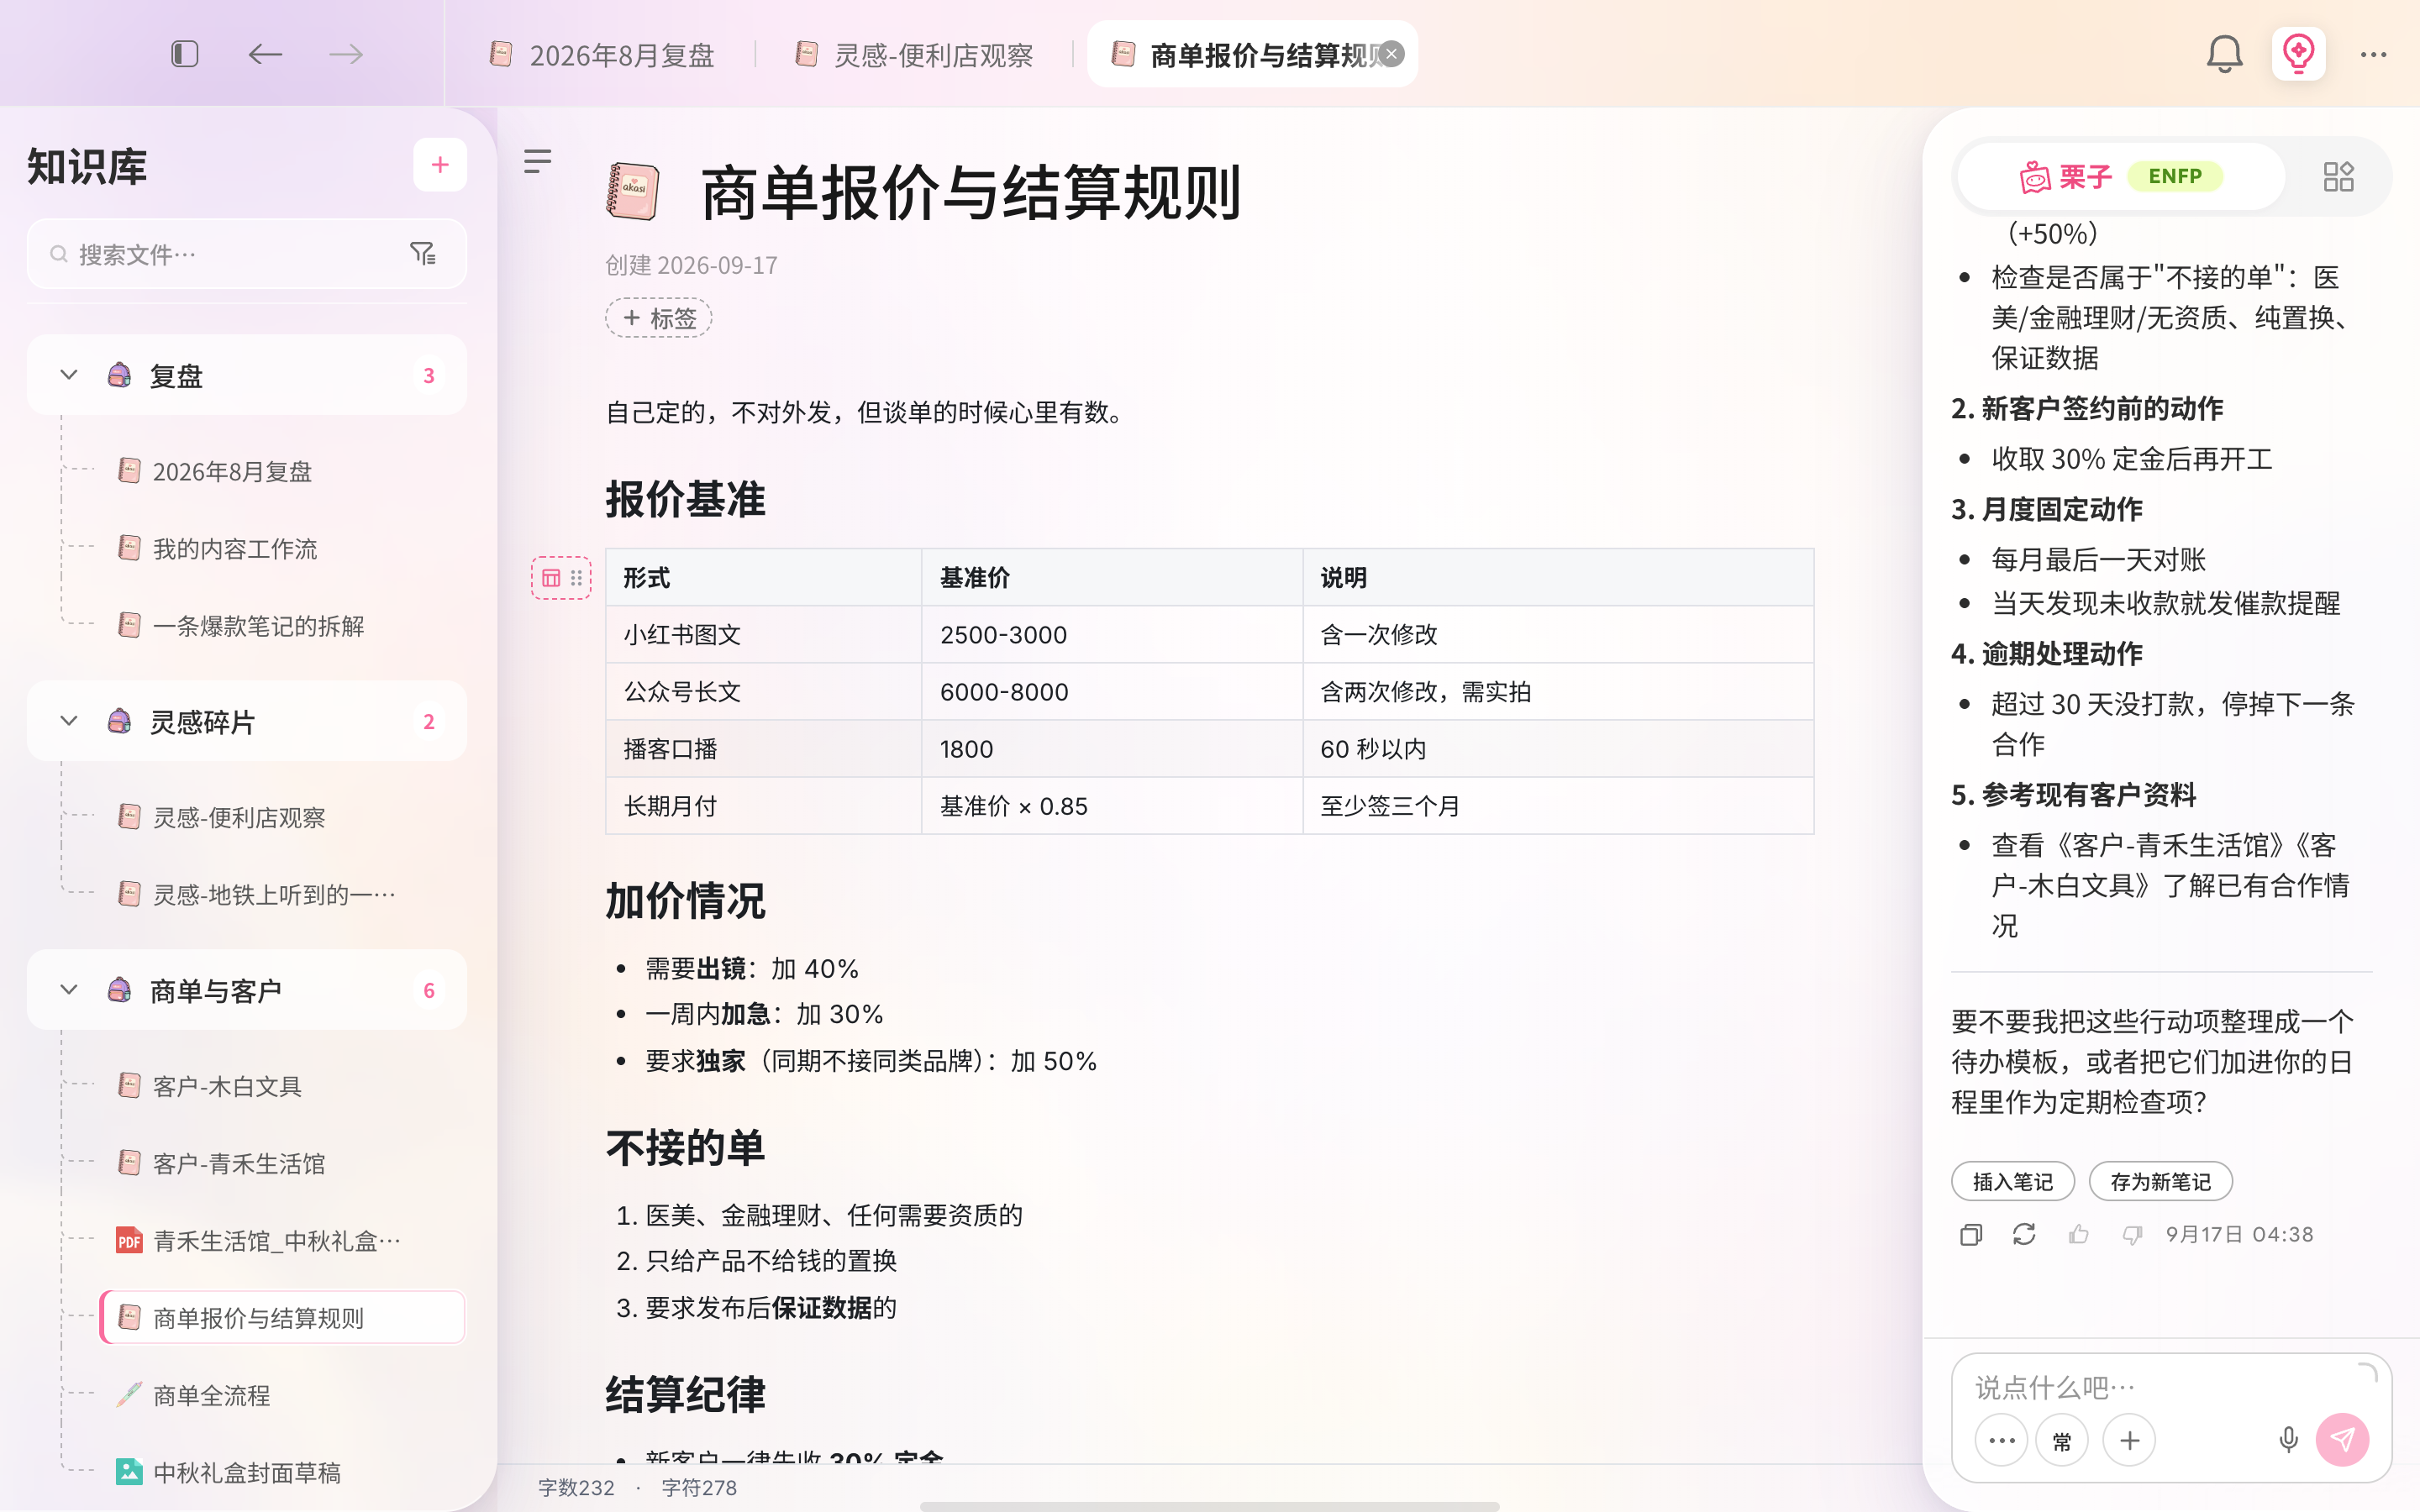
The AI sidebar has two tabs: Companion Chat and Tools. Ask a question in Companion Chat and the current note is included automatically, with no need to paste it. Open saved prompts from the button above the input, then select one to ask it. Six prompts are provided, and you can save your own questions, up to eight saved prompts. After an answer is generated, select “Insert into note” to add it to the current note, or “Save as new note” to create a separate note. You can also copy or regenerate the answer. Drag to resize the sidebar; dragging it to its narrowest width collapses it, and dragging back opens it again.
Annotations & comments
Select text in a note to open the formatting toolbar. You can change the block type and alignment; apply bold, strikethrough, italics, underline, inline code, subscript, or superscript; add links; and change text color. The last two buttons are “Annotate” and “Comment”: Annotate marks the original text, while Comment adds a comment to the selection. Annotations follow their original location after edits; if that location can no longer be found, the annotation is marked invalid.

Tools: turn a note into a podcast
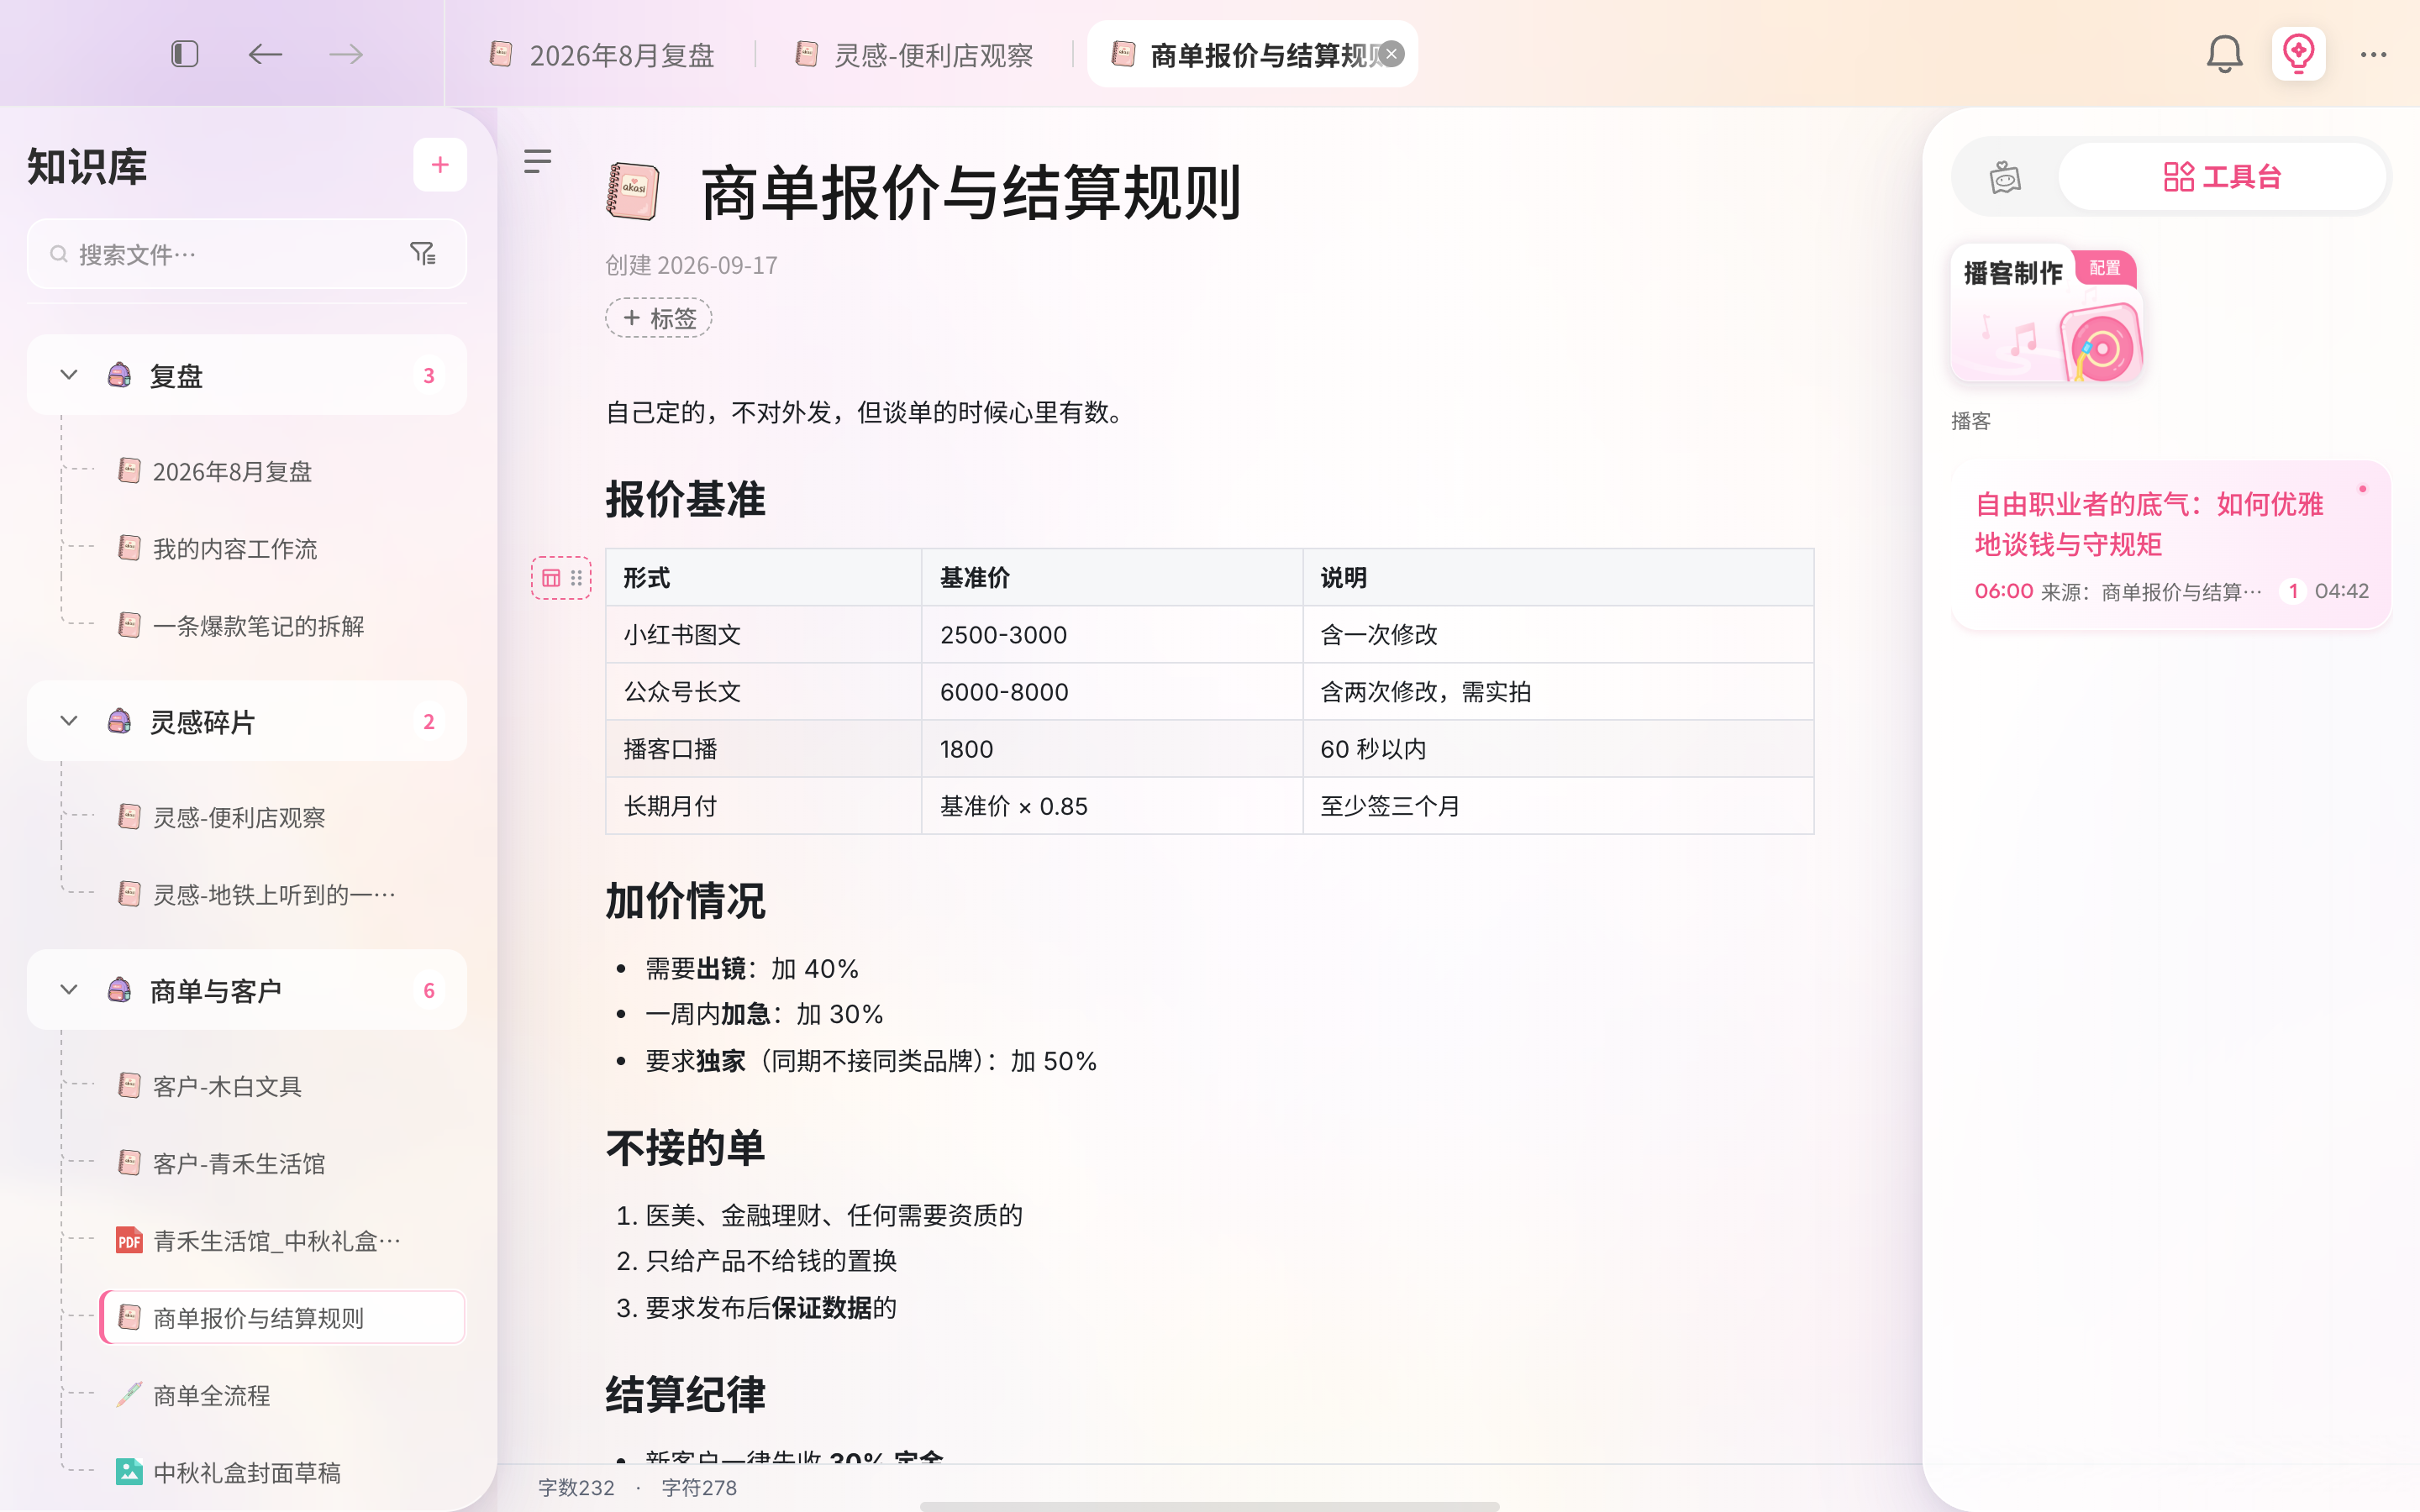
Switch to Tools and select Generate to turn the current note into a podcast episode. You can leave the page or switch tabs while it is being created without losing the task. When generation succeeds, select the episode to open its details and play it. If it fails, select “Retry.” These podcasts share the same list as Personal Radio on Home, so you can find them in either place.
Chat
Chat shows your conversation list on the left, messages between you and Akasi in the center, and podcasts and notes from the current conversation on the right. Select the Chat icon in the bottom dock to open it.
Start a conversation
Select “New chat” at the top left to return to the welcome screen. Ask a question directly in the input at the bottom, or choose “Ask about my knowledge,” “Share a link,” “Take a note,” “Make a podcast,” or “Search the web” to see three suggested questions. Selecting a suggestion fills and focuses the input; review it before sending. Once the conversation starts, the message history replaces the welcome screen.
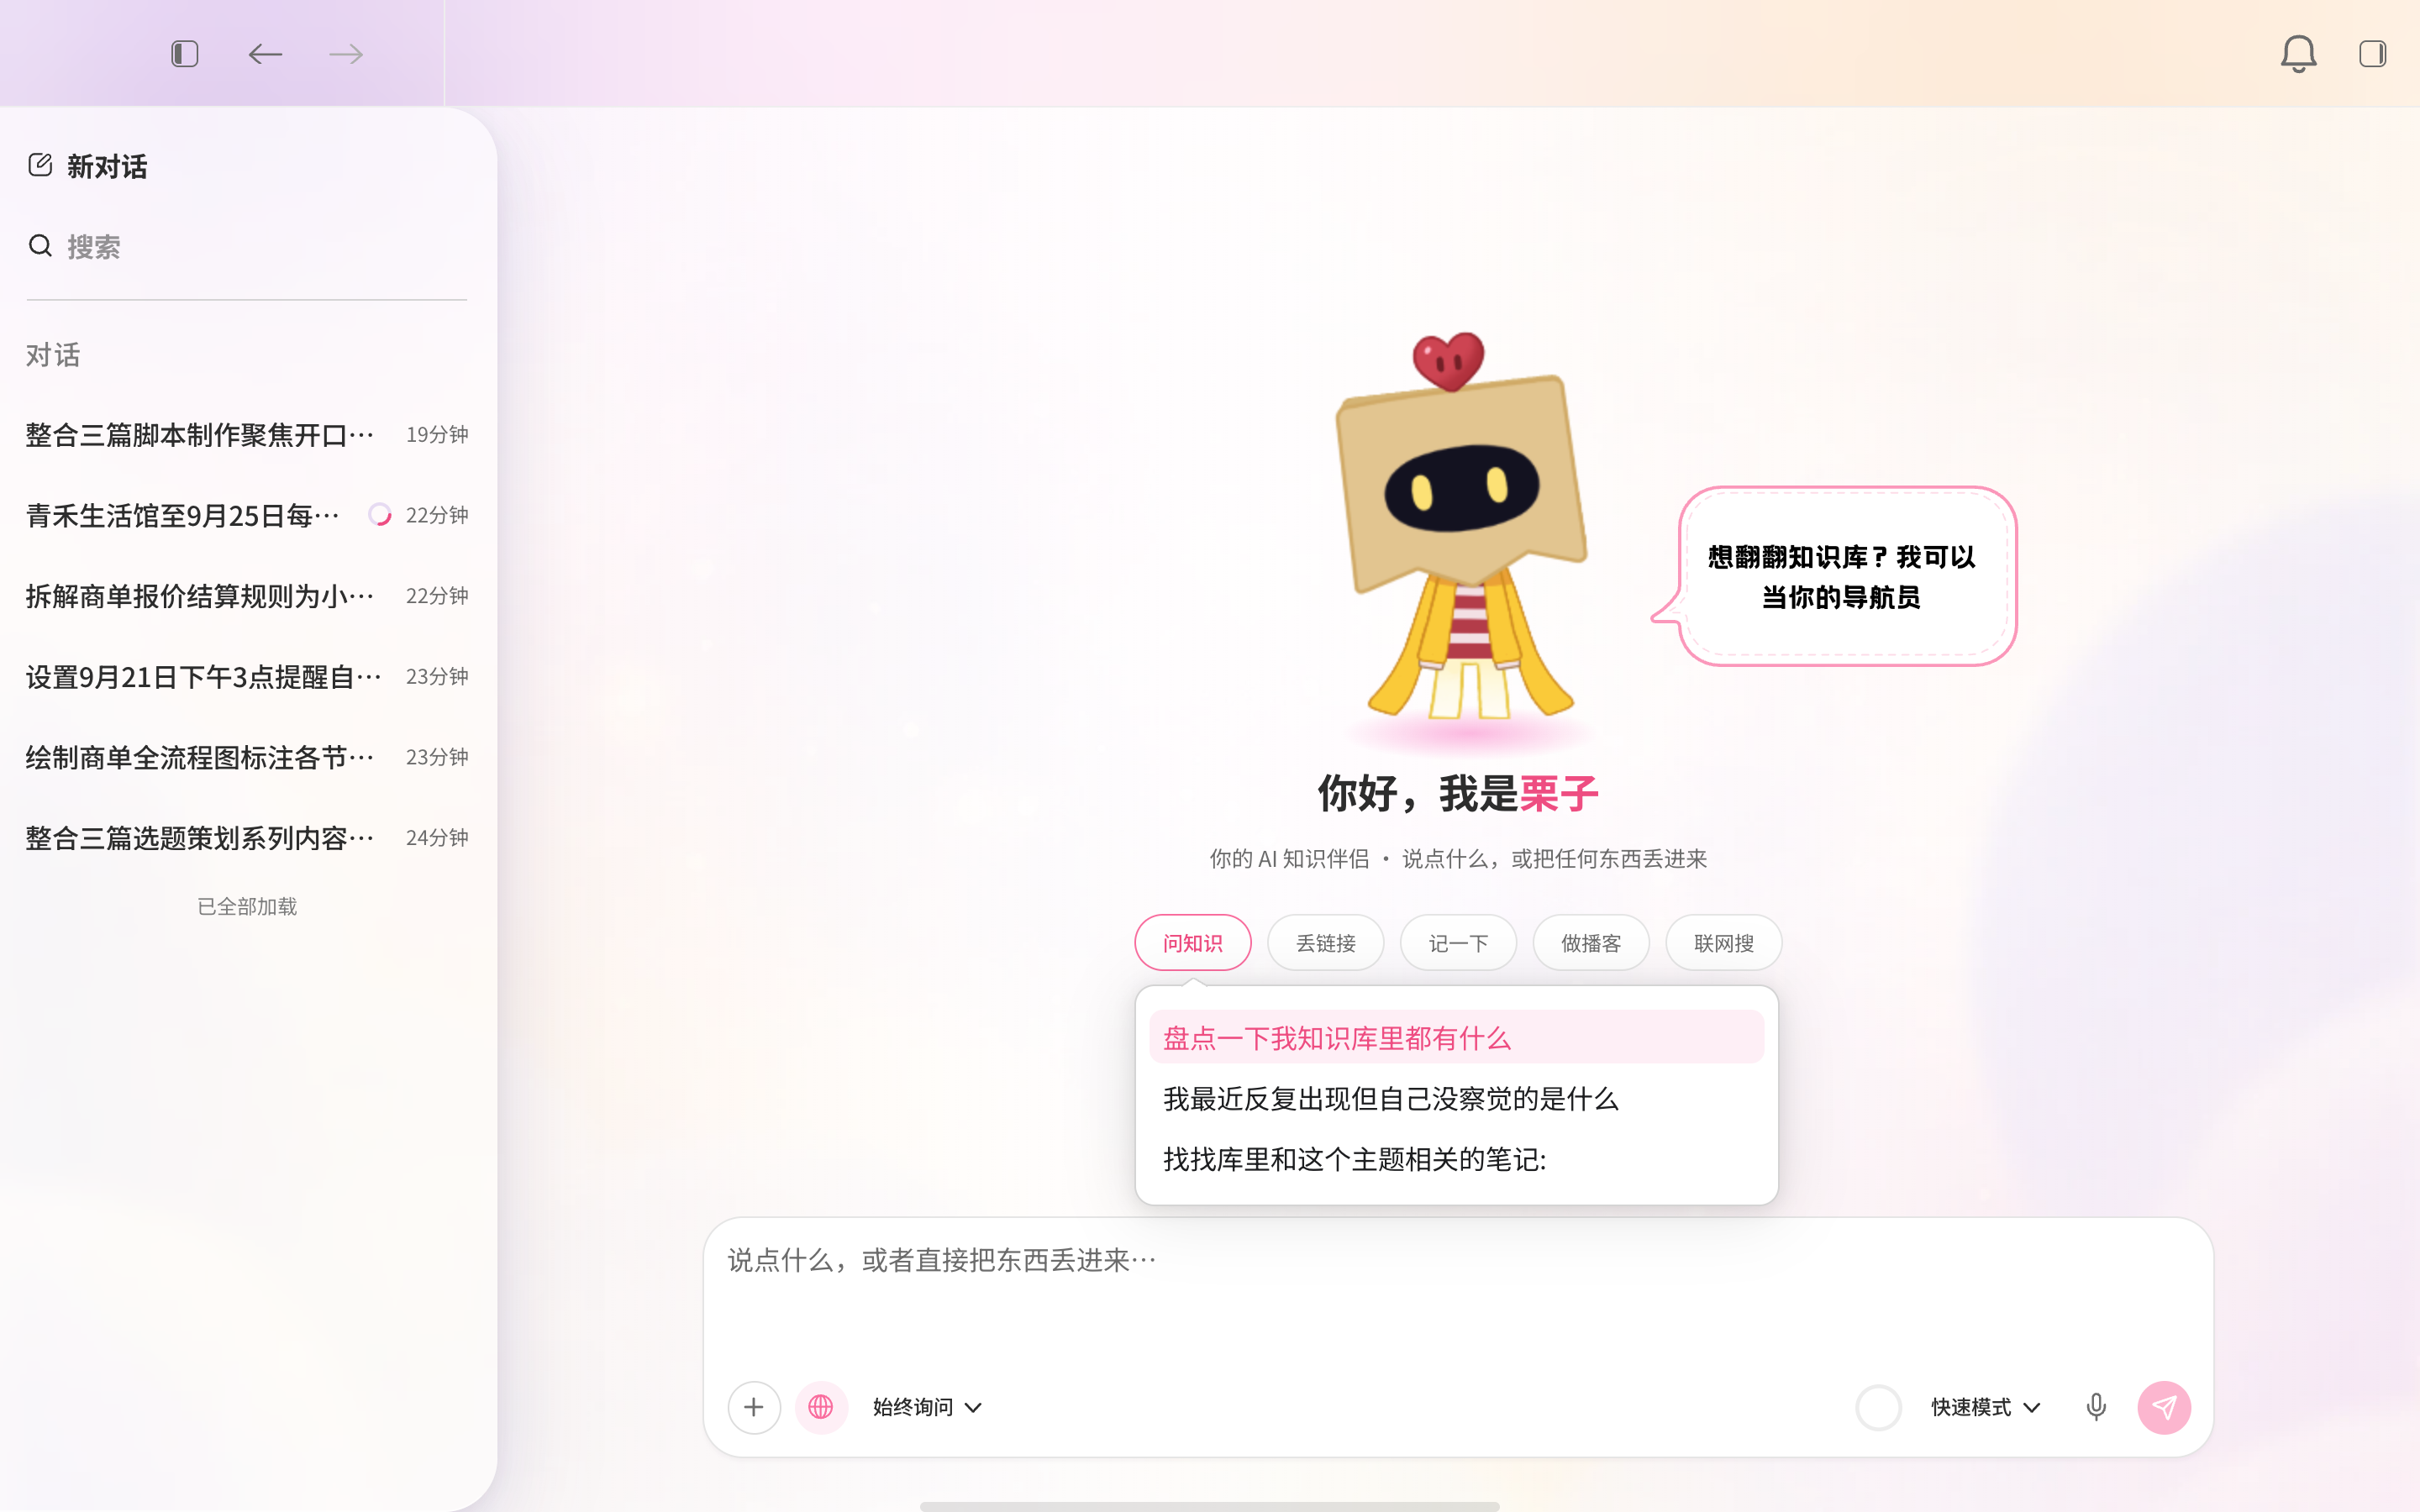
Conversation list & search
Your previous conversations are saved in the list on the left. Select one to continue it. Hover over a conversation to pin it, or use its more menu to rename or delete it. Select Search and enter keywords to find a conversation. If nothing matches, you will see “No matching conversations found.”
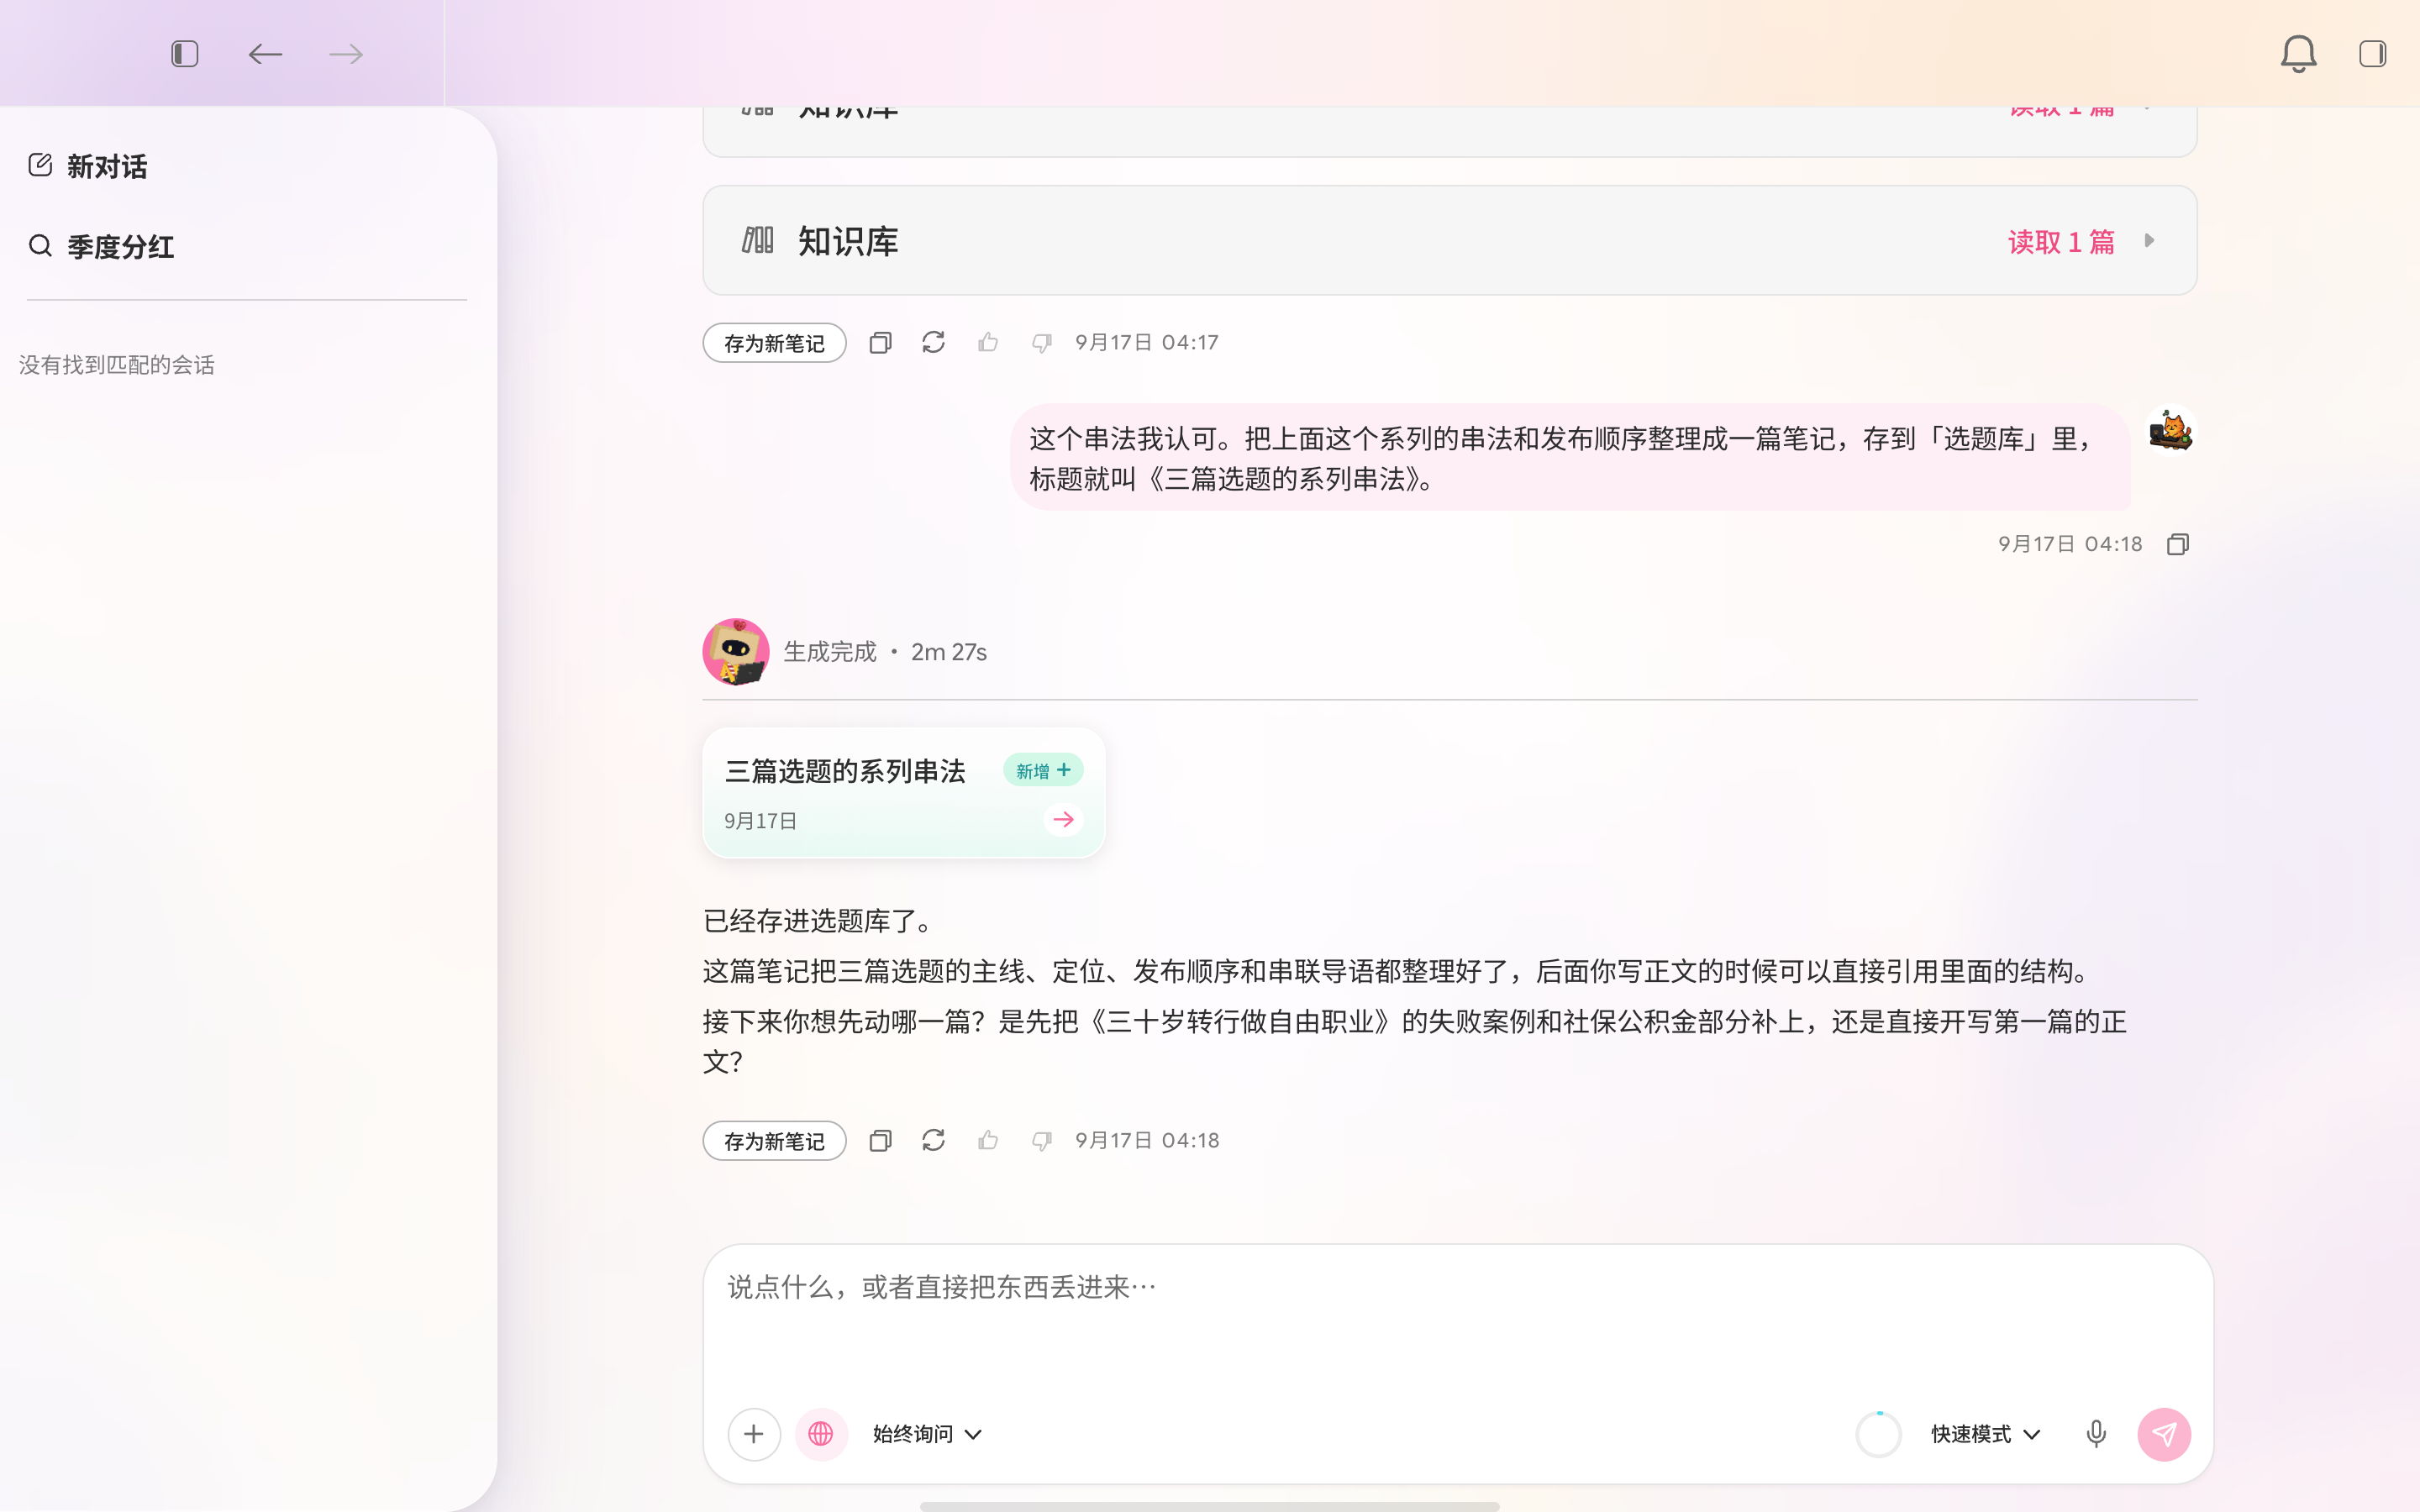
Questions & answers
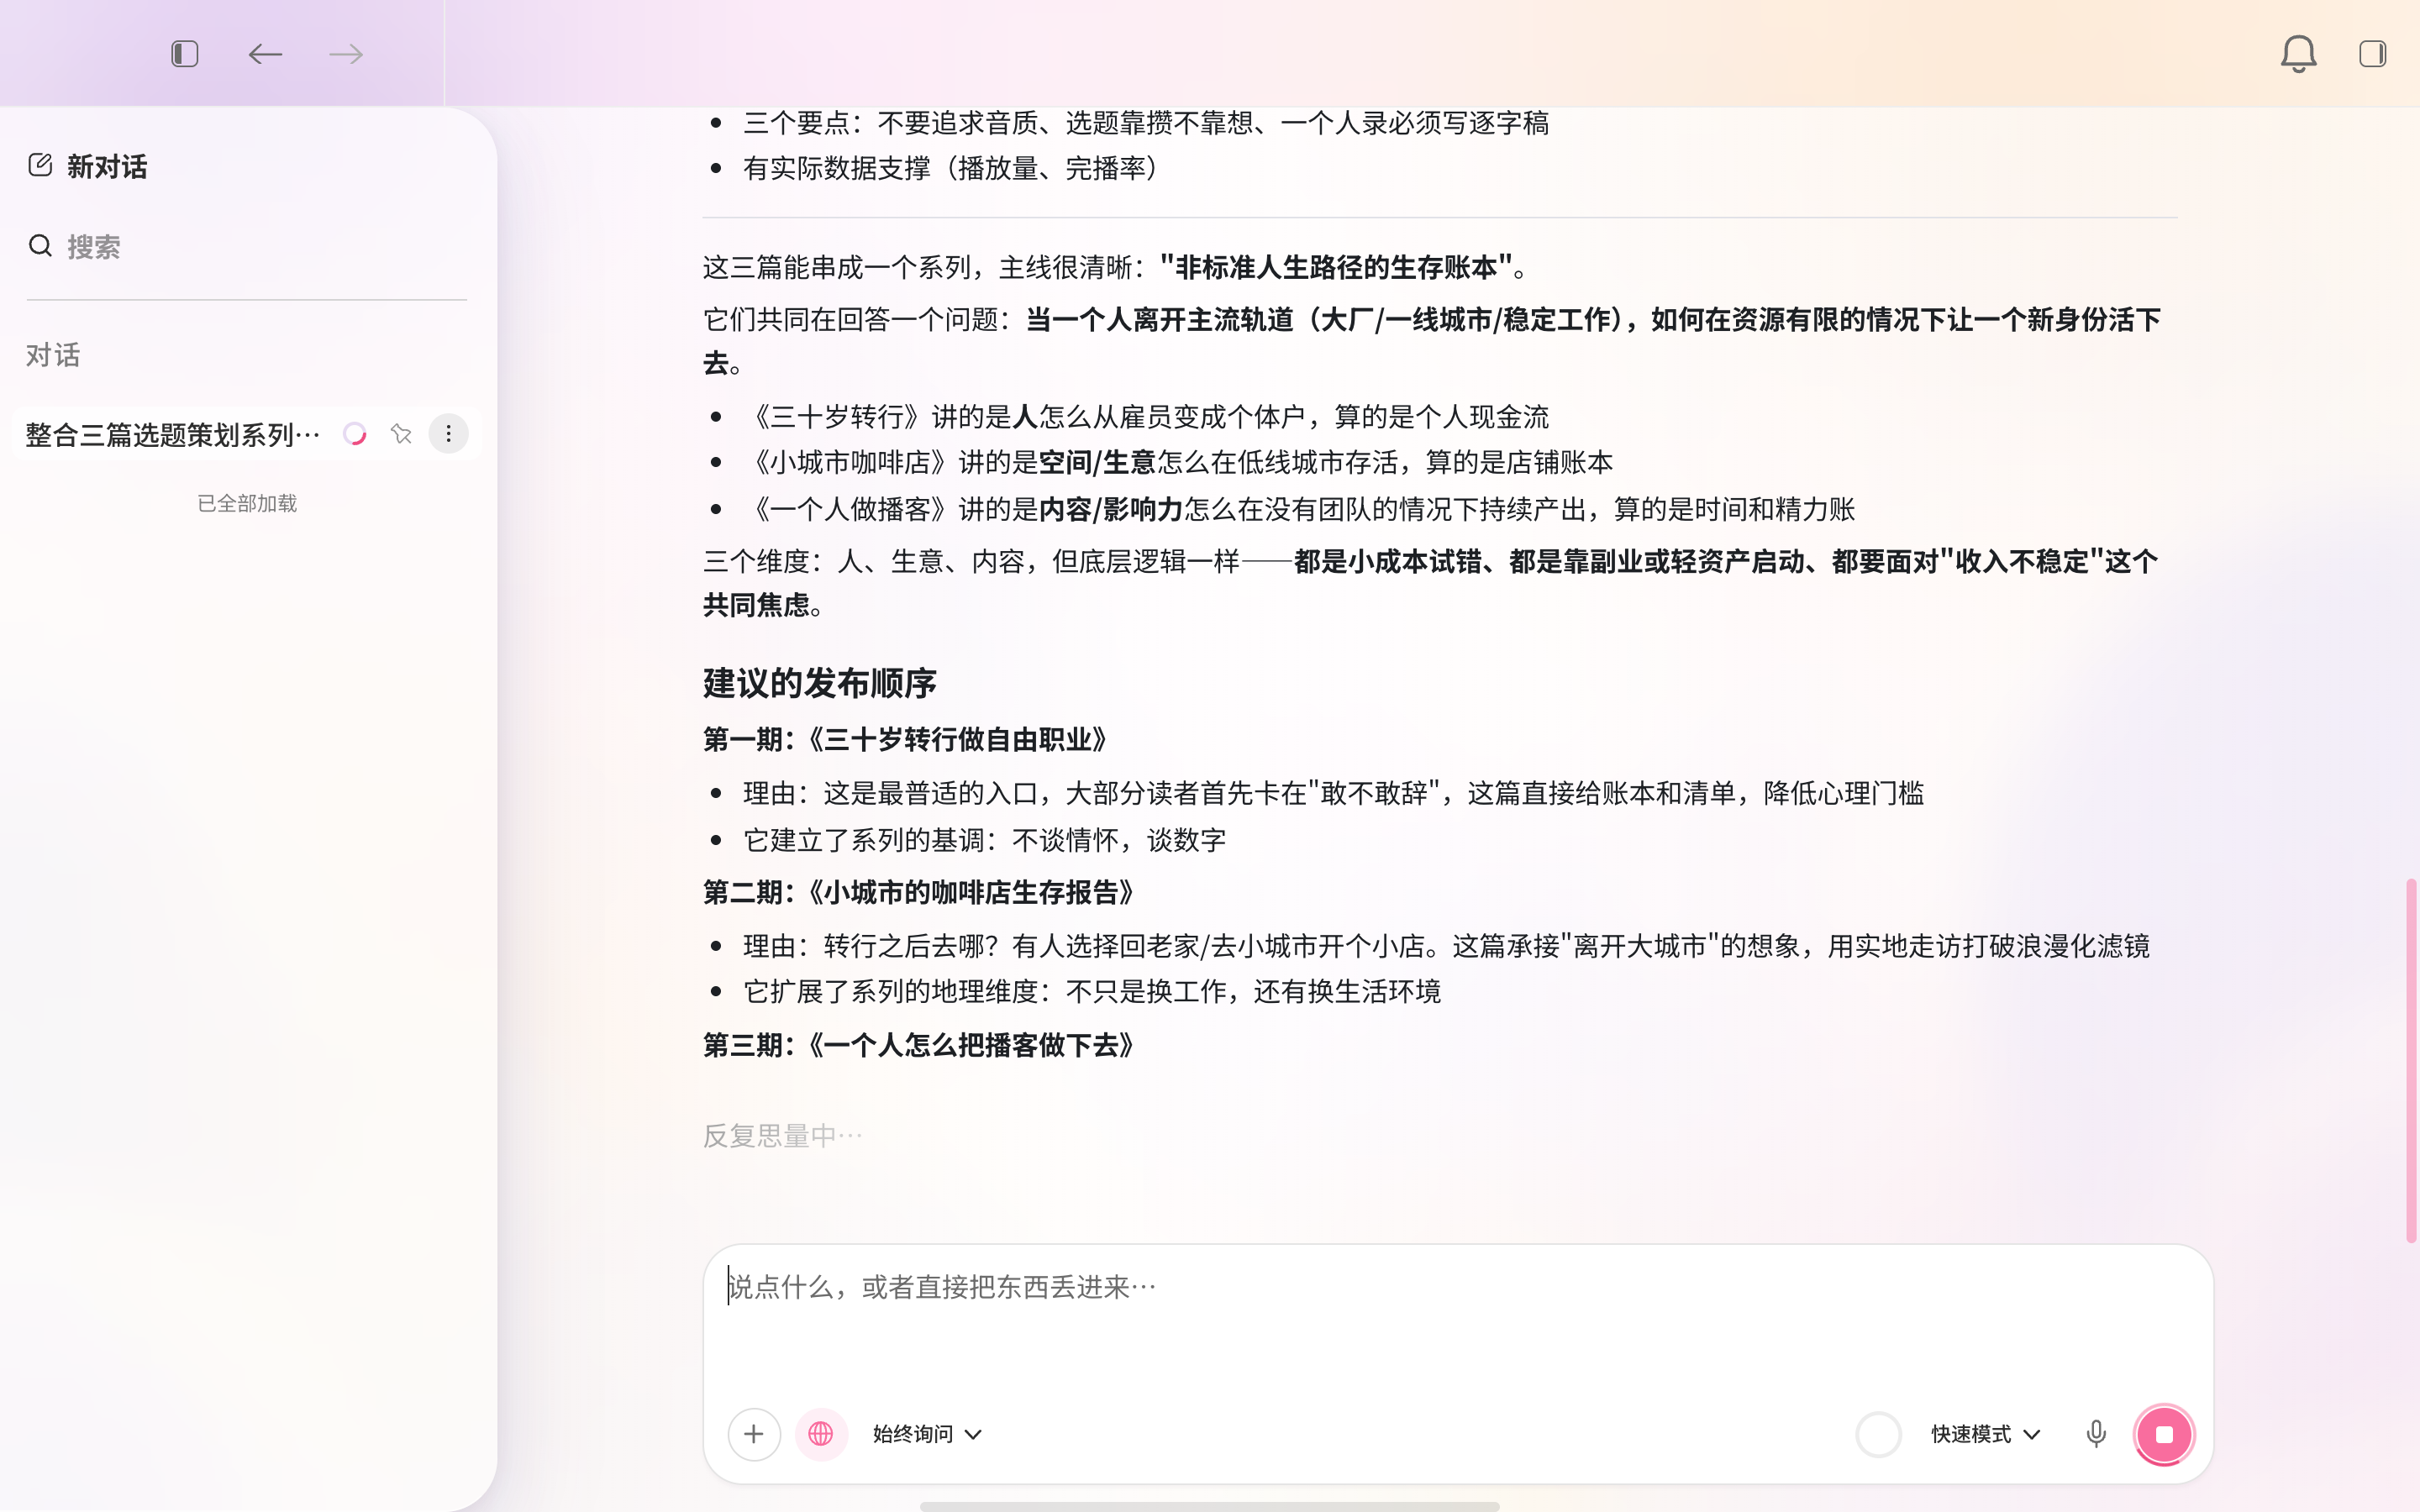
After you send a question, a “Generating” indicator appears above the answer as the text streams in below. The Send button becomes a Stop button; select it to stop the current response.
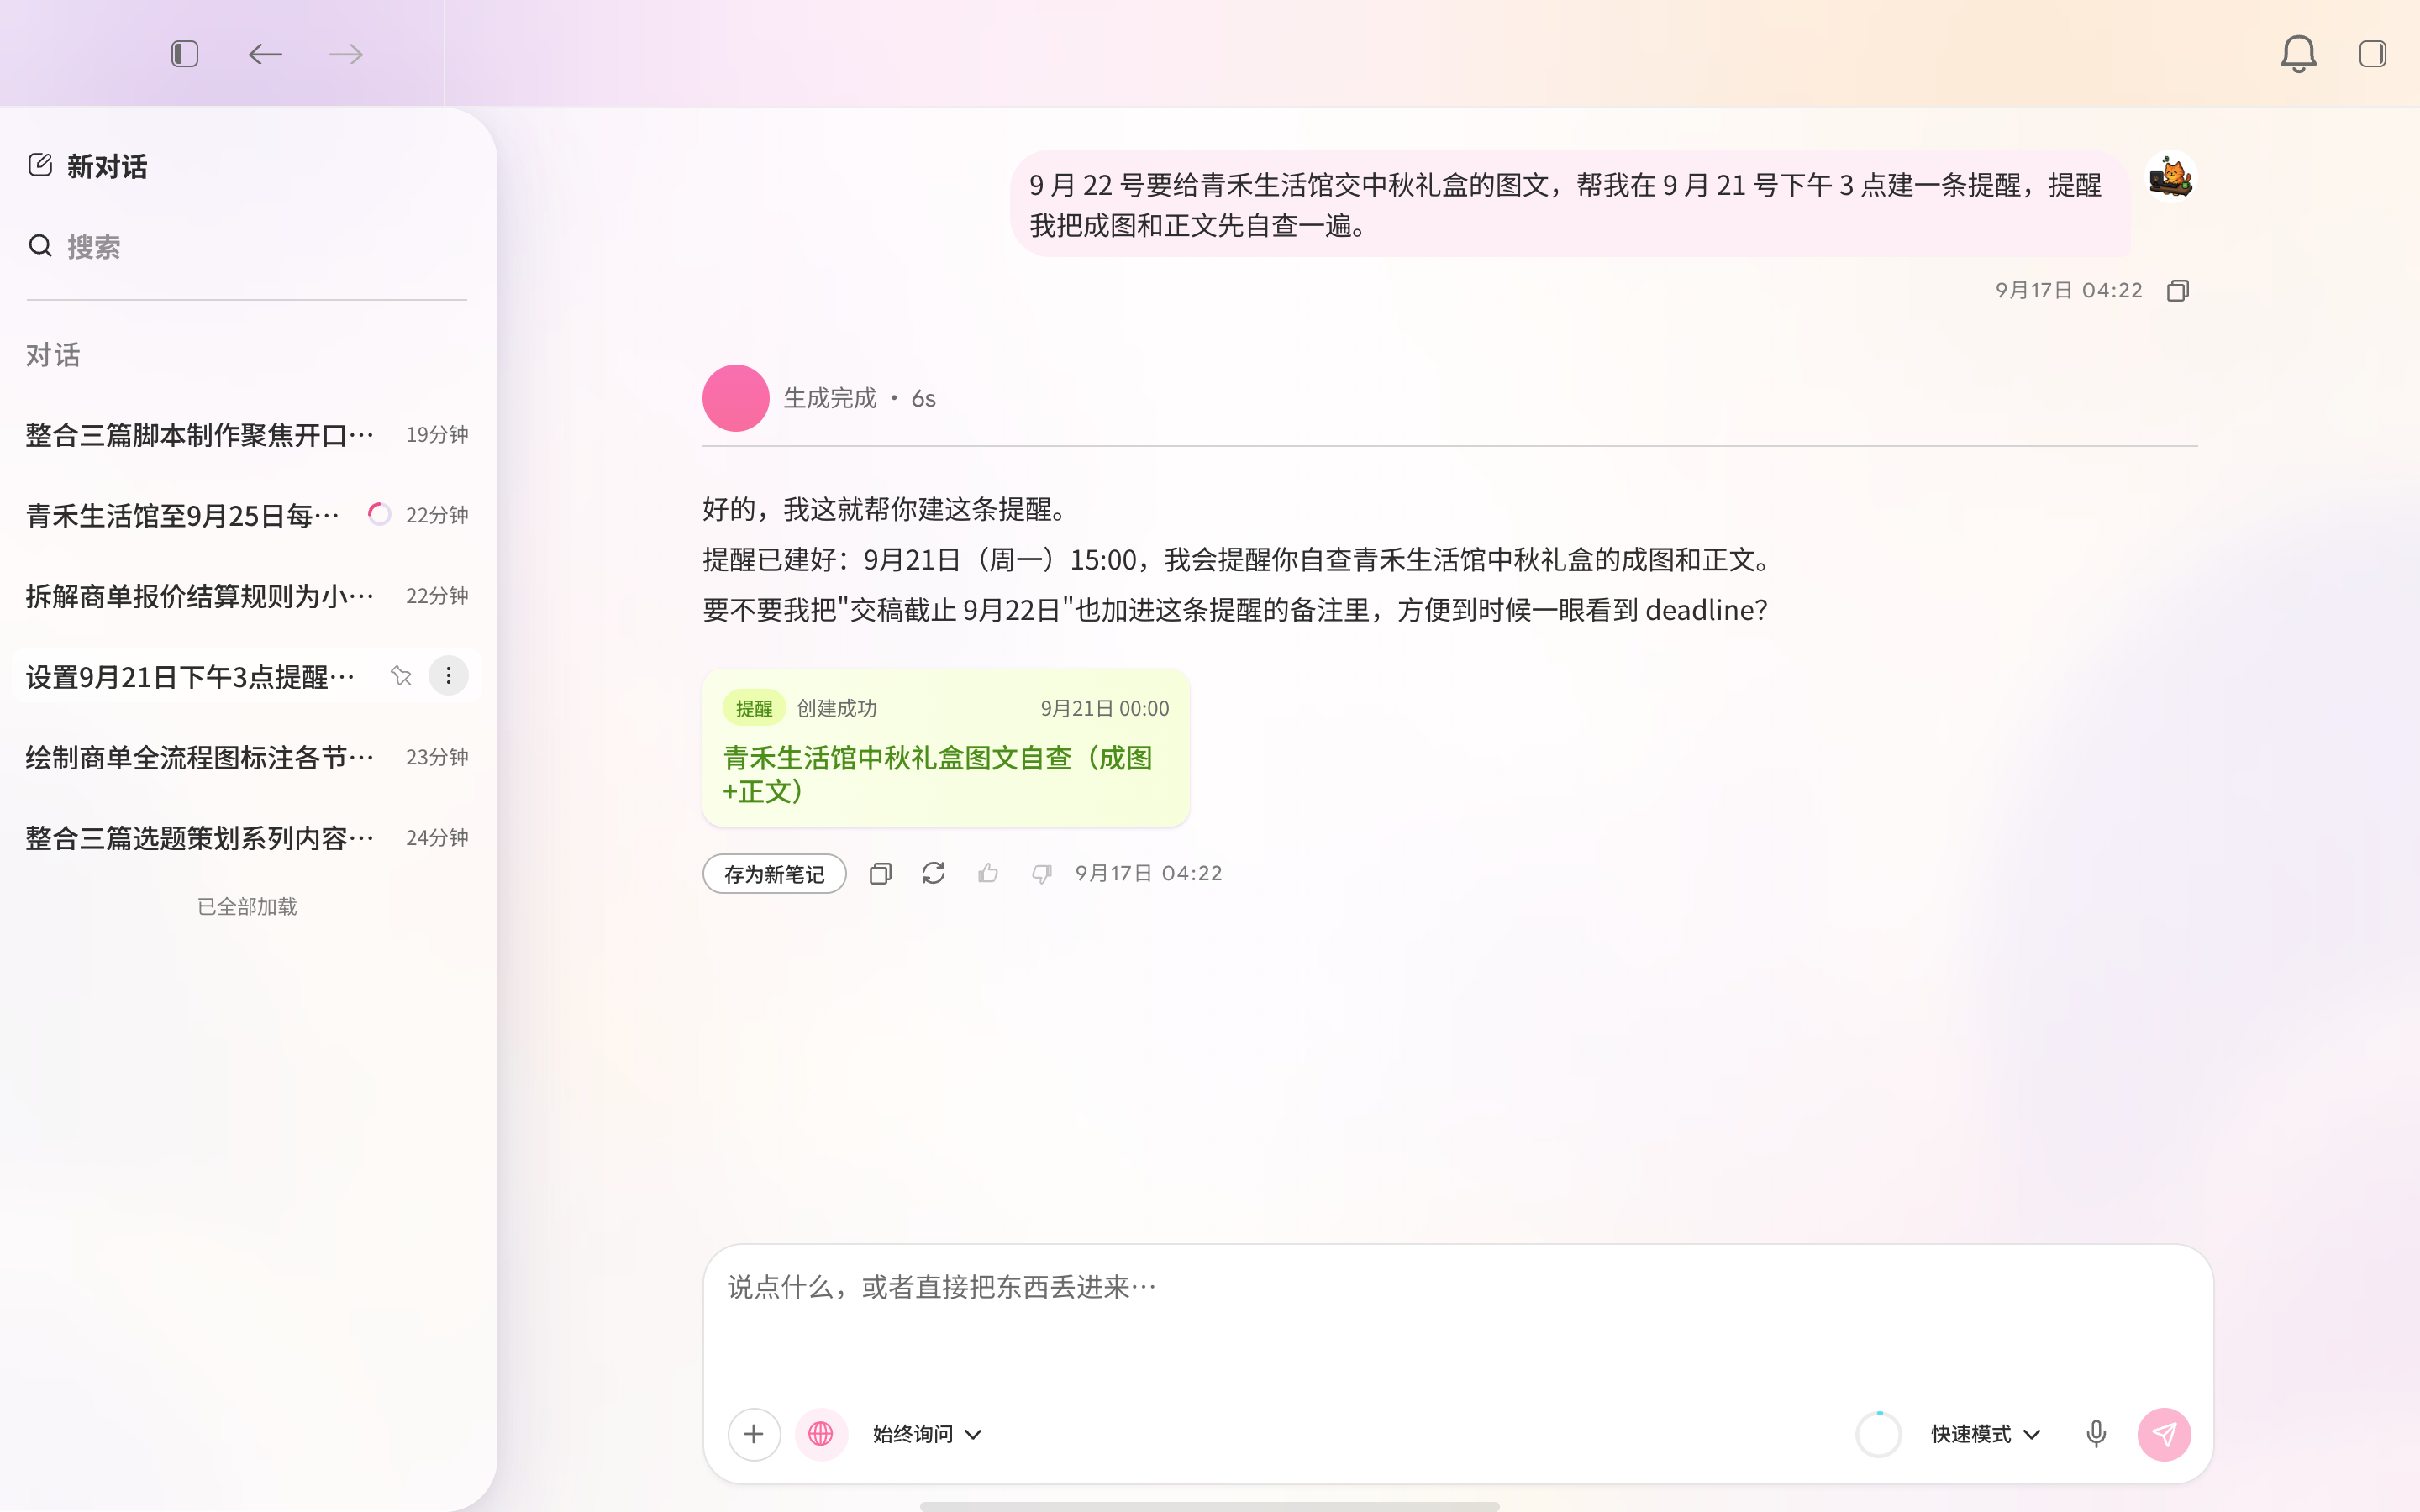
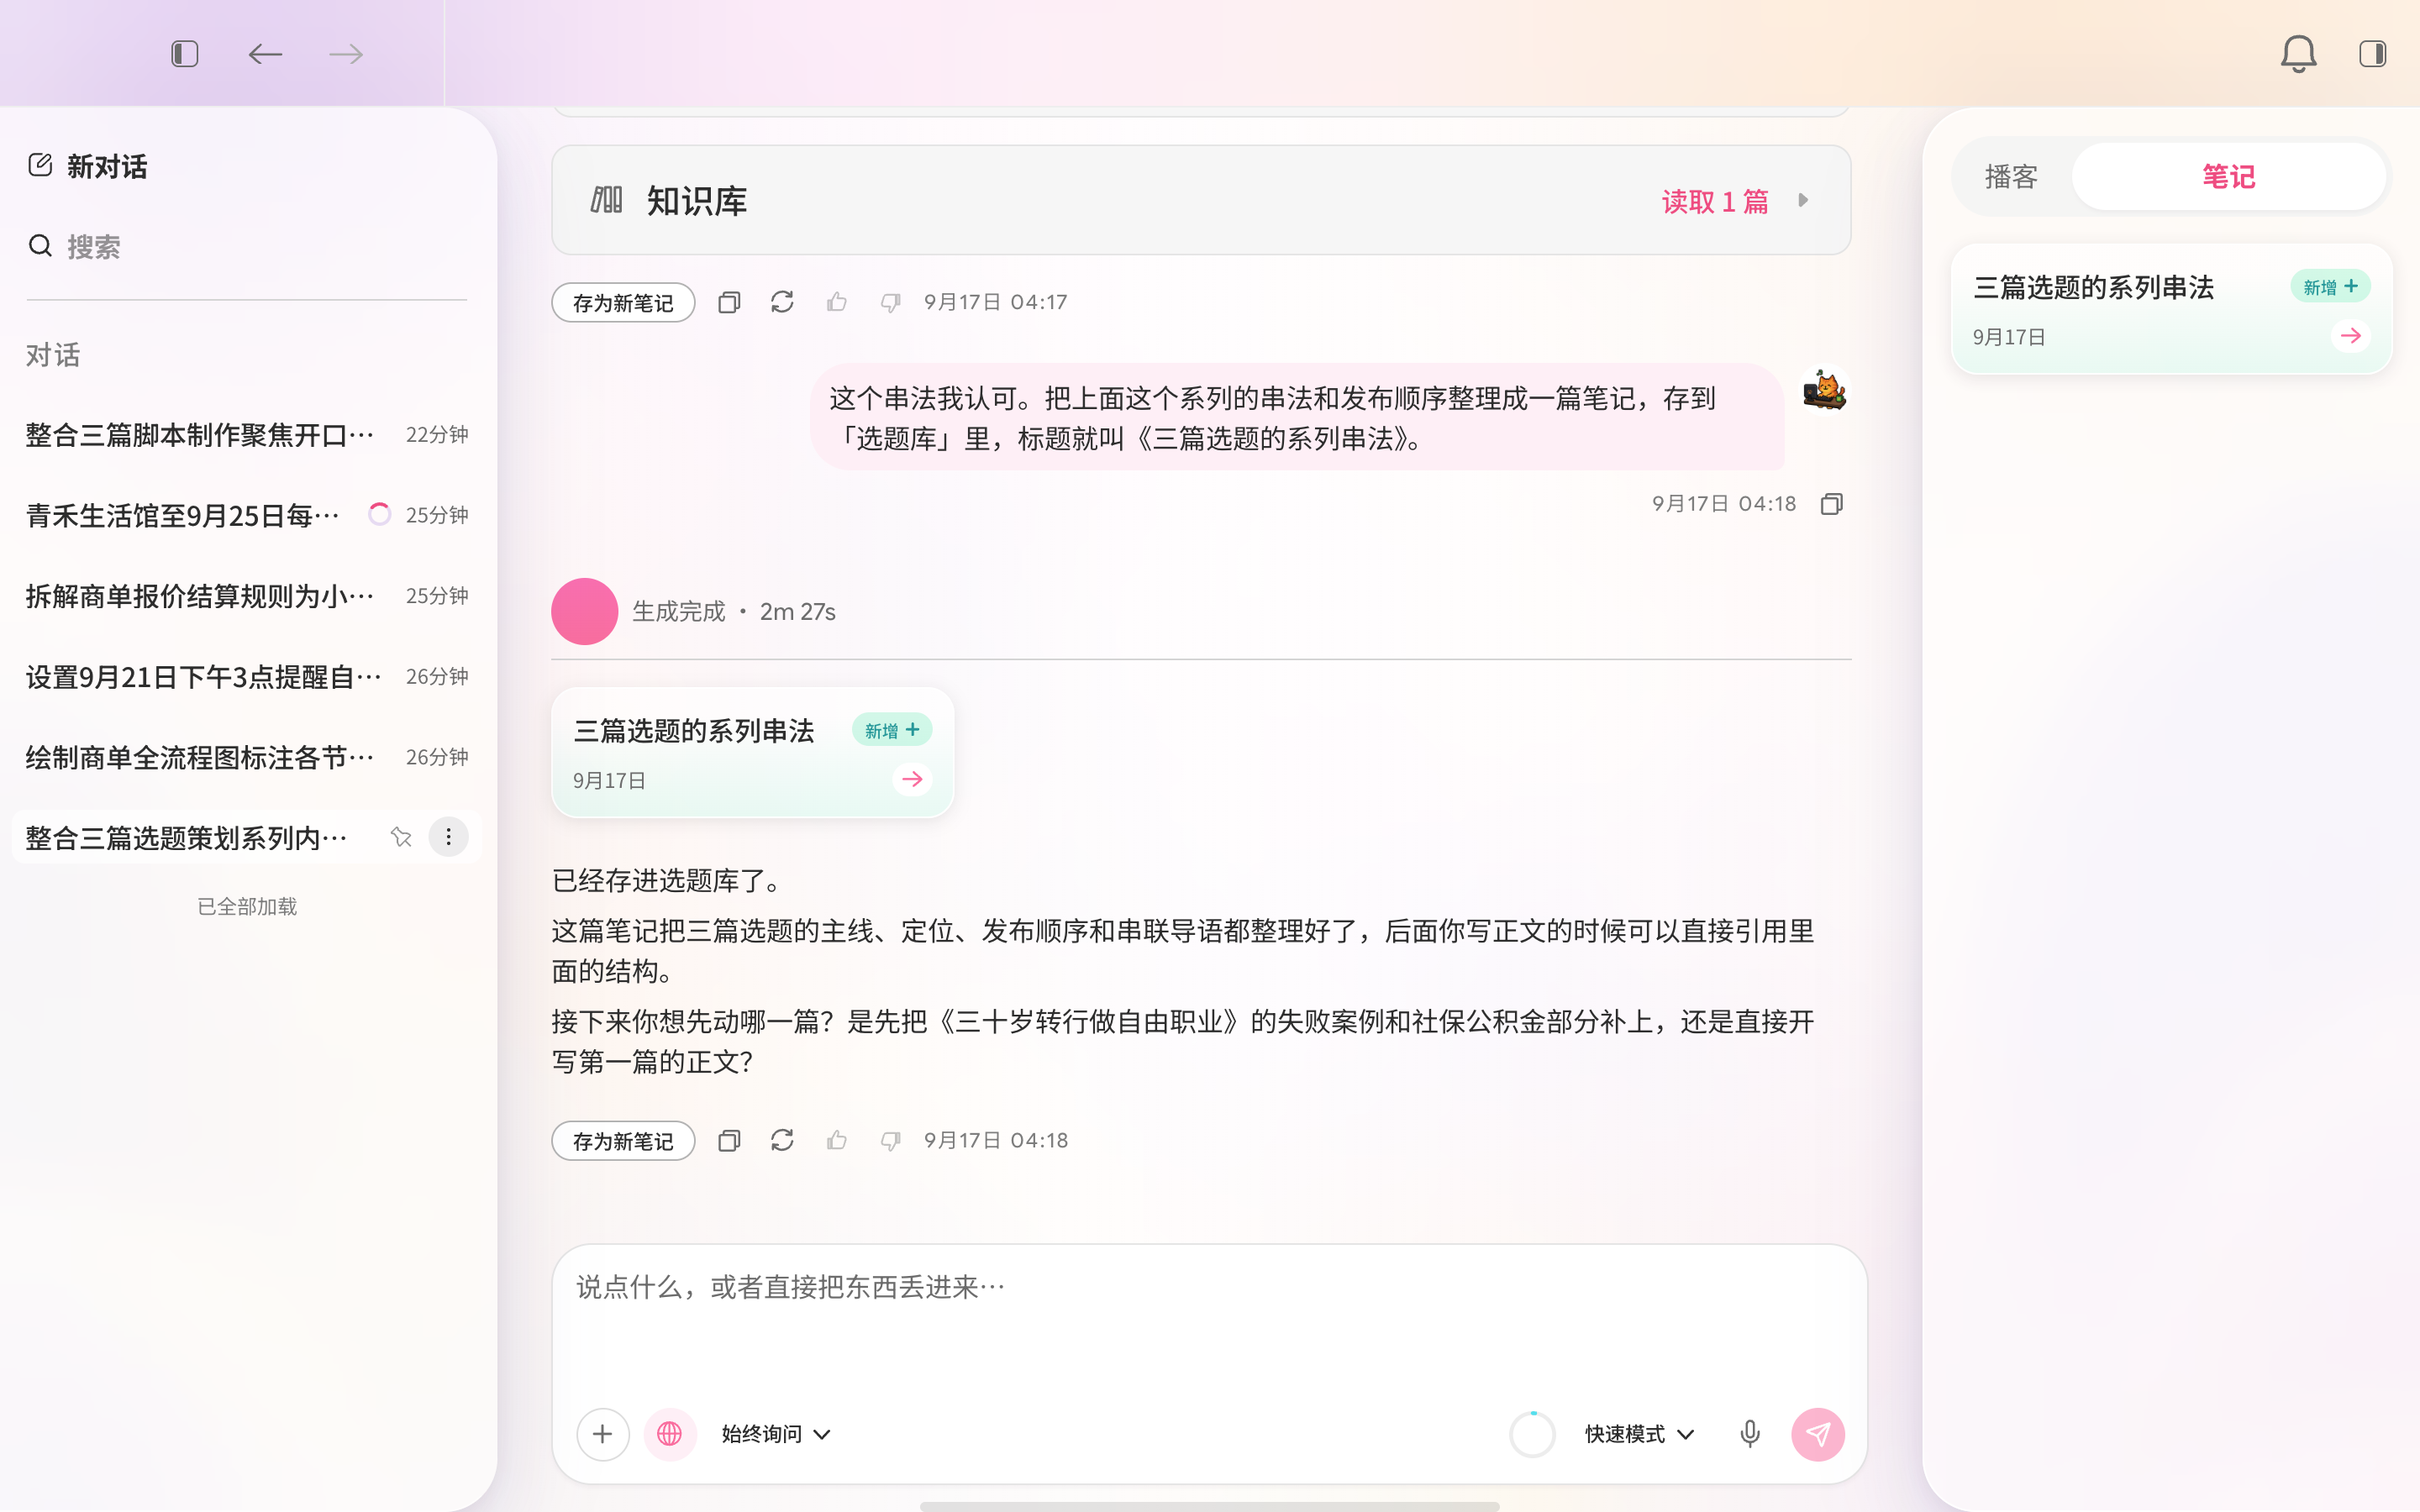
When the answer is complete, actions appear below it: Save as new note, thumbs up, thumbs down, Copy, and Regenerate. If you scroll up to older messages, select “Back to latest” to return to the bottom.
If an answer is incomplete, the message shows “Task incomplete.” Select Regenerate to try again. In long conversations, a “Compressing” card appears while earlier messages are summarized. The original message history remains available.
Ask AI to create a note: confirmation cards
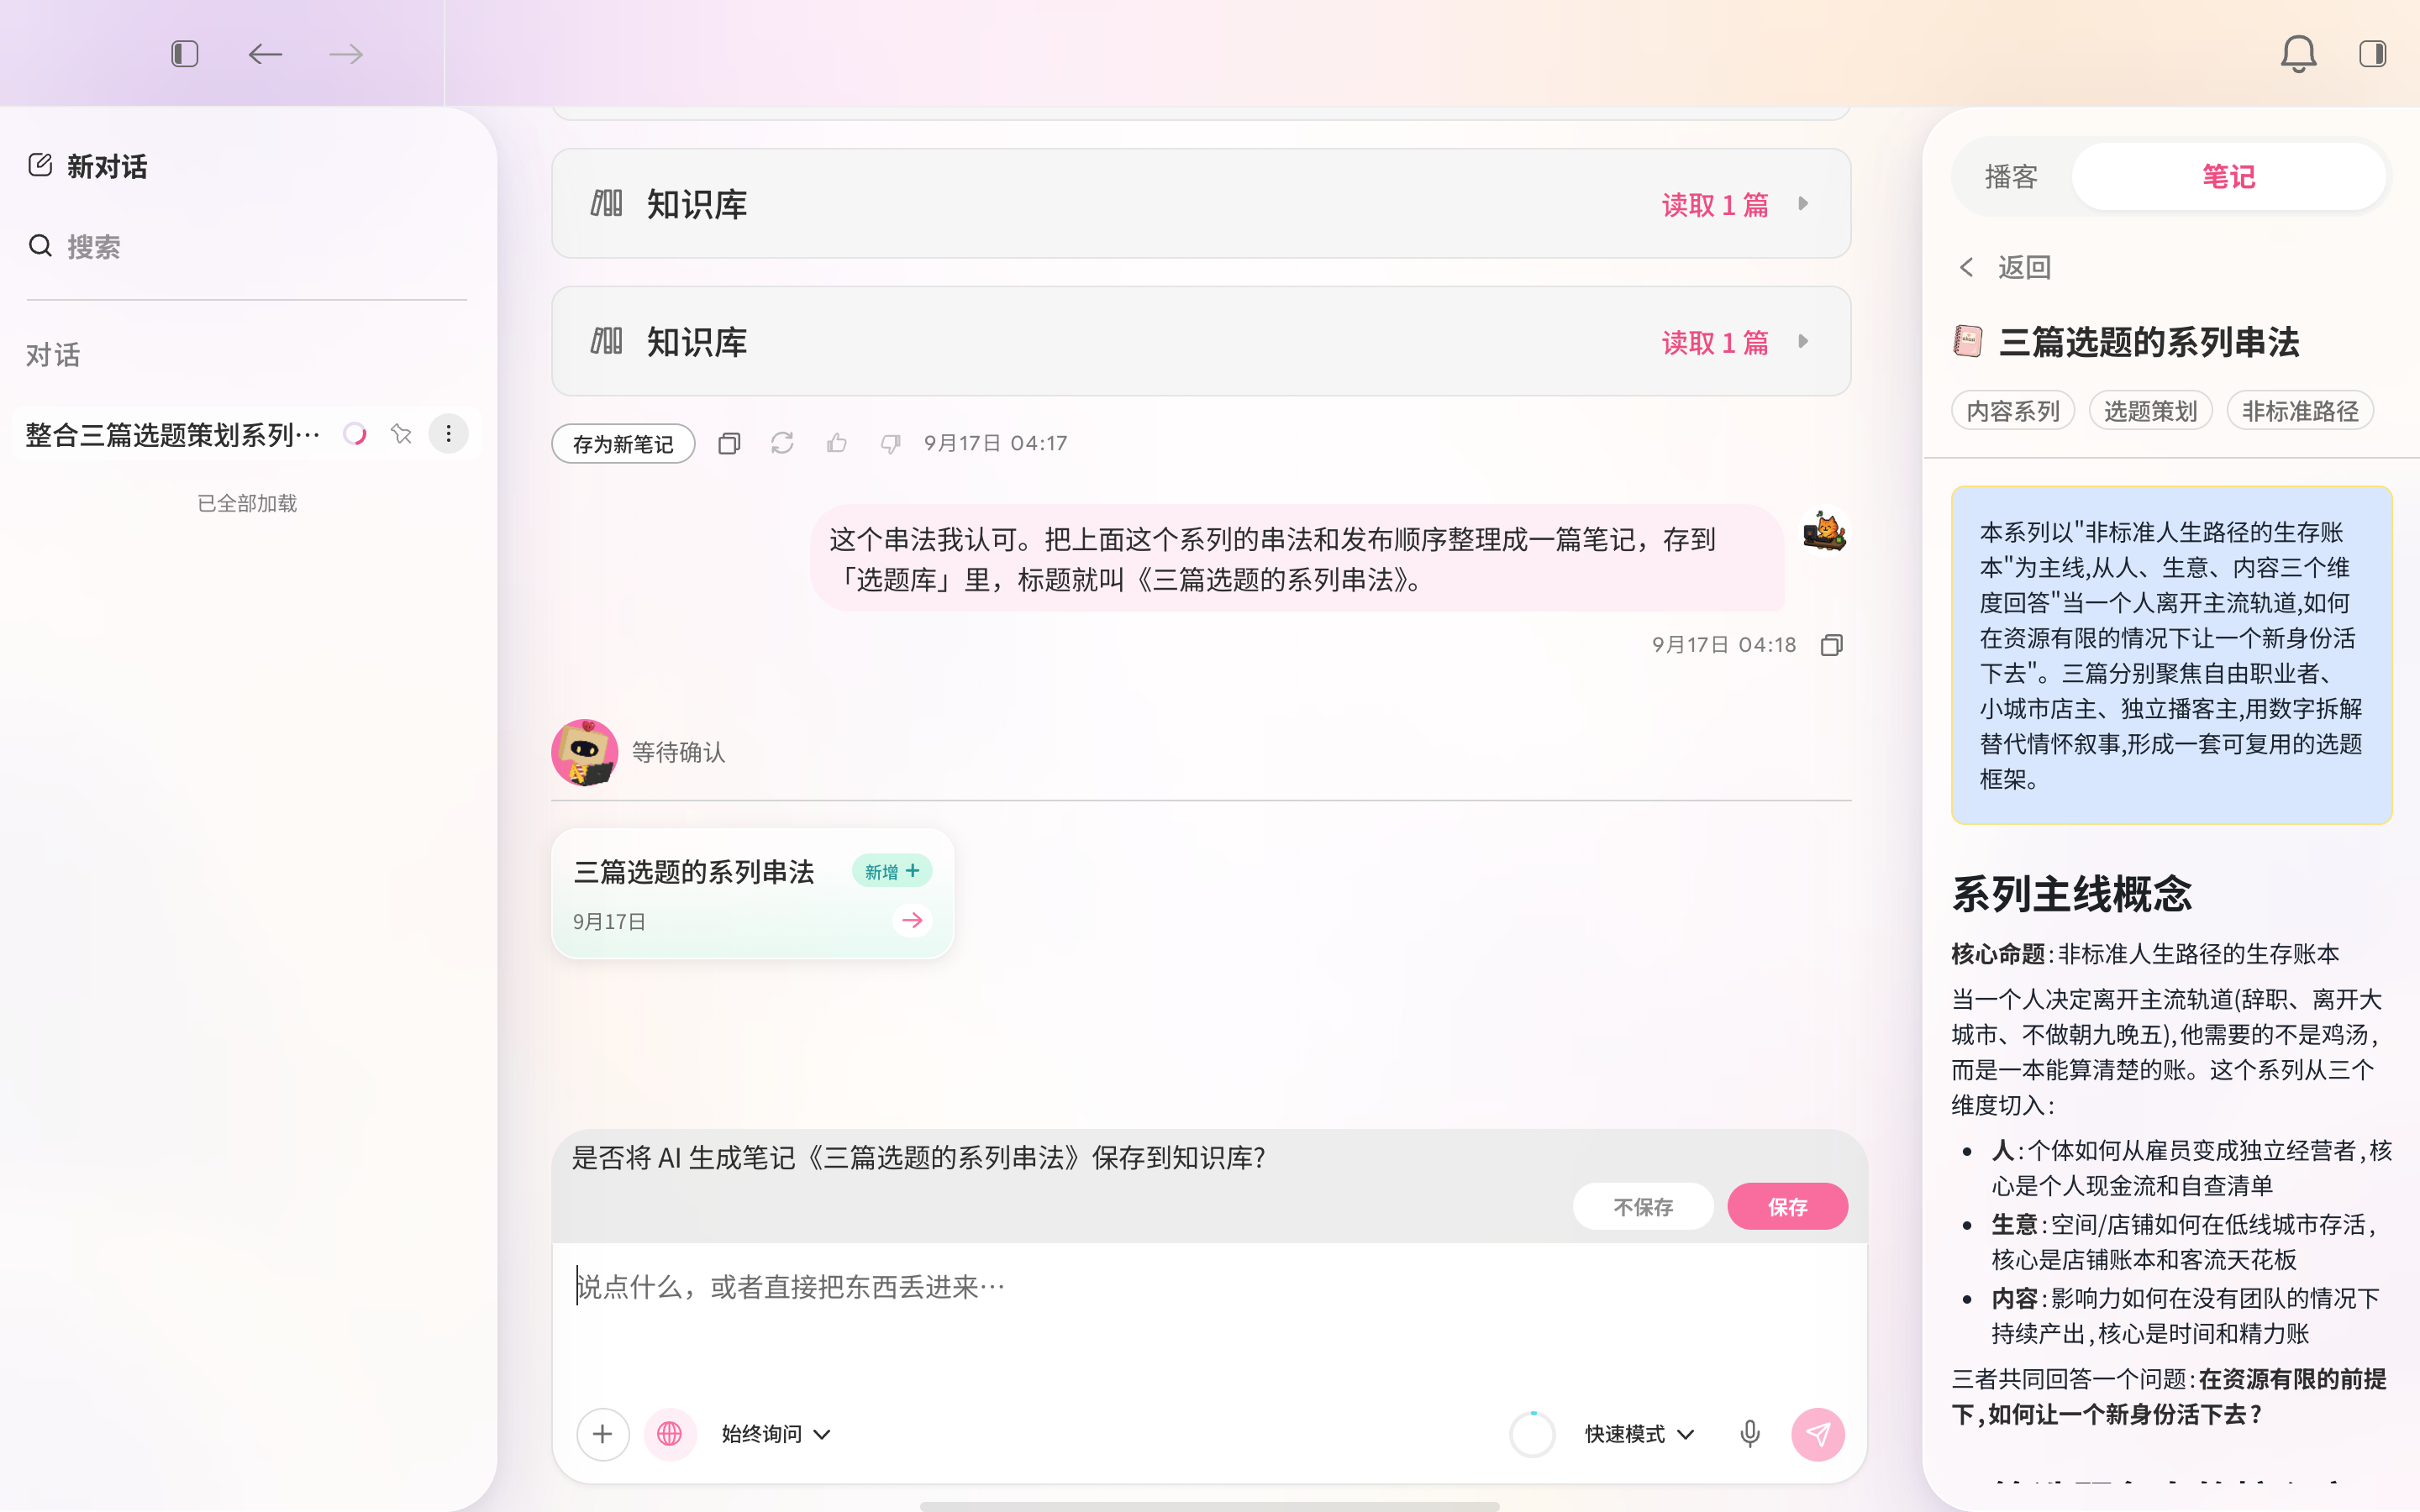
When you ask Akasi to organize content into a note, it does not save it to your Library immediately. A note card labeled “New” appears in the conversation, “Awaiting confirmation” appears beside your companion’s avatar, and a preview opens in the right sidebar. Above the input, a confirmation bar asks whether to save the AI-generated note to your Library, with “Don’t save” and “Save” options.
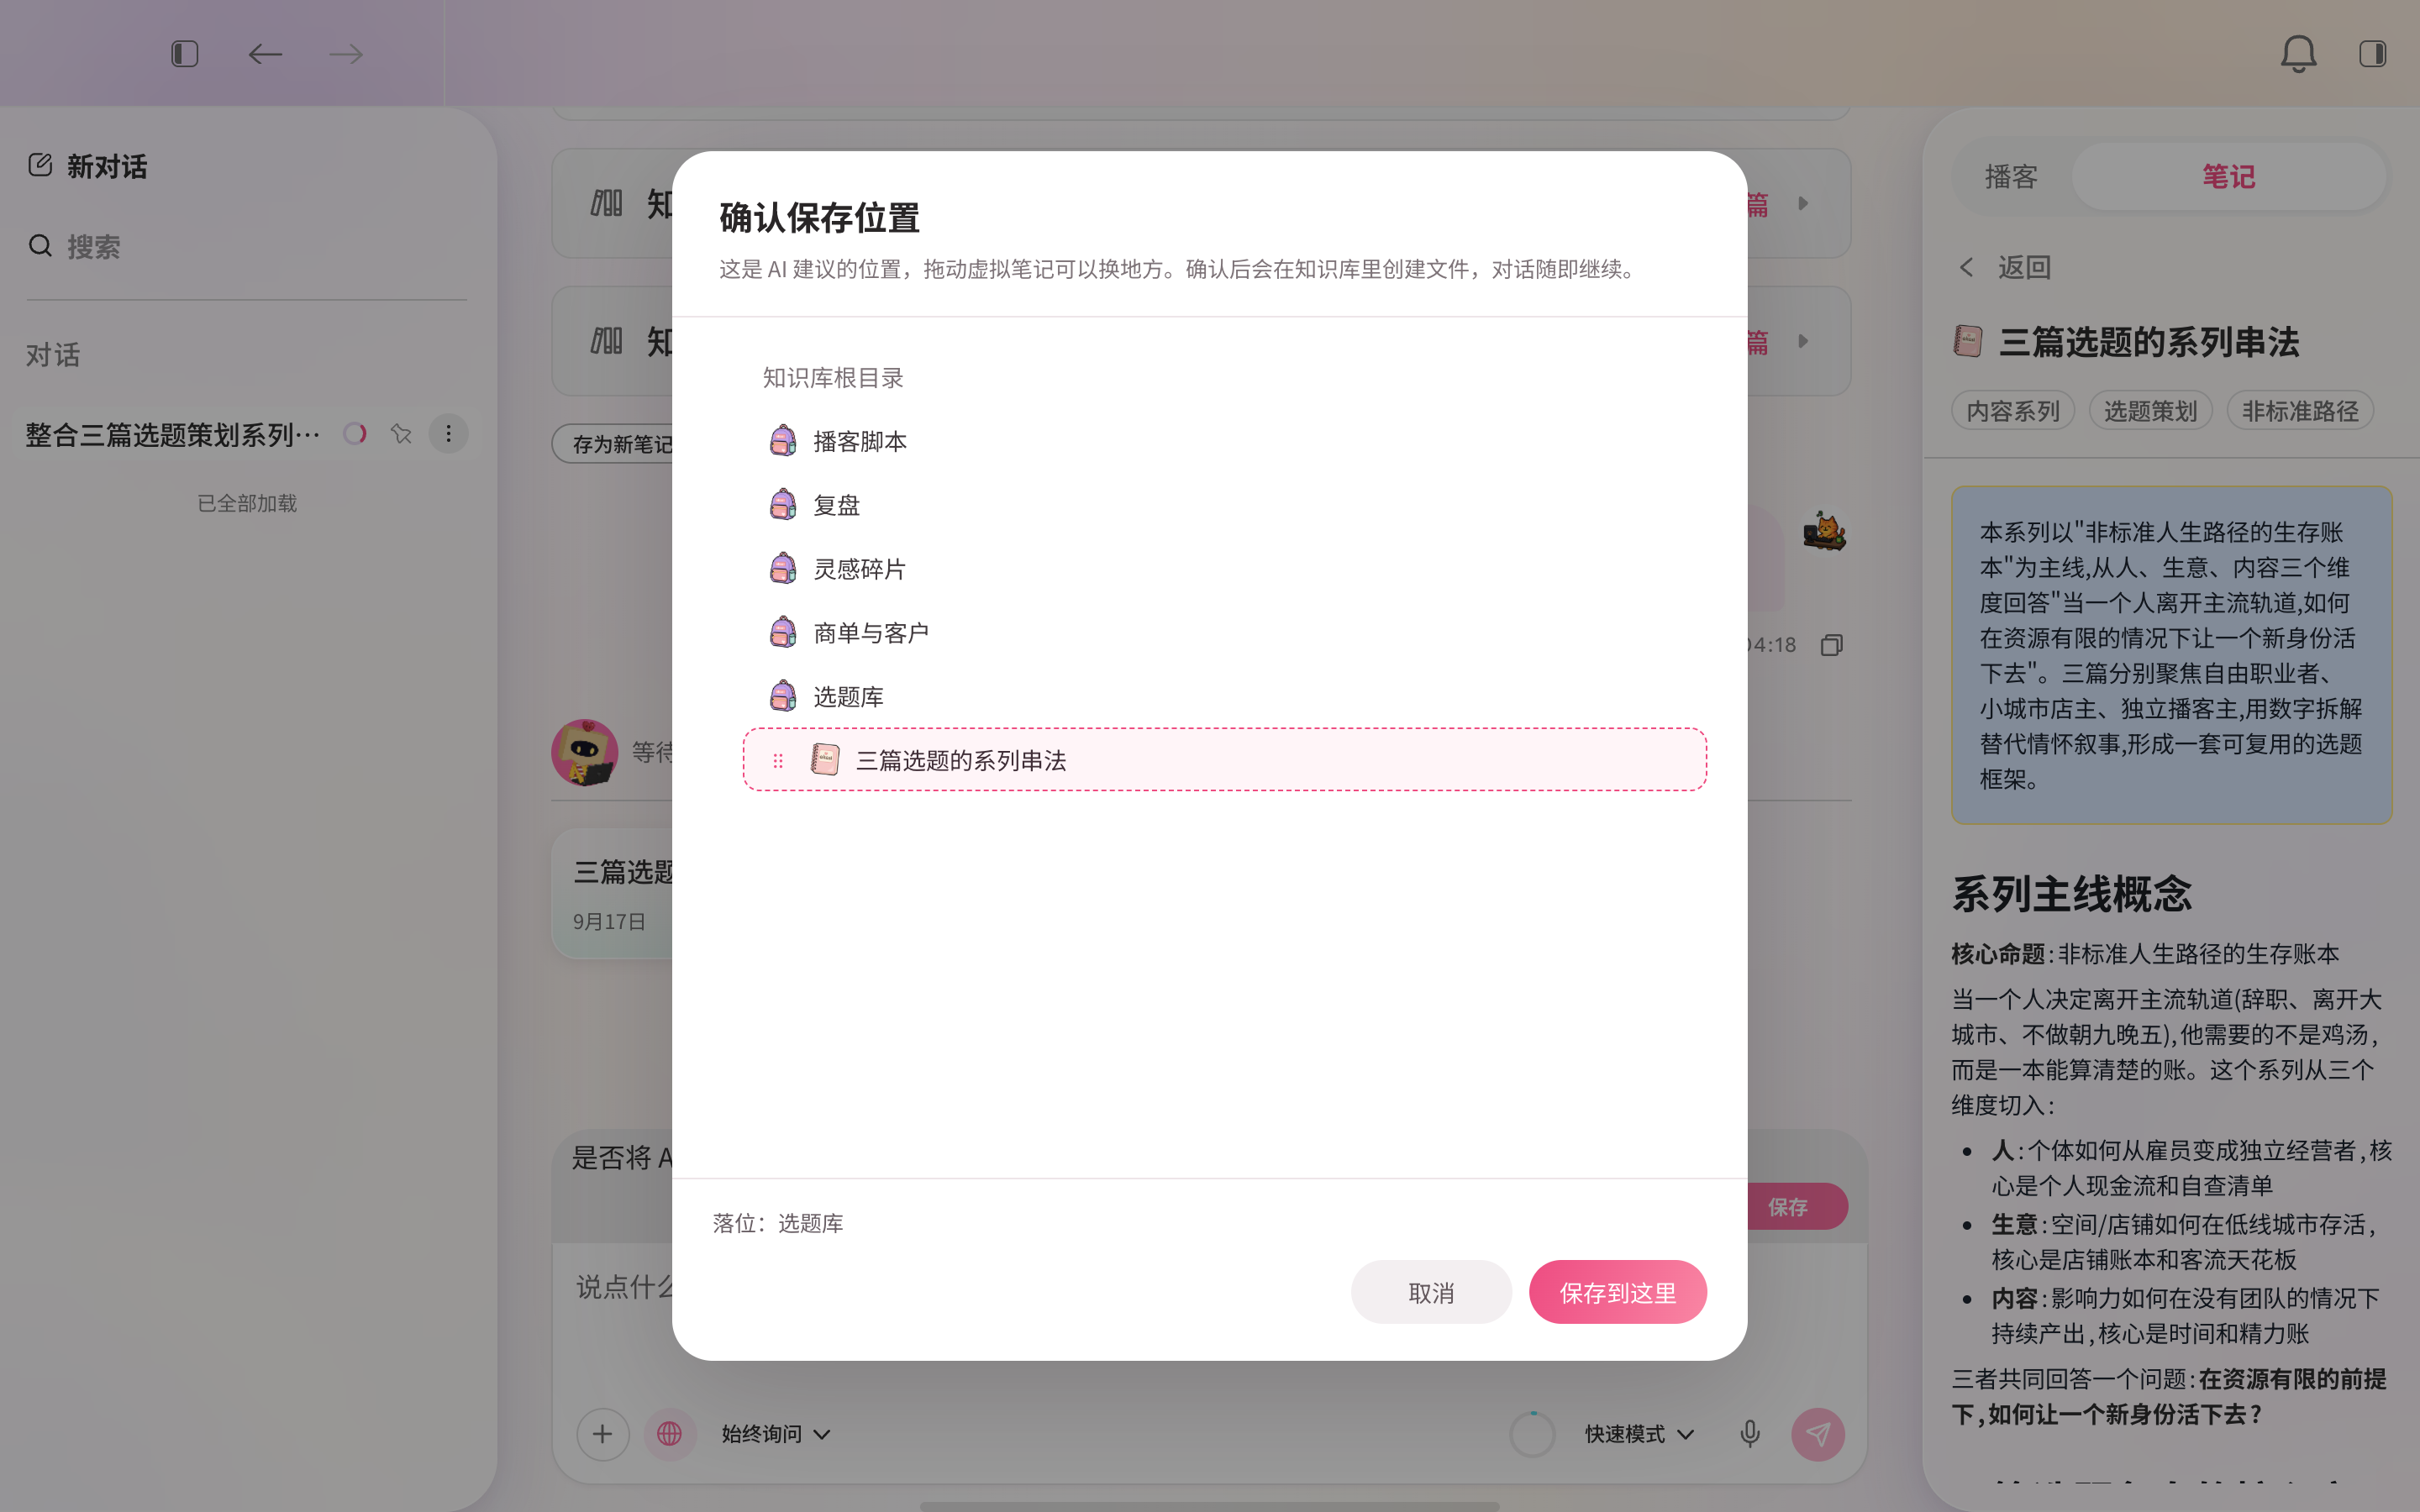
Select Save to open “Confirm save location.” The upper part shows your Library’s folders, with the note placed in Akasi’s suggested location. You can drag it to another folder. The selected destination appears at the bottom left, with Cancel and “Save here” buttons below.
Attachments, voice input & drafts
Use the plus icon at the bottom left of the input to select Library content or local files, or drag files onto the page. Attachments appear as small cards that you can reorder or remove. You cannot send attachments that are still being processed, and failures show a reason. Select the microphone to transcribe speech into text, appended to your current draft. Press Enter to send or Shift+Enter for a new line. Each conversation keeps its own text draft and unsent attachments when you switch between chats.
Make a podcast in Chat
Ask “Turn this content into a podcast.” When Akasi recognizes the request, it asks about your preferred format, length, and voice before starting production. The finished episode appears under Podcasts in the right sidebar and in Personal Radio on Home.
View this conversation’s podcasts & notes
Open the right sidebar and switch between Podcasts and Notes at the bottom. Podcasts shows progress, failed tasks, and completed episodes from this conversation. Switching chats or closing the sidebar does not interrupt production. Notes groups content created or edited in this conversation by note; select a card to view it. Drag the sidebar’s left edge to resize it.
Companion chat window
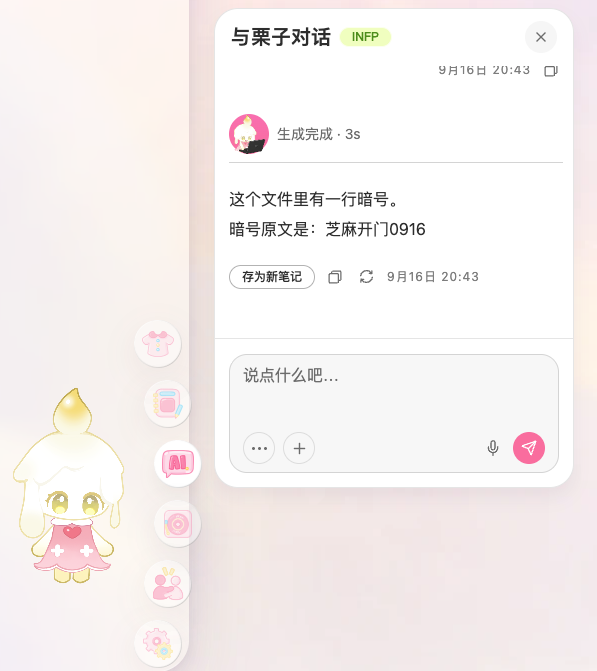
Right-click your companion to open a small chat window titled “Chat with {companion name}.” You can attach sources, choose a thinking mode, use voice input, and send or stop responses. Saving an answer as a new note shows “Saved as new note” without interrupting your work on the main page.
Tasks
Tasks shows a monthly calendar on the left, day/week/month controls at the top, a timeline or calendar in the center, and the selected day’s items on the right. Select the Tasks icon in the bottom dock to open it.
Create tasks, reminders & events
Select “+ Add” at the top right to open the sidebar. Choose Task, Reminder, or Event, enter a title, and add any other details. Tasks support priority, a time range, subtasks, tags, and notes. Reminders can have just a date, or a reminder time and recurrence. Events support priority, a time range, all-day status, recurrence, location, a meeting link, tags, advance reminders, and notes. Select Create to add the item to its date.
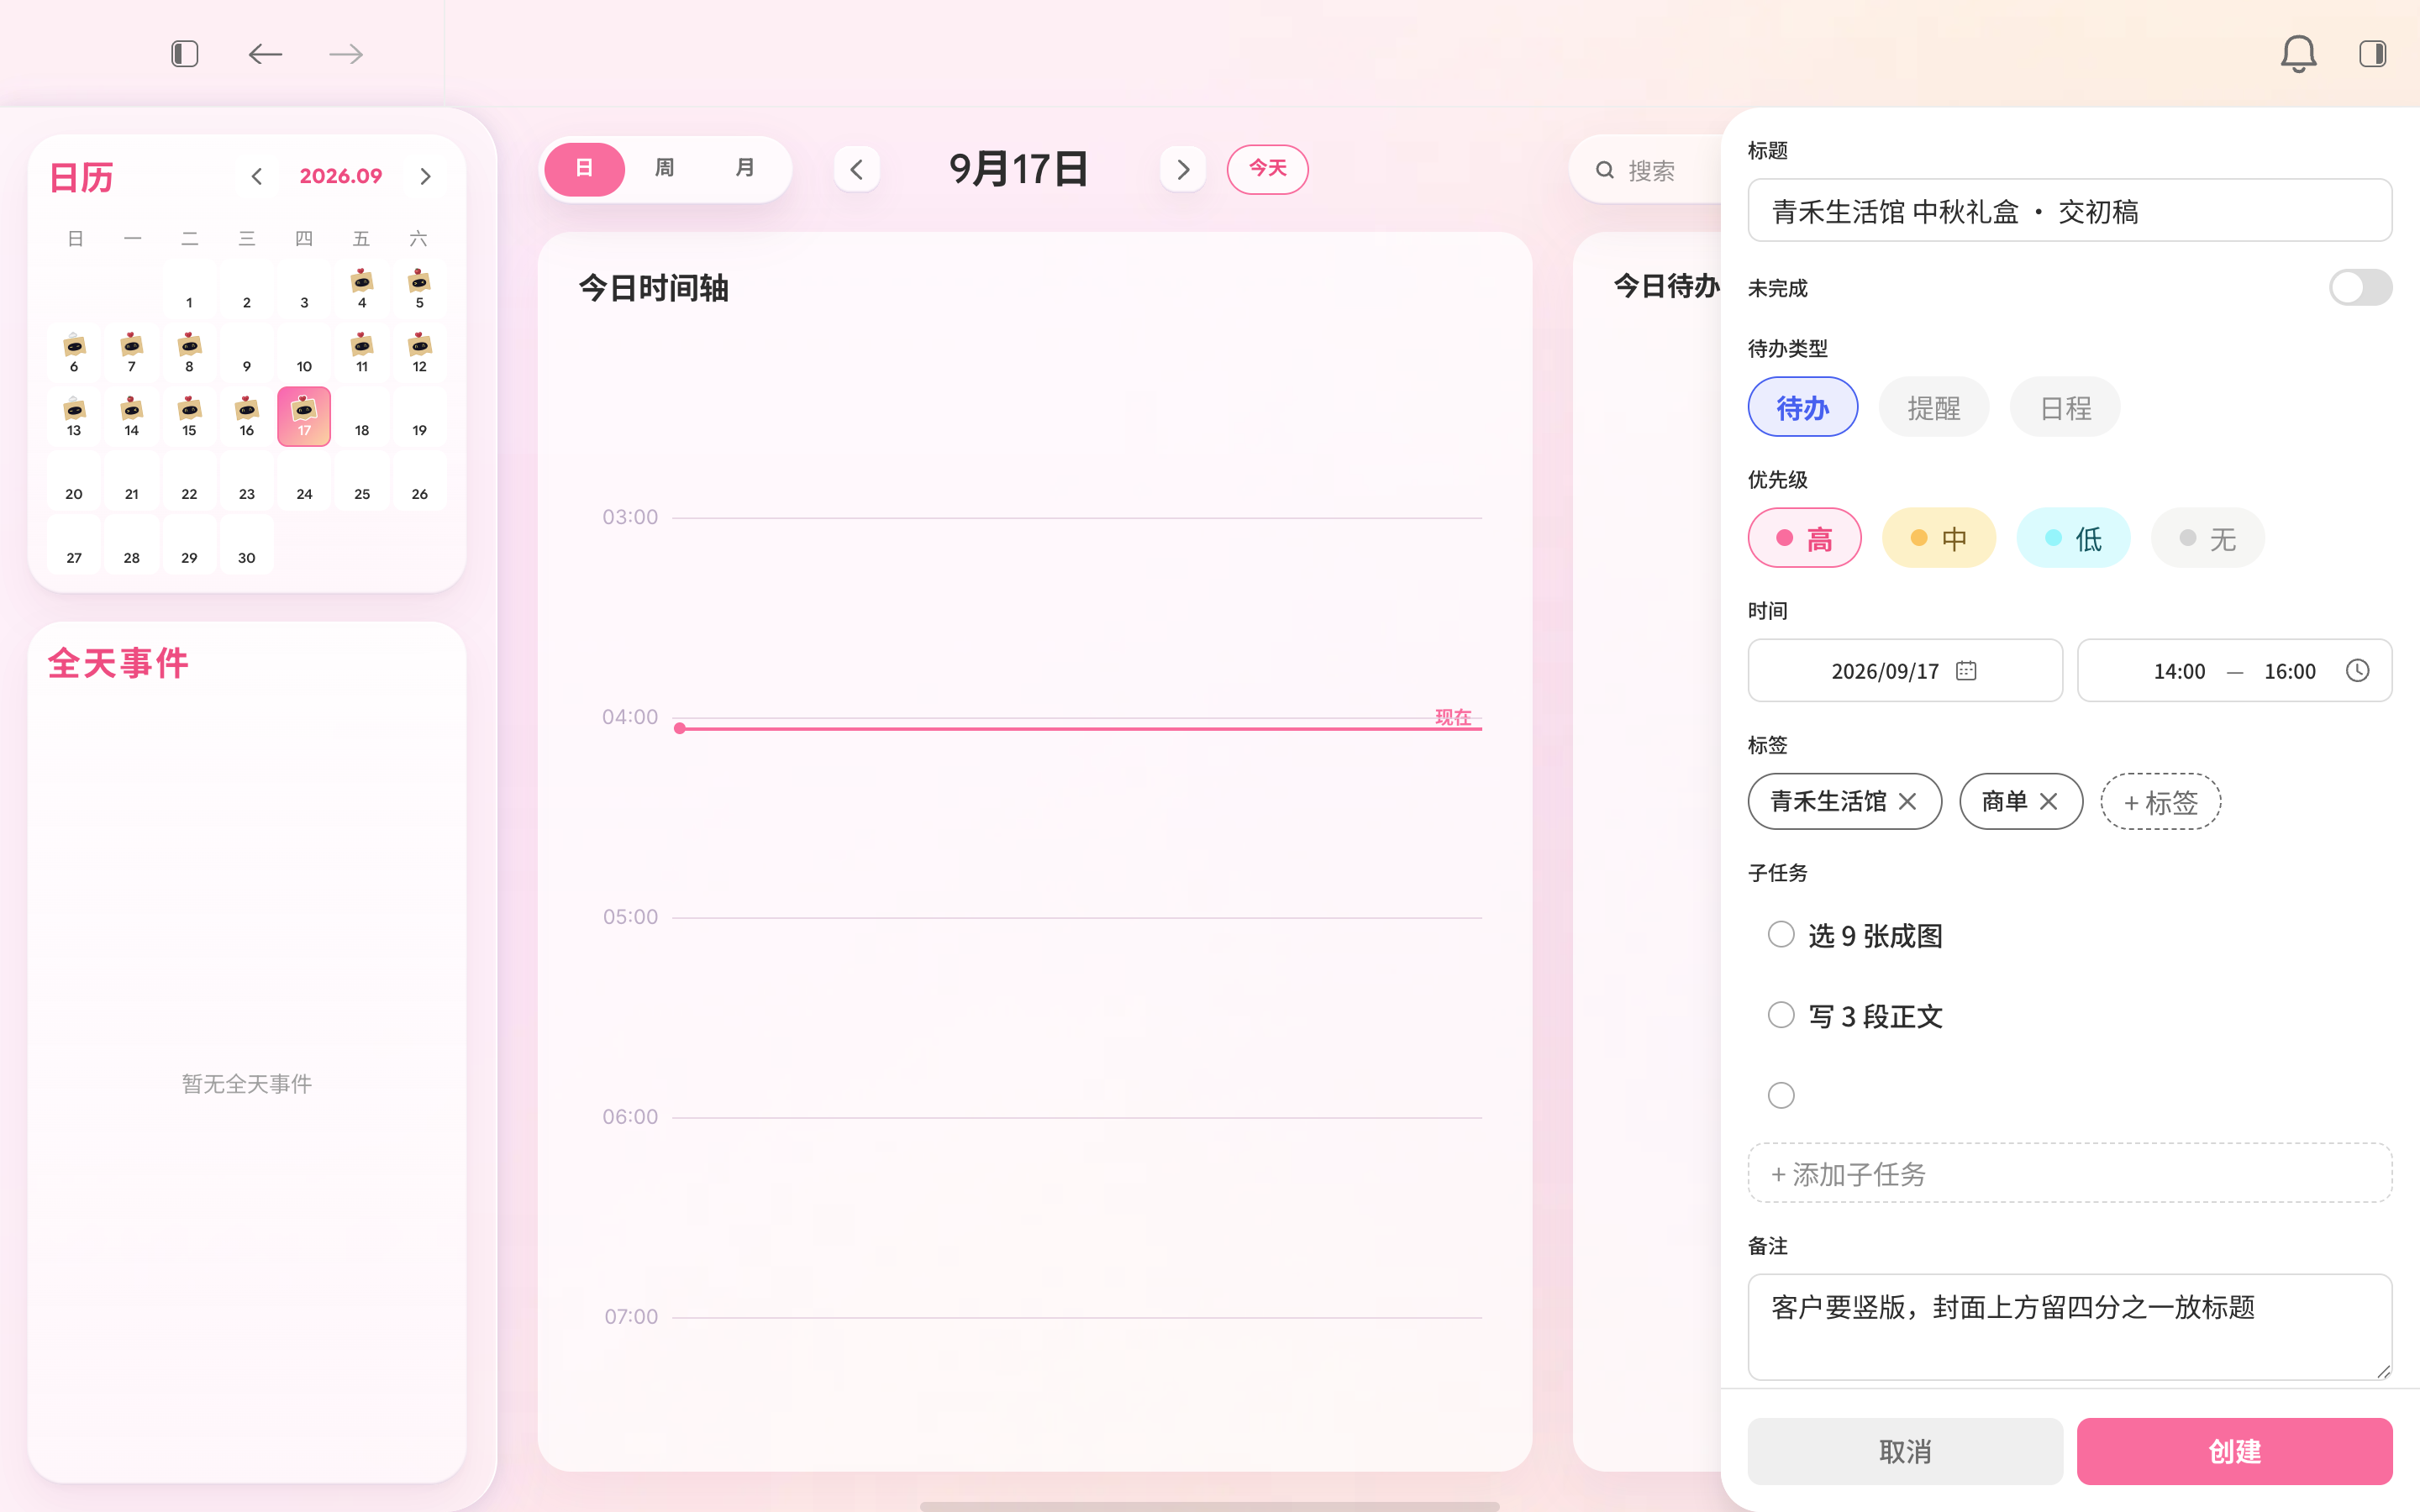
Set times & all-day events
Tasks and events use start and end times; reminders use a single time or “No time.” Select a date or time field to edit it. Changing the start time adjusts the end time where possible to preserve the duration. You cannot save if the end is before the start. Only events have an All-day switch. Turning it on disables the time fields but keeps their values; turning it off restores them.
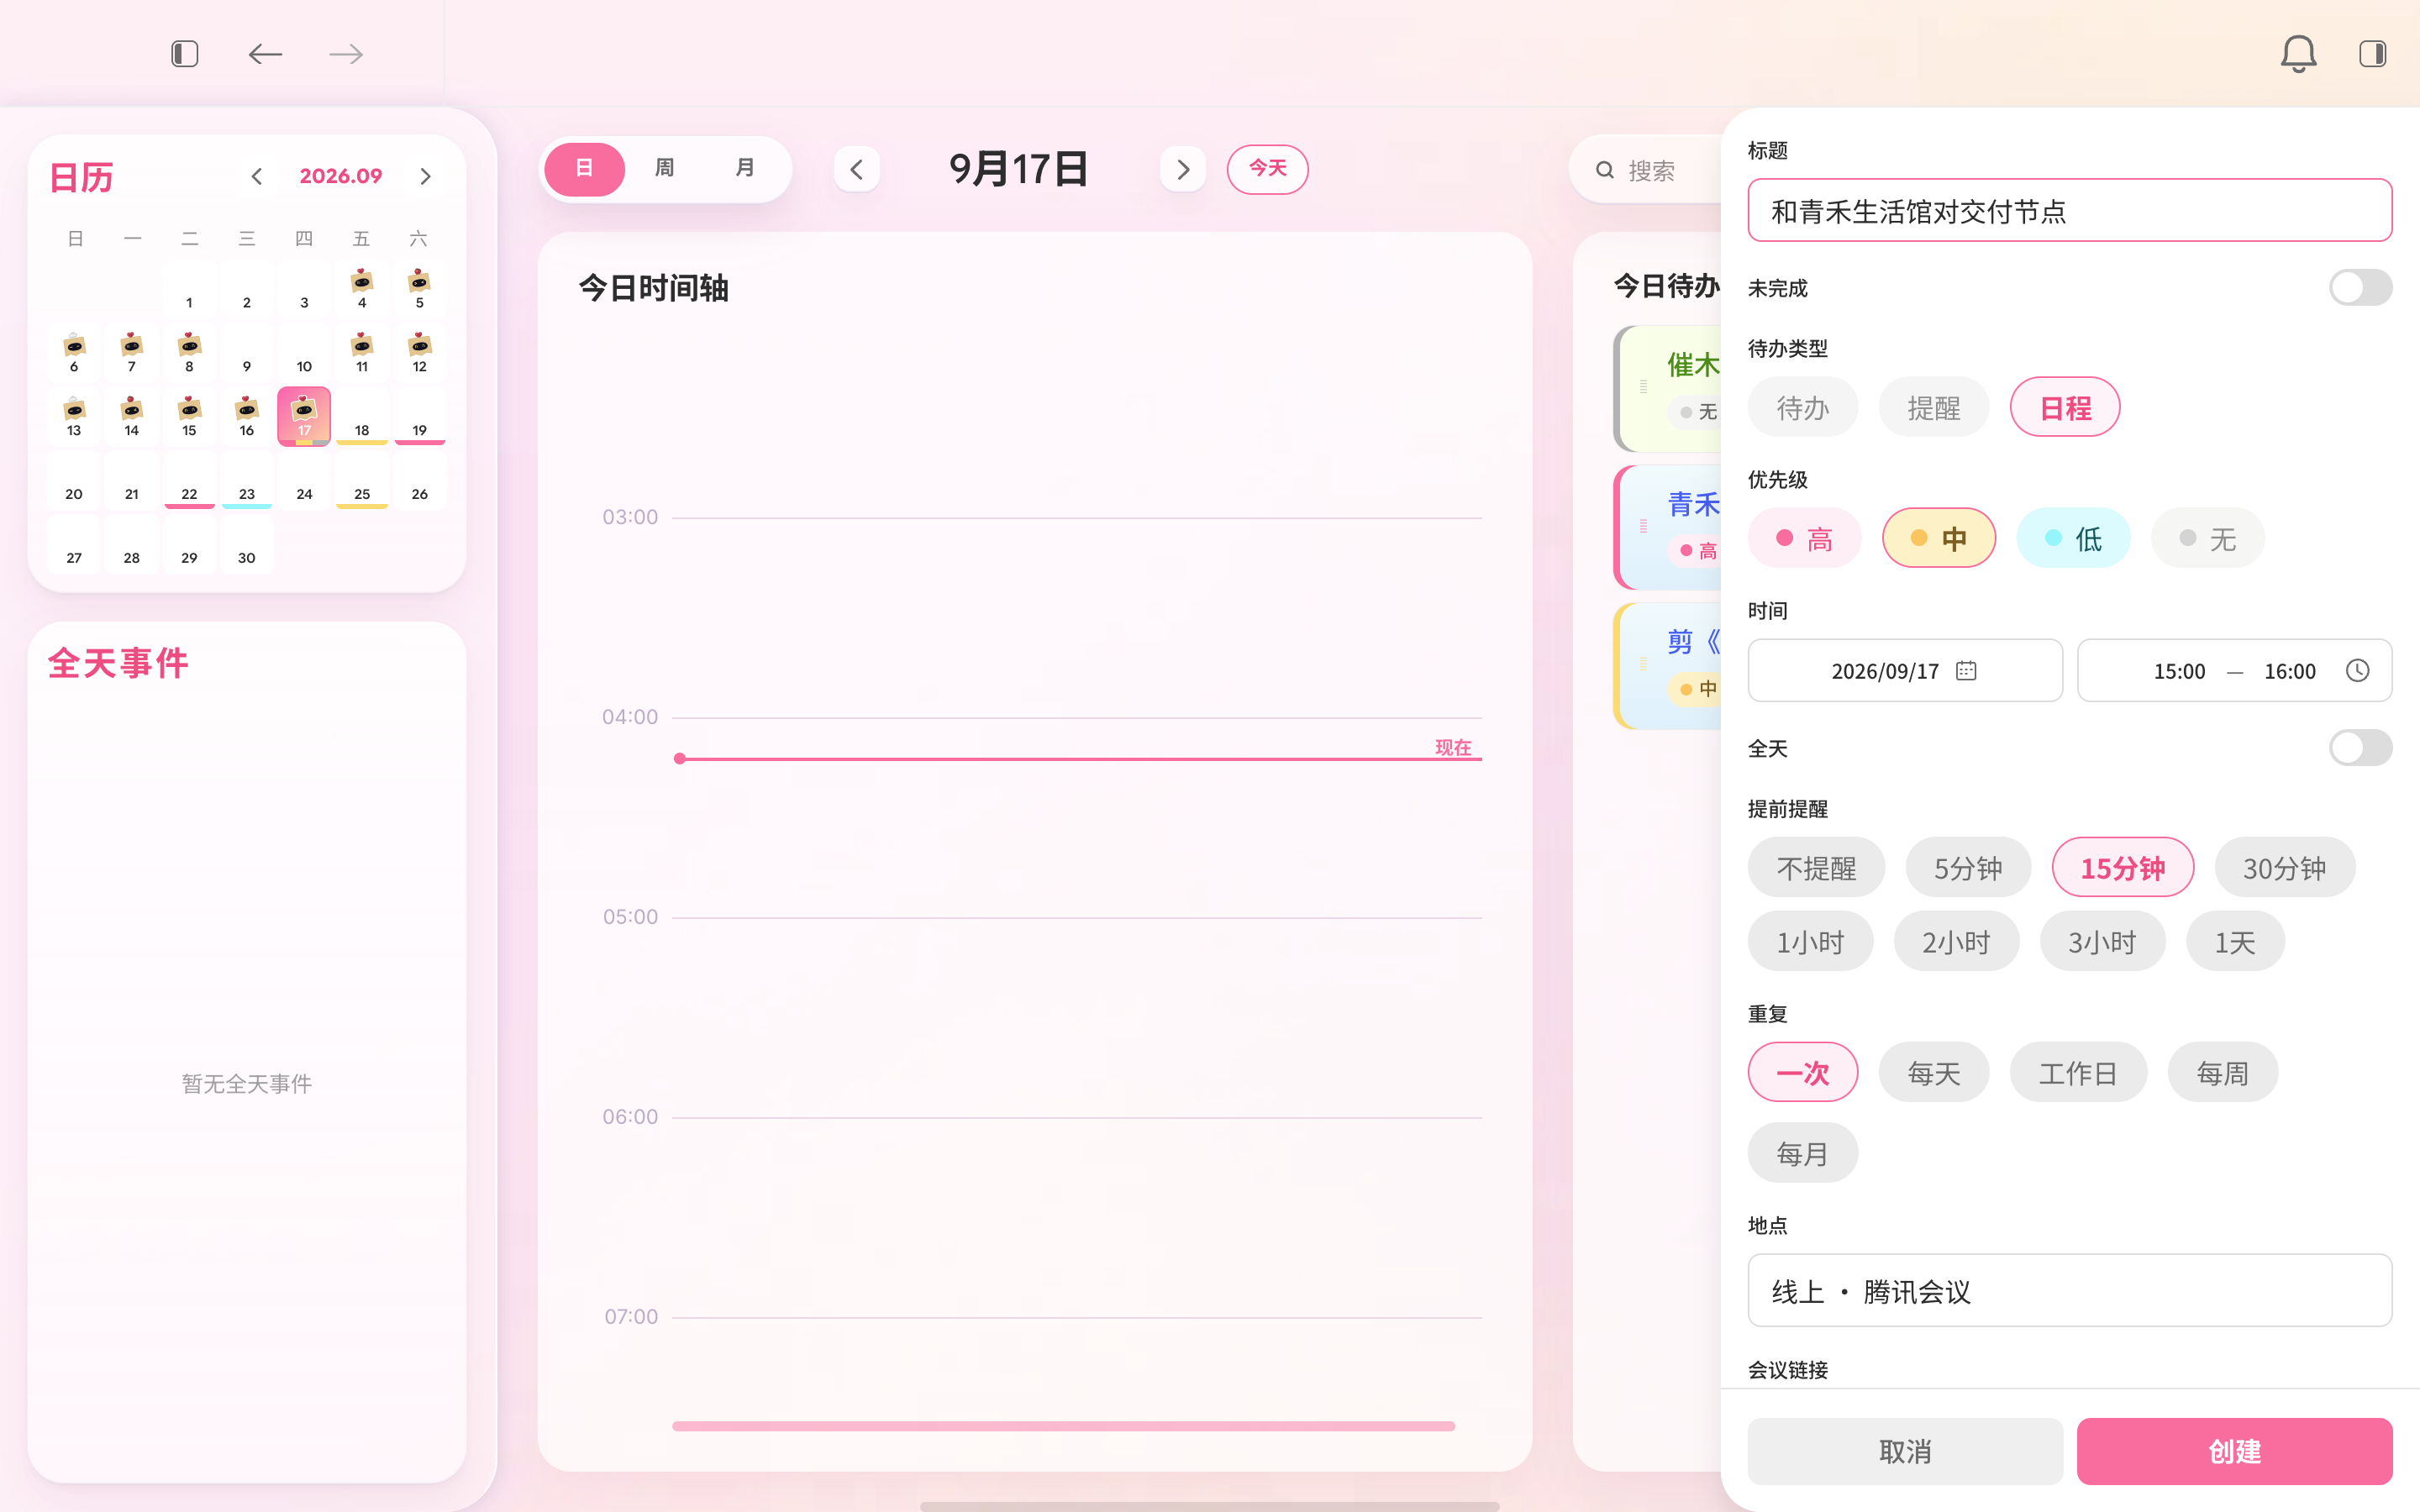
Set up recurring items
Reminders and events can occur once, daily, on weekdays, weekly, or monthly. For weekly recurrence, the Time row lets you select weekdays; for monthly recurrence, select a day of the month. Recurring items appear on future calendar dates according to your settings.
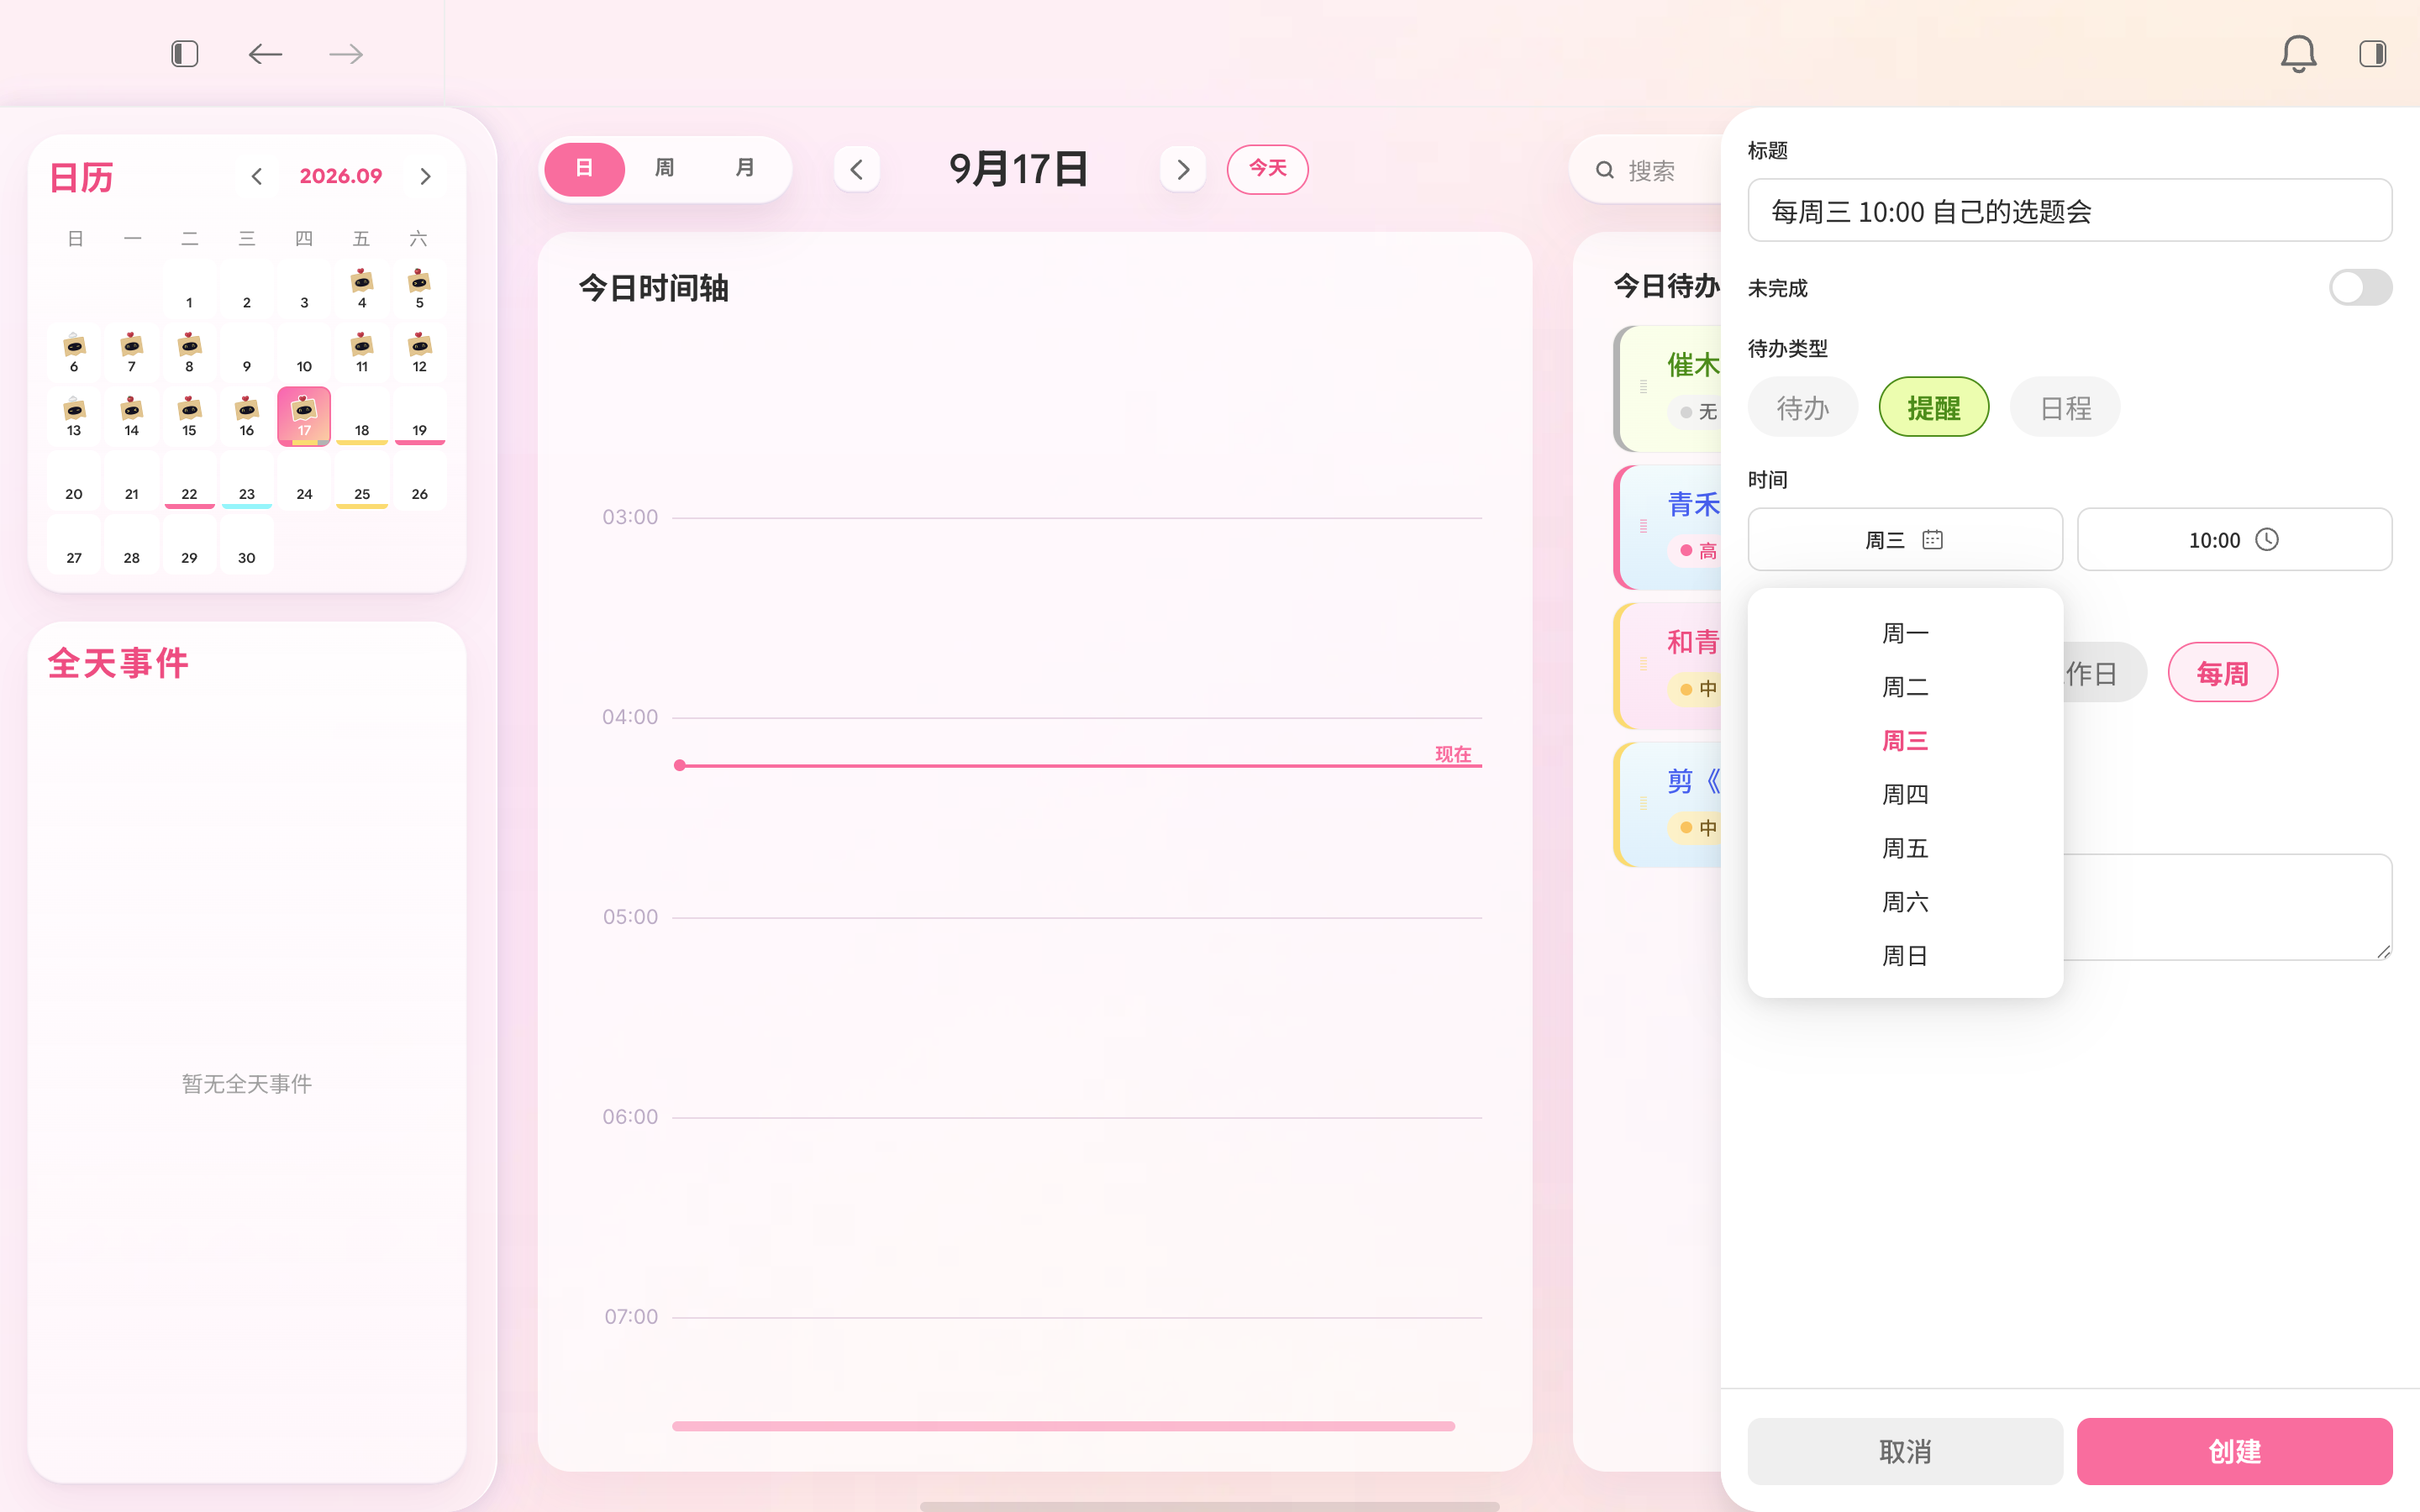
Edit or delete recurring items
When editing or deleting one occurrence of a recurring item, choose the scope. “This occurrence only” affects just that instance; “All occurrences” affects the entire series. Use the close button at the top right to cancel.
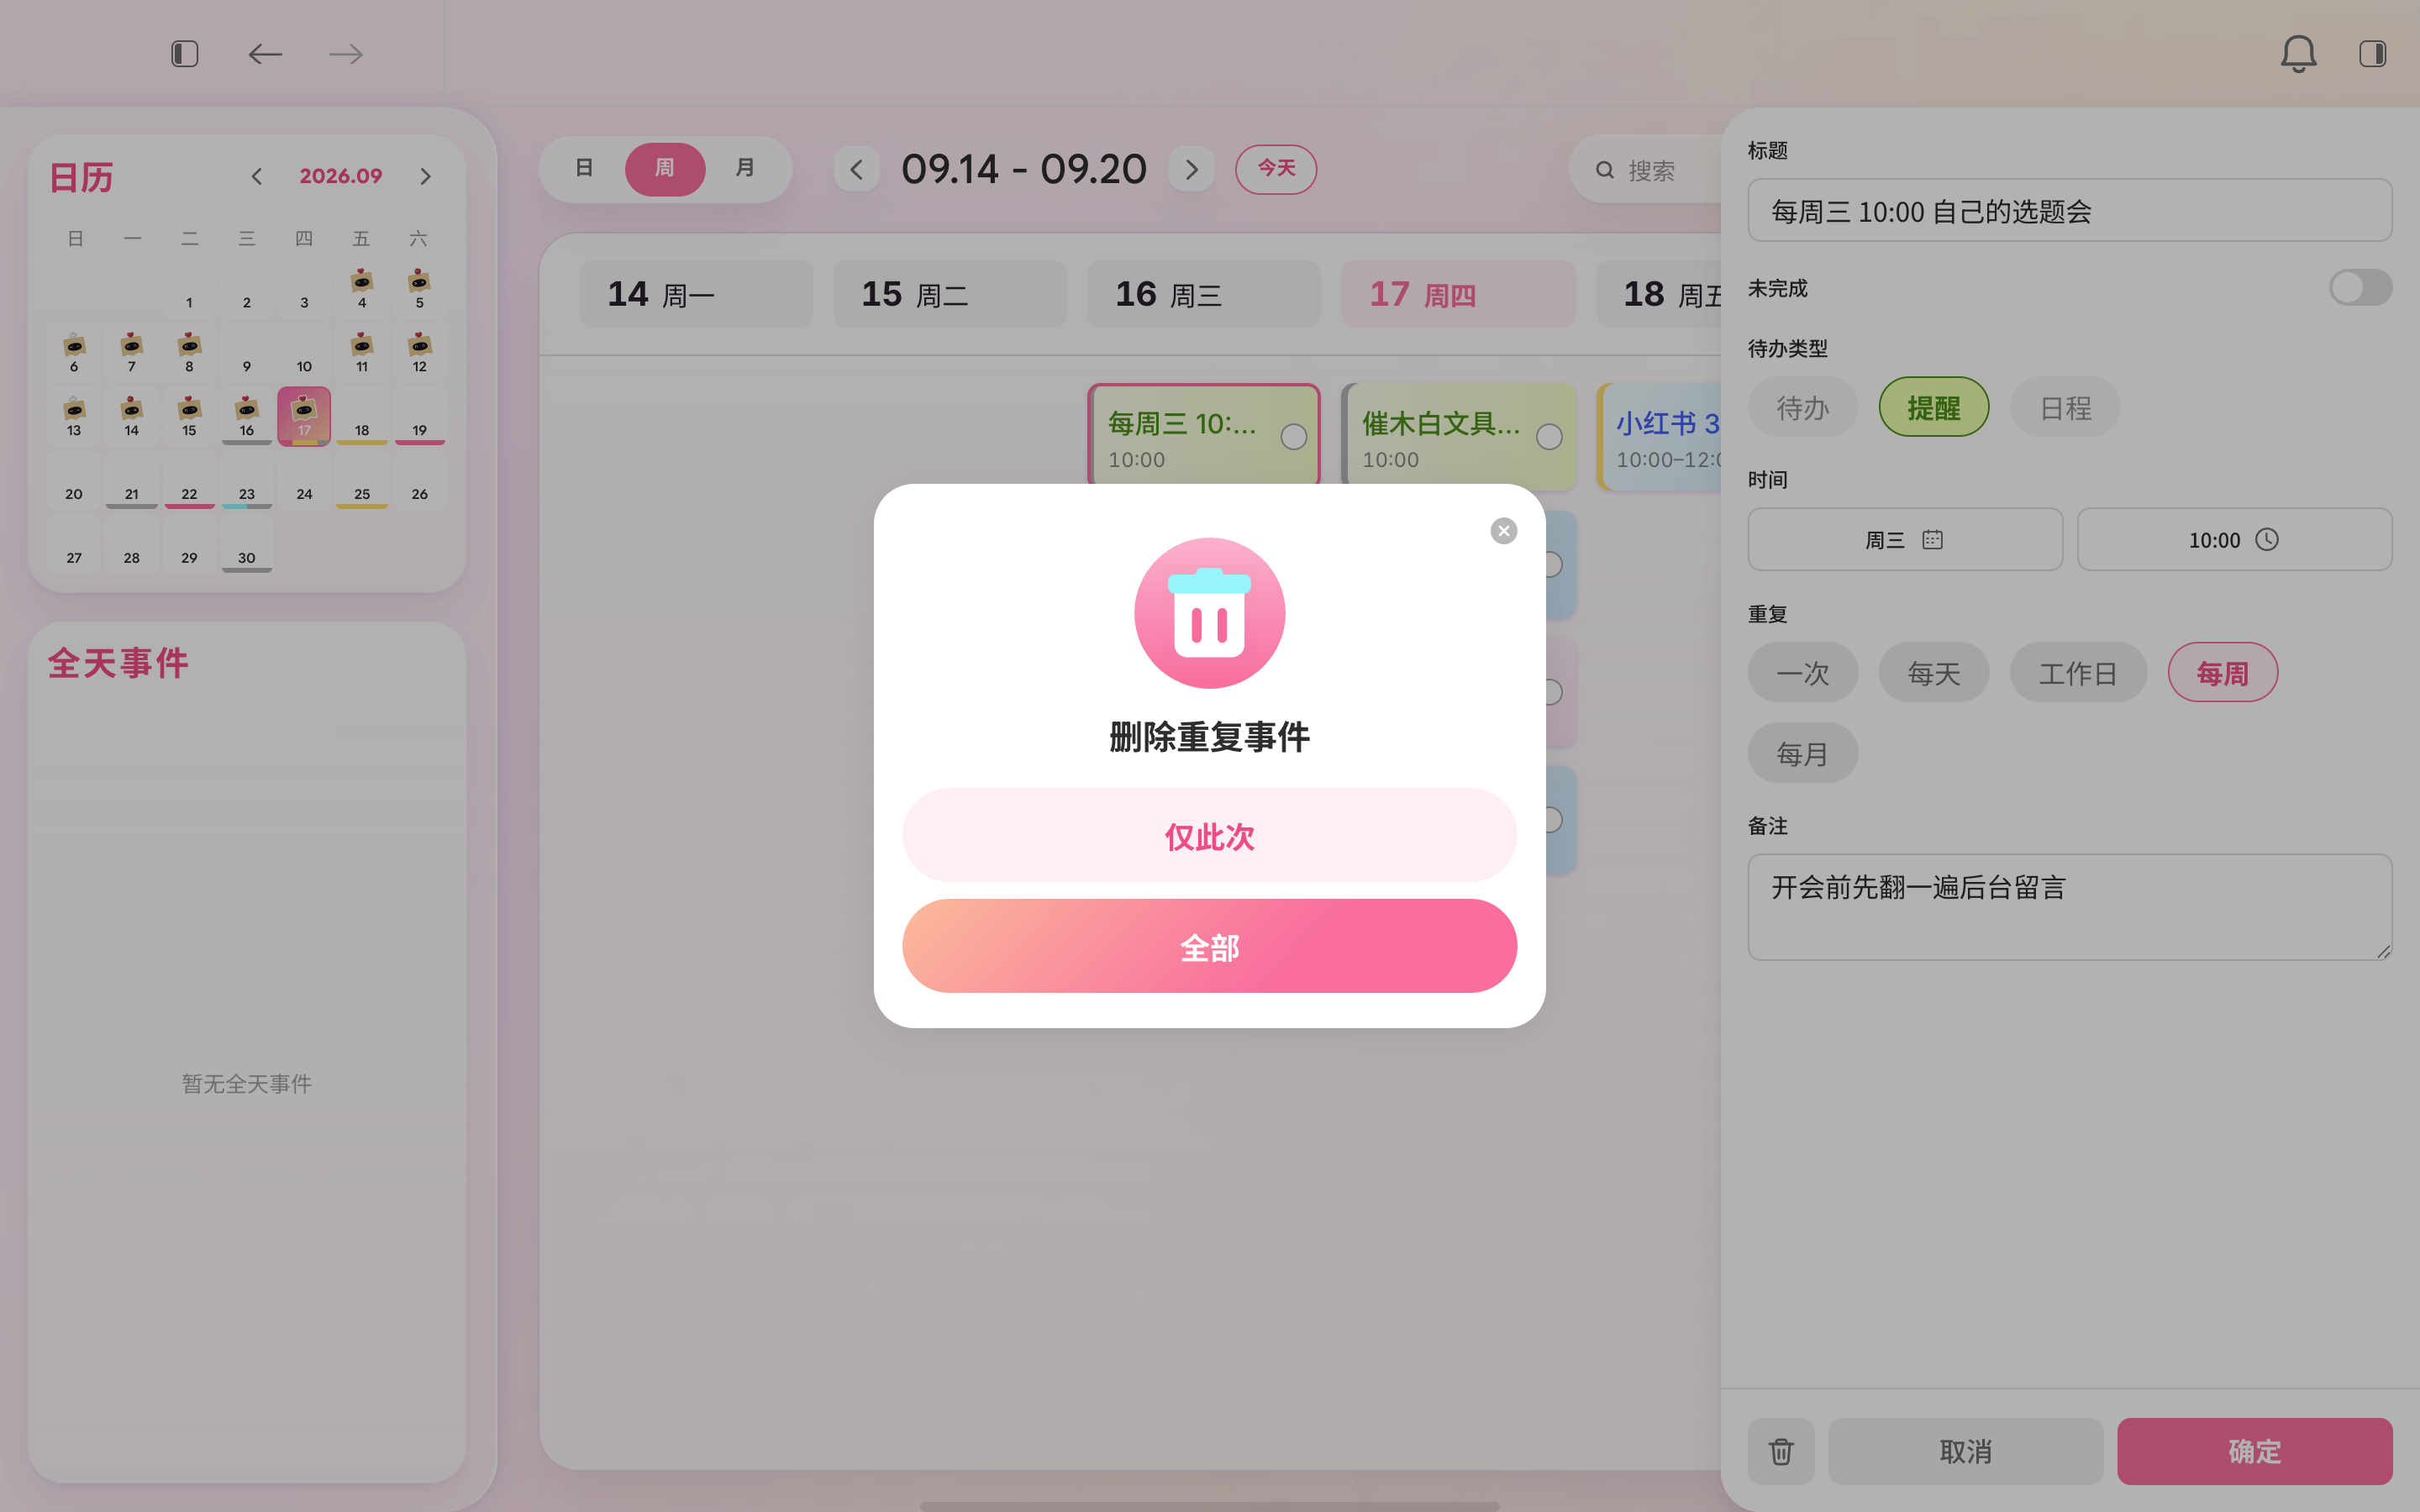
Day, week & month views
Day view places items along a timeline, with all-day events in the left panel’s All-day events area. When viewing today, a pink Now line marks the current time. Today’s Tasks on the right lists all items for the day; timed items appear both there and on the timeline. Select an item to open details, or select its circle to mark it complete or incomplete.
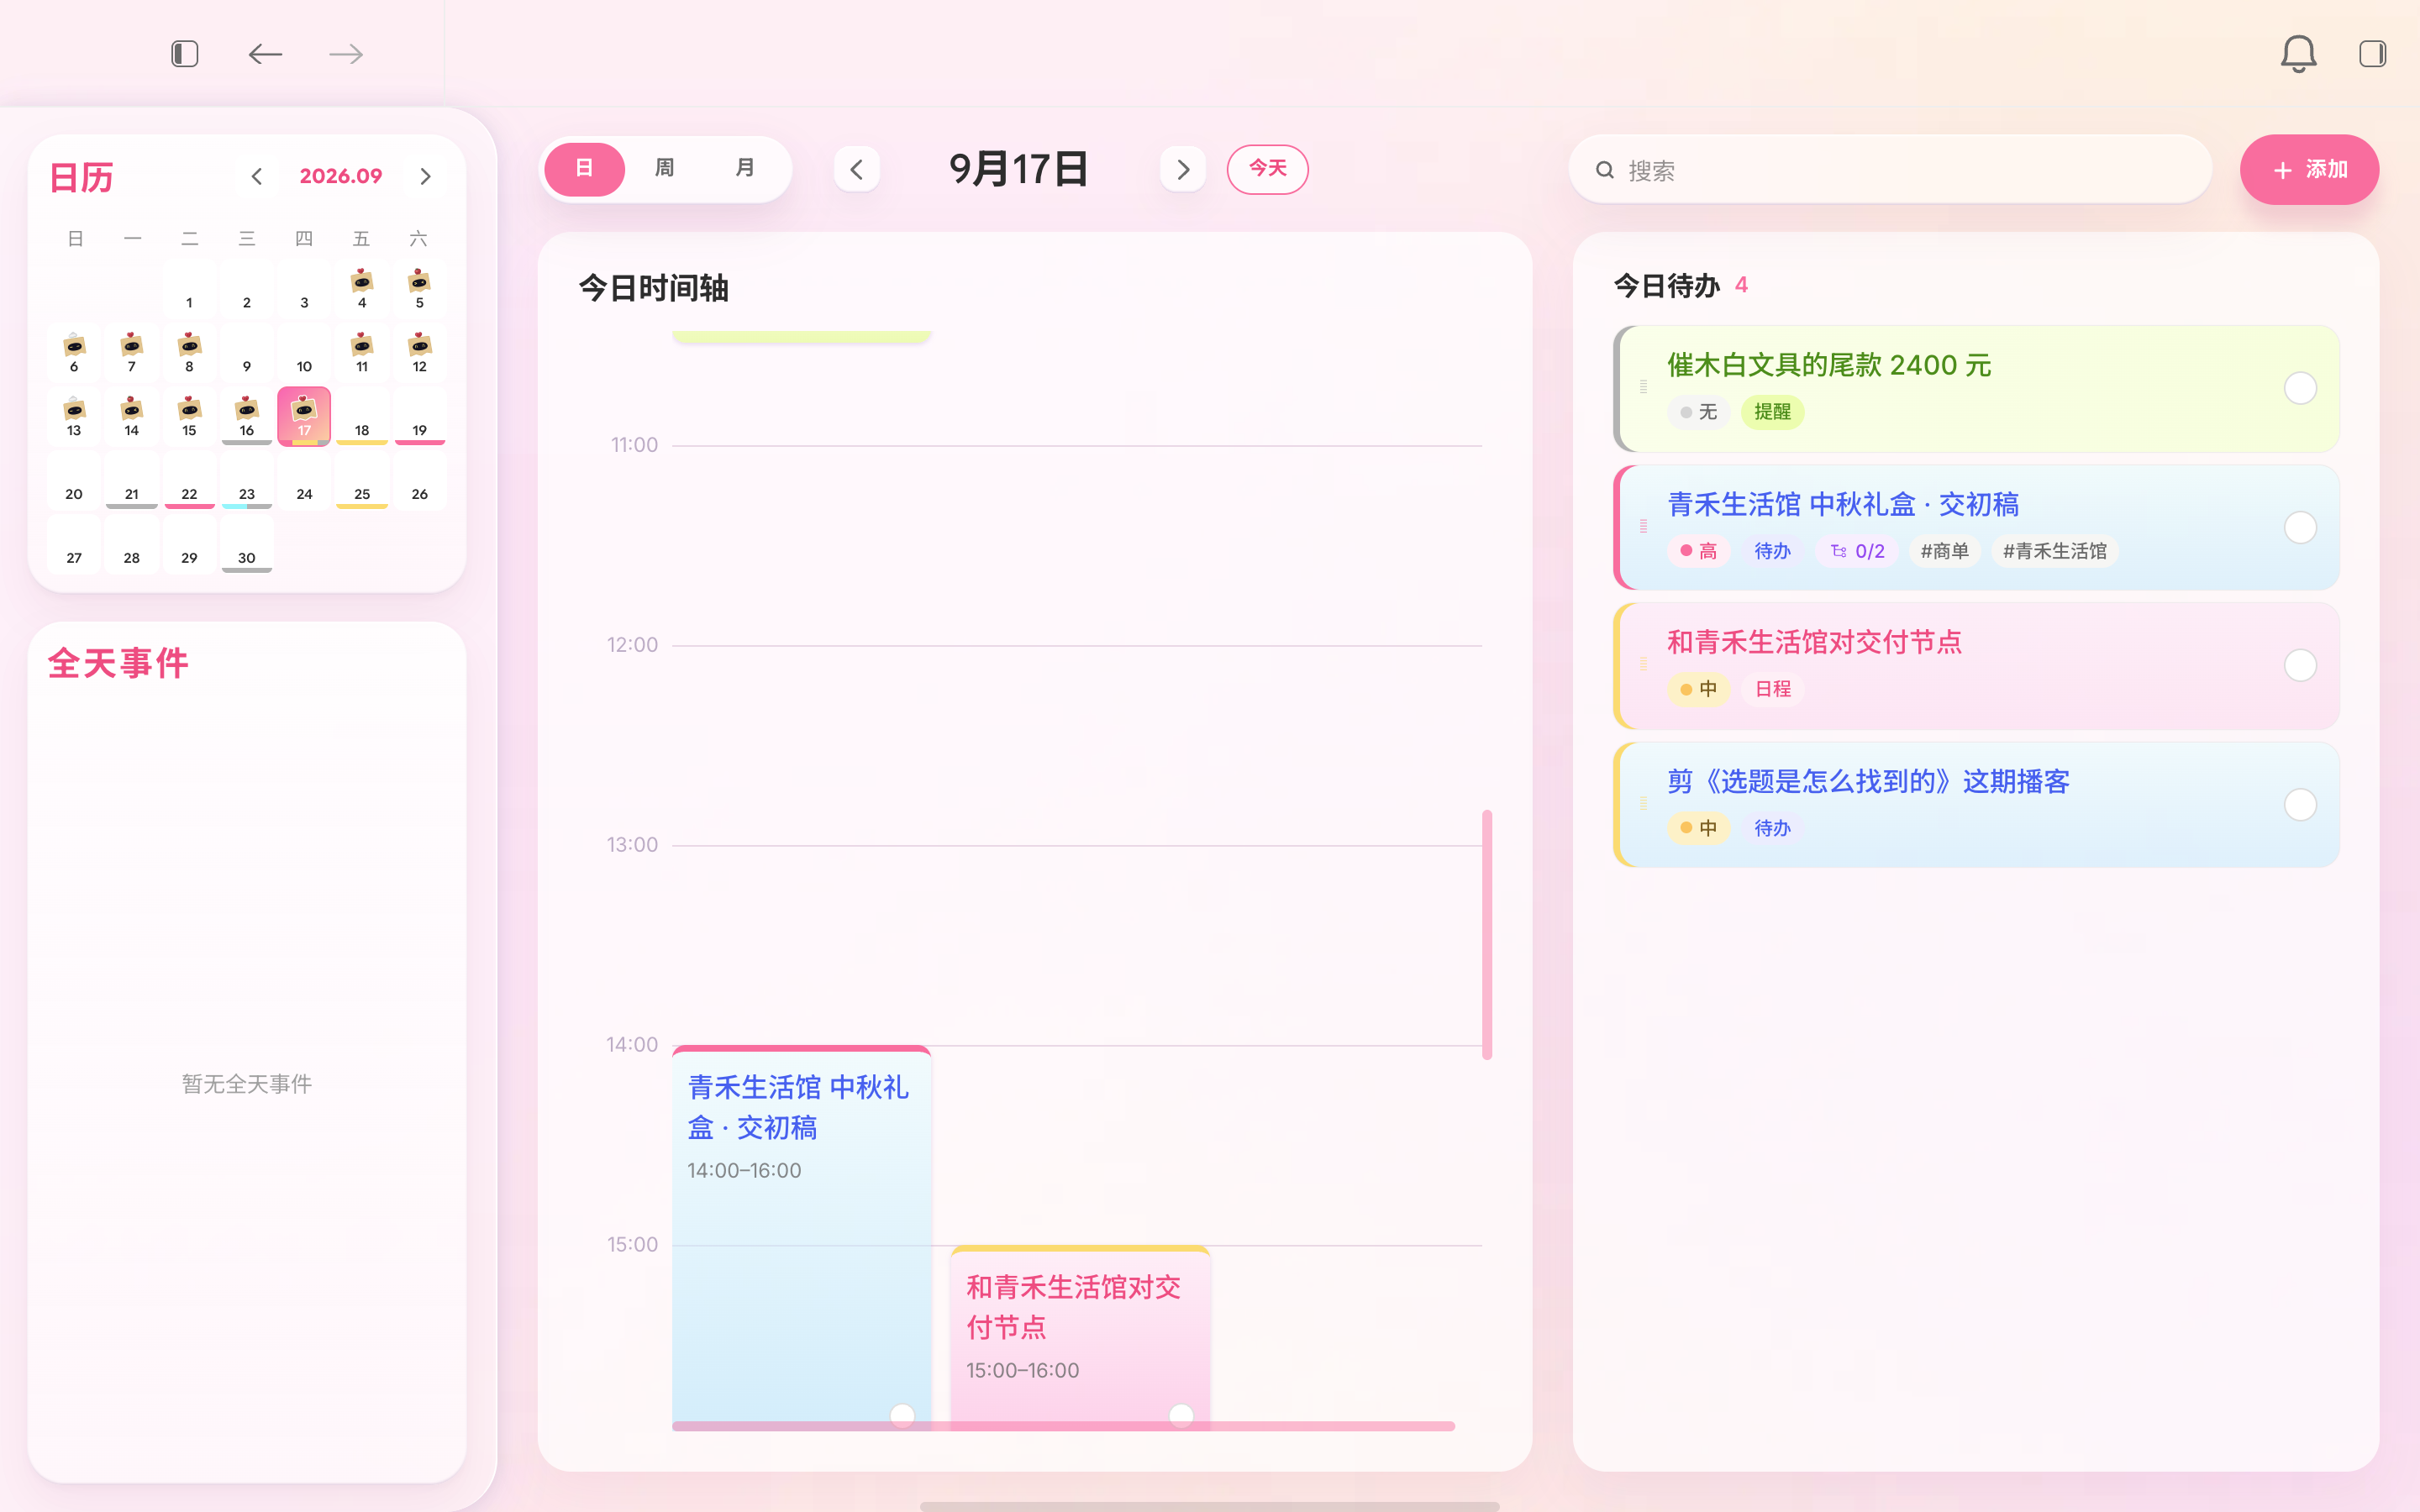
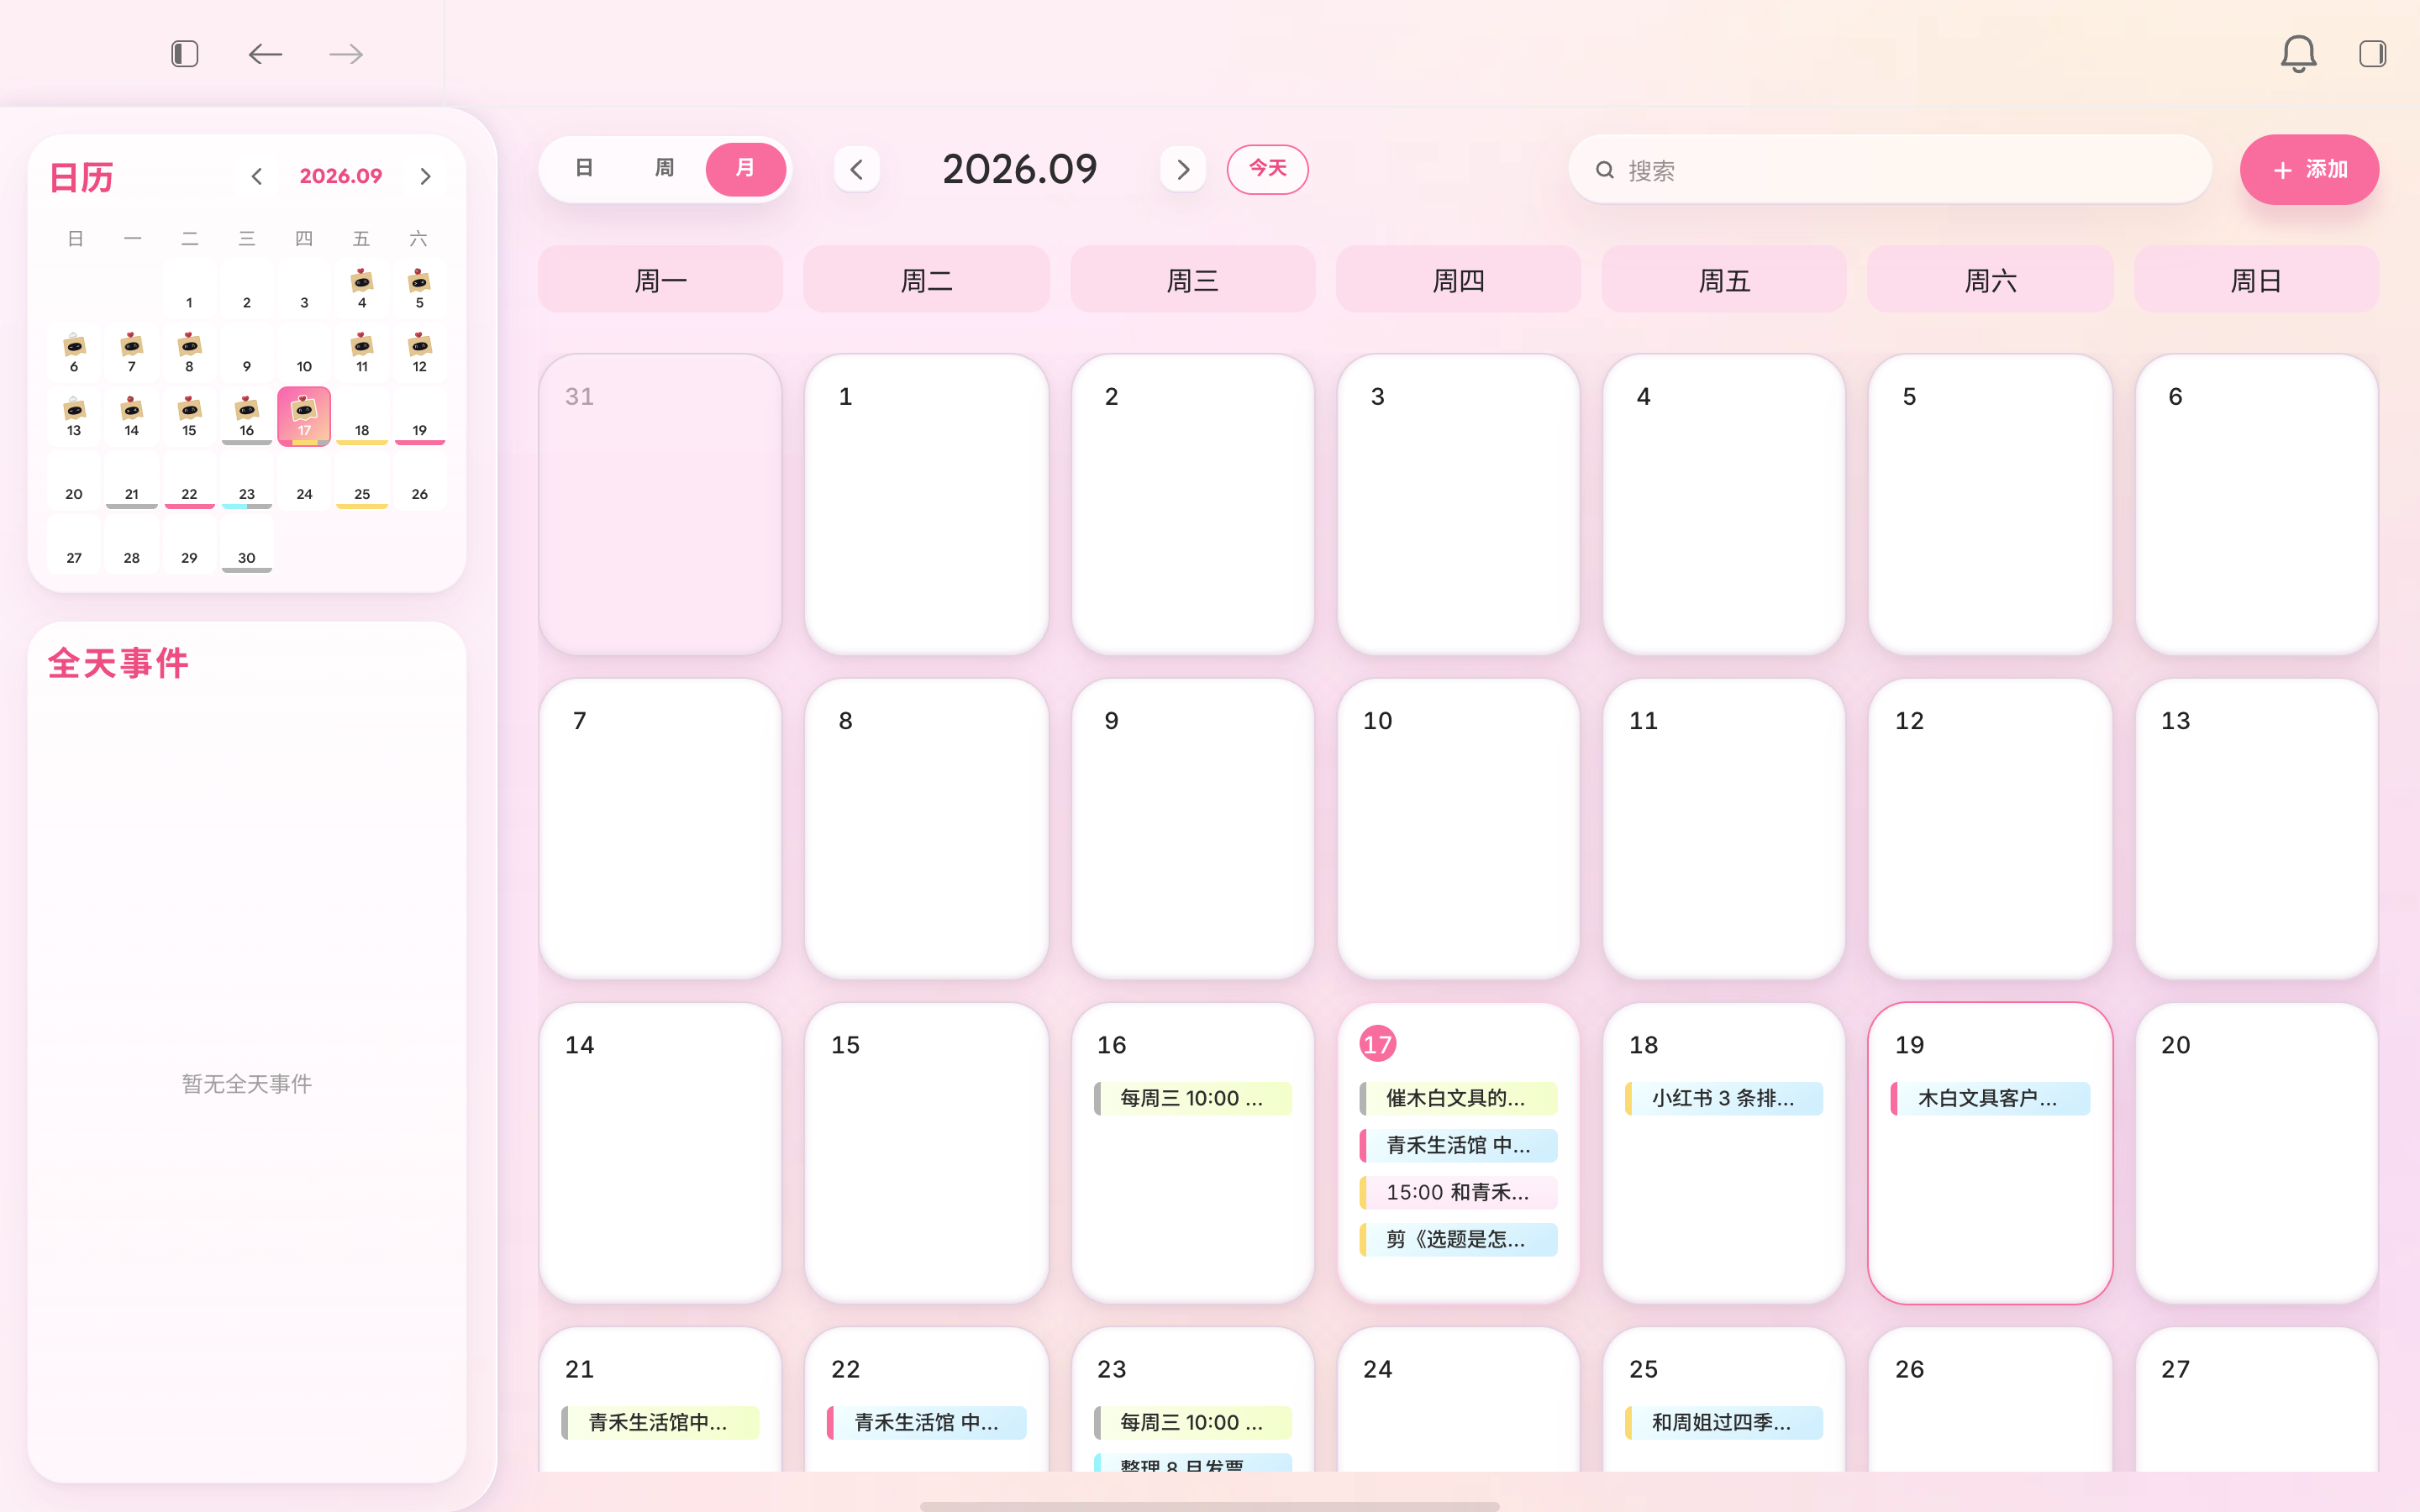
Month view gives you an overview of the entire month. If a day has more than four items, the first three and “View more” are shown. Week view arranges items by weekday; select “+ New” at the bottom of a column to add an item for that day. The calendar on the left stays in sync with the main view. Select a date to jump to it; date markers update as items are added or removed.

Search & filters
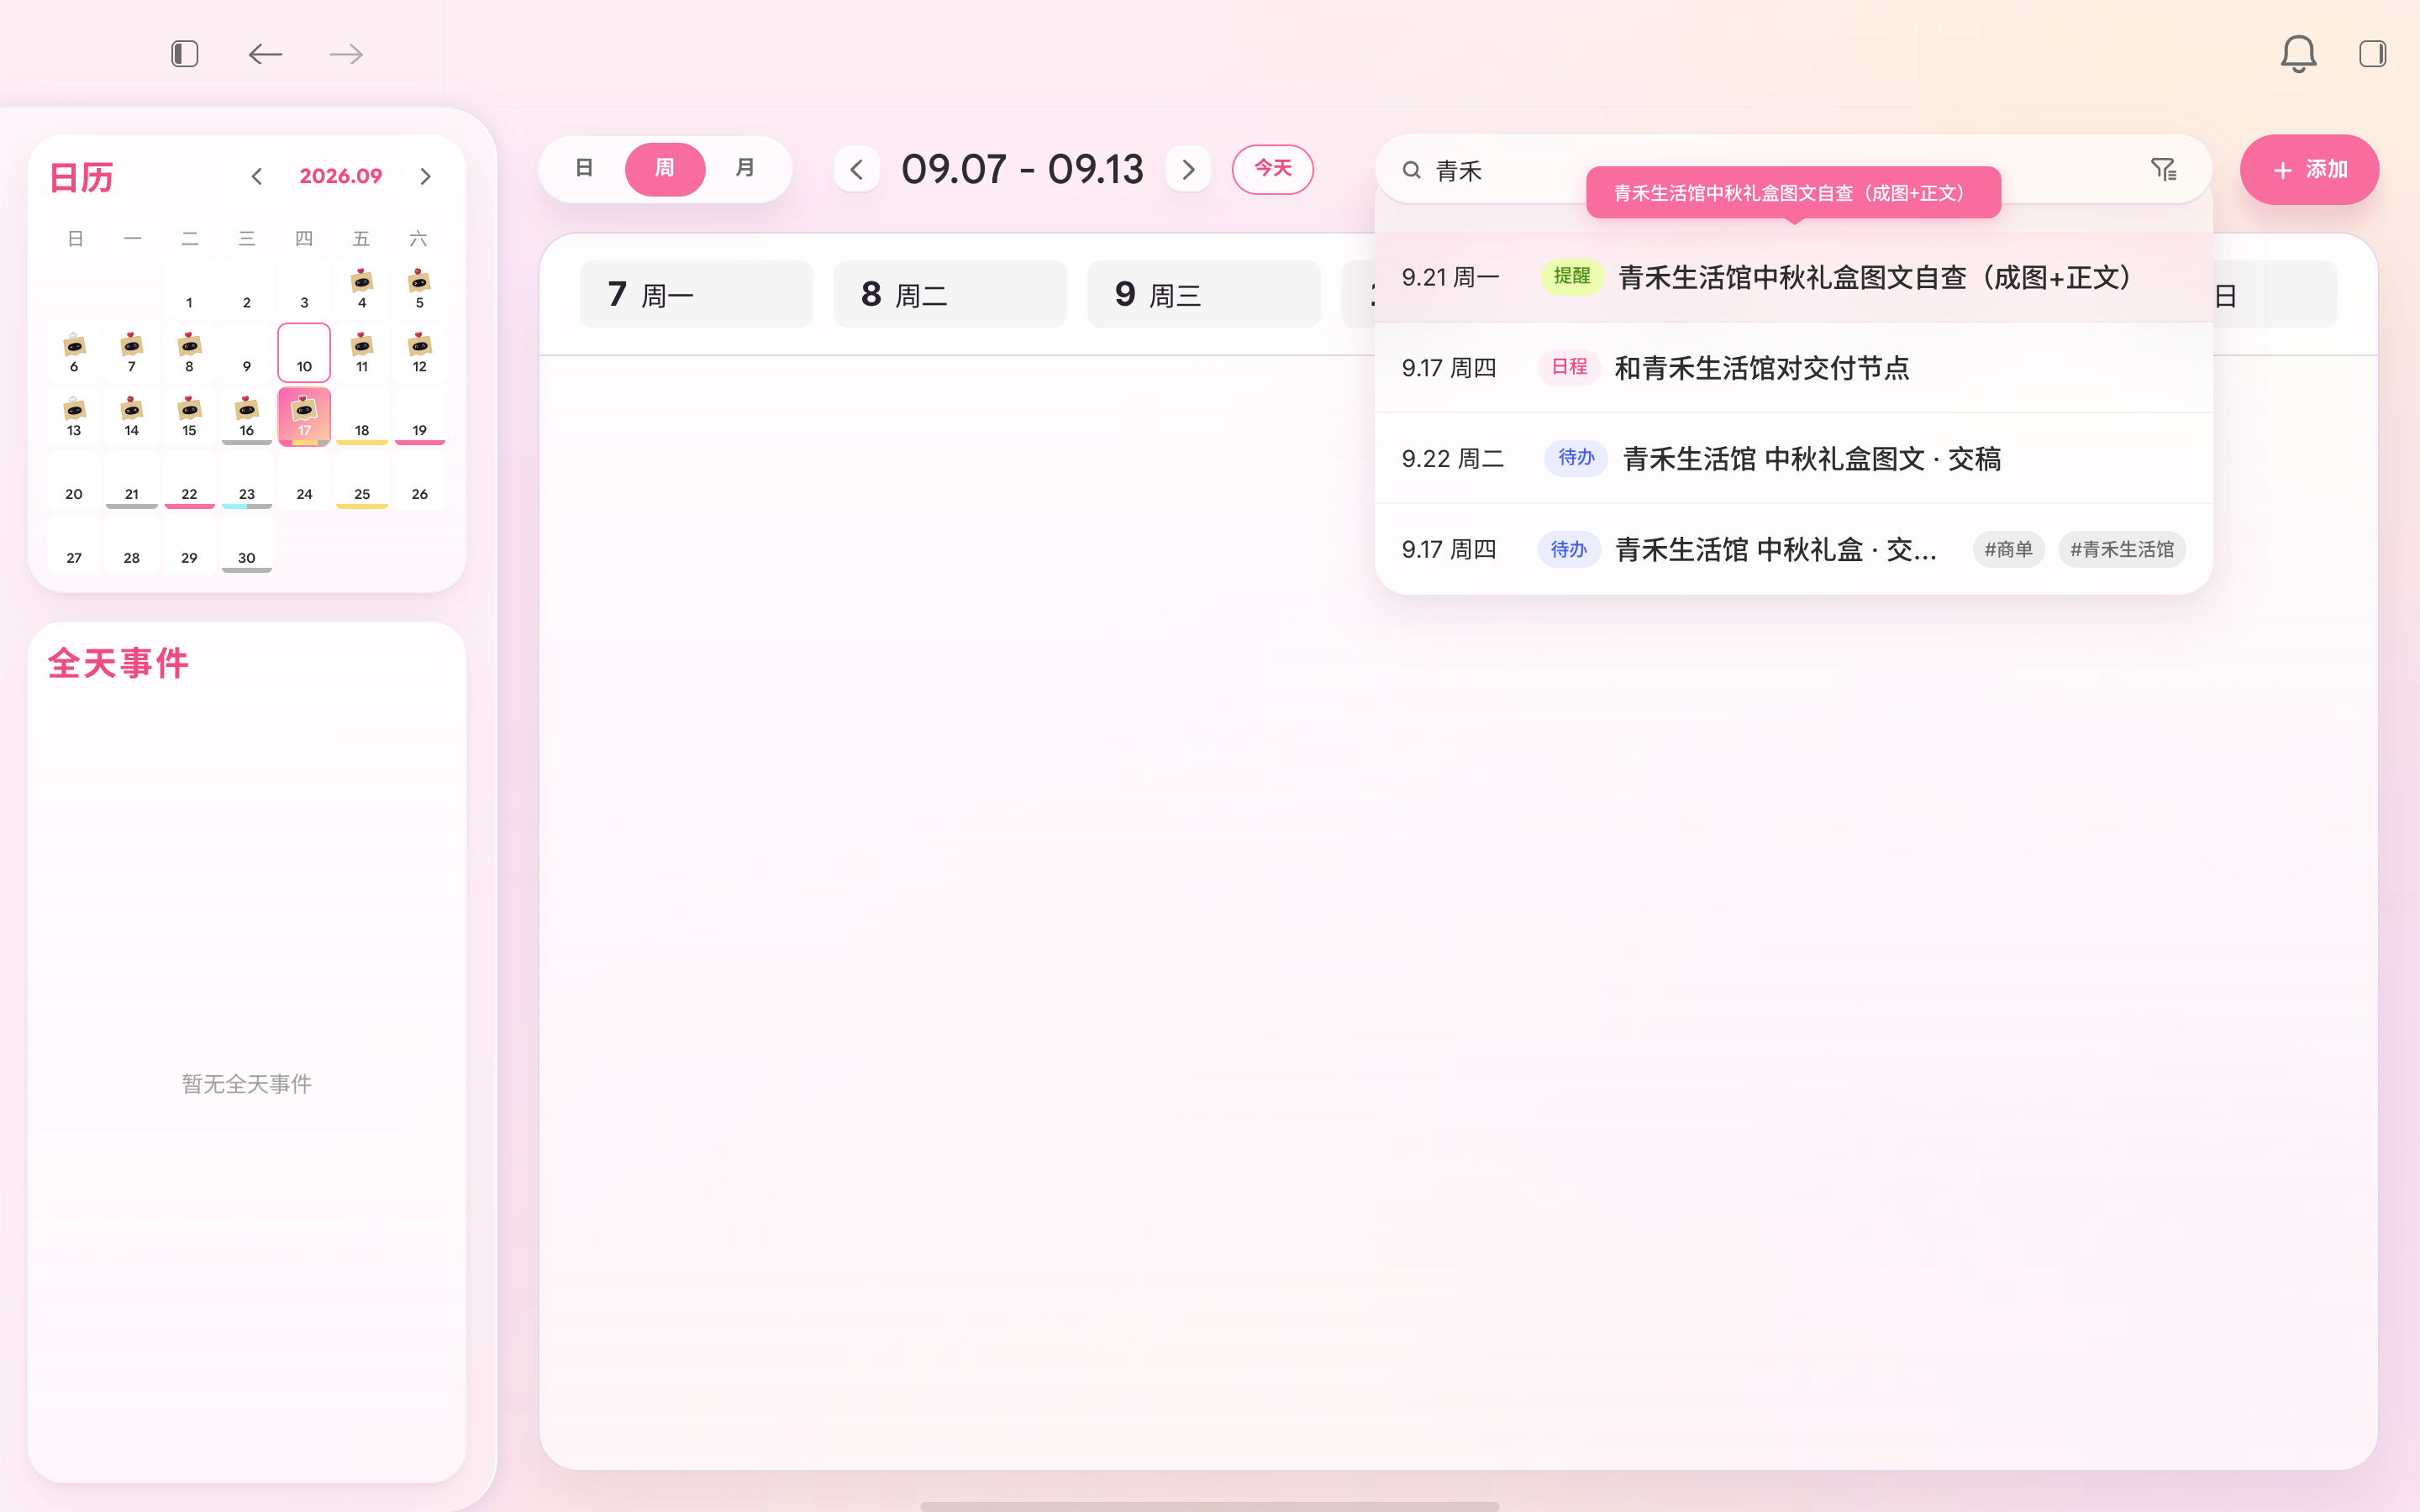
Enter keywords in Search at the top to search titles, notes, tags, and subtasks. With multiple keywords, results must contain all of them. Select a result to jump to its date and briefly highlight the item.
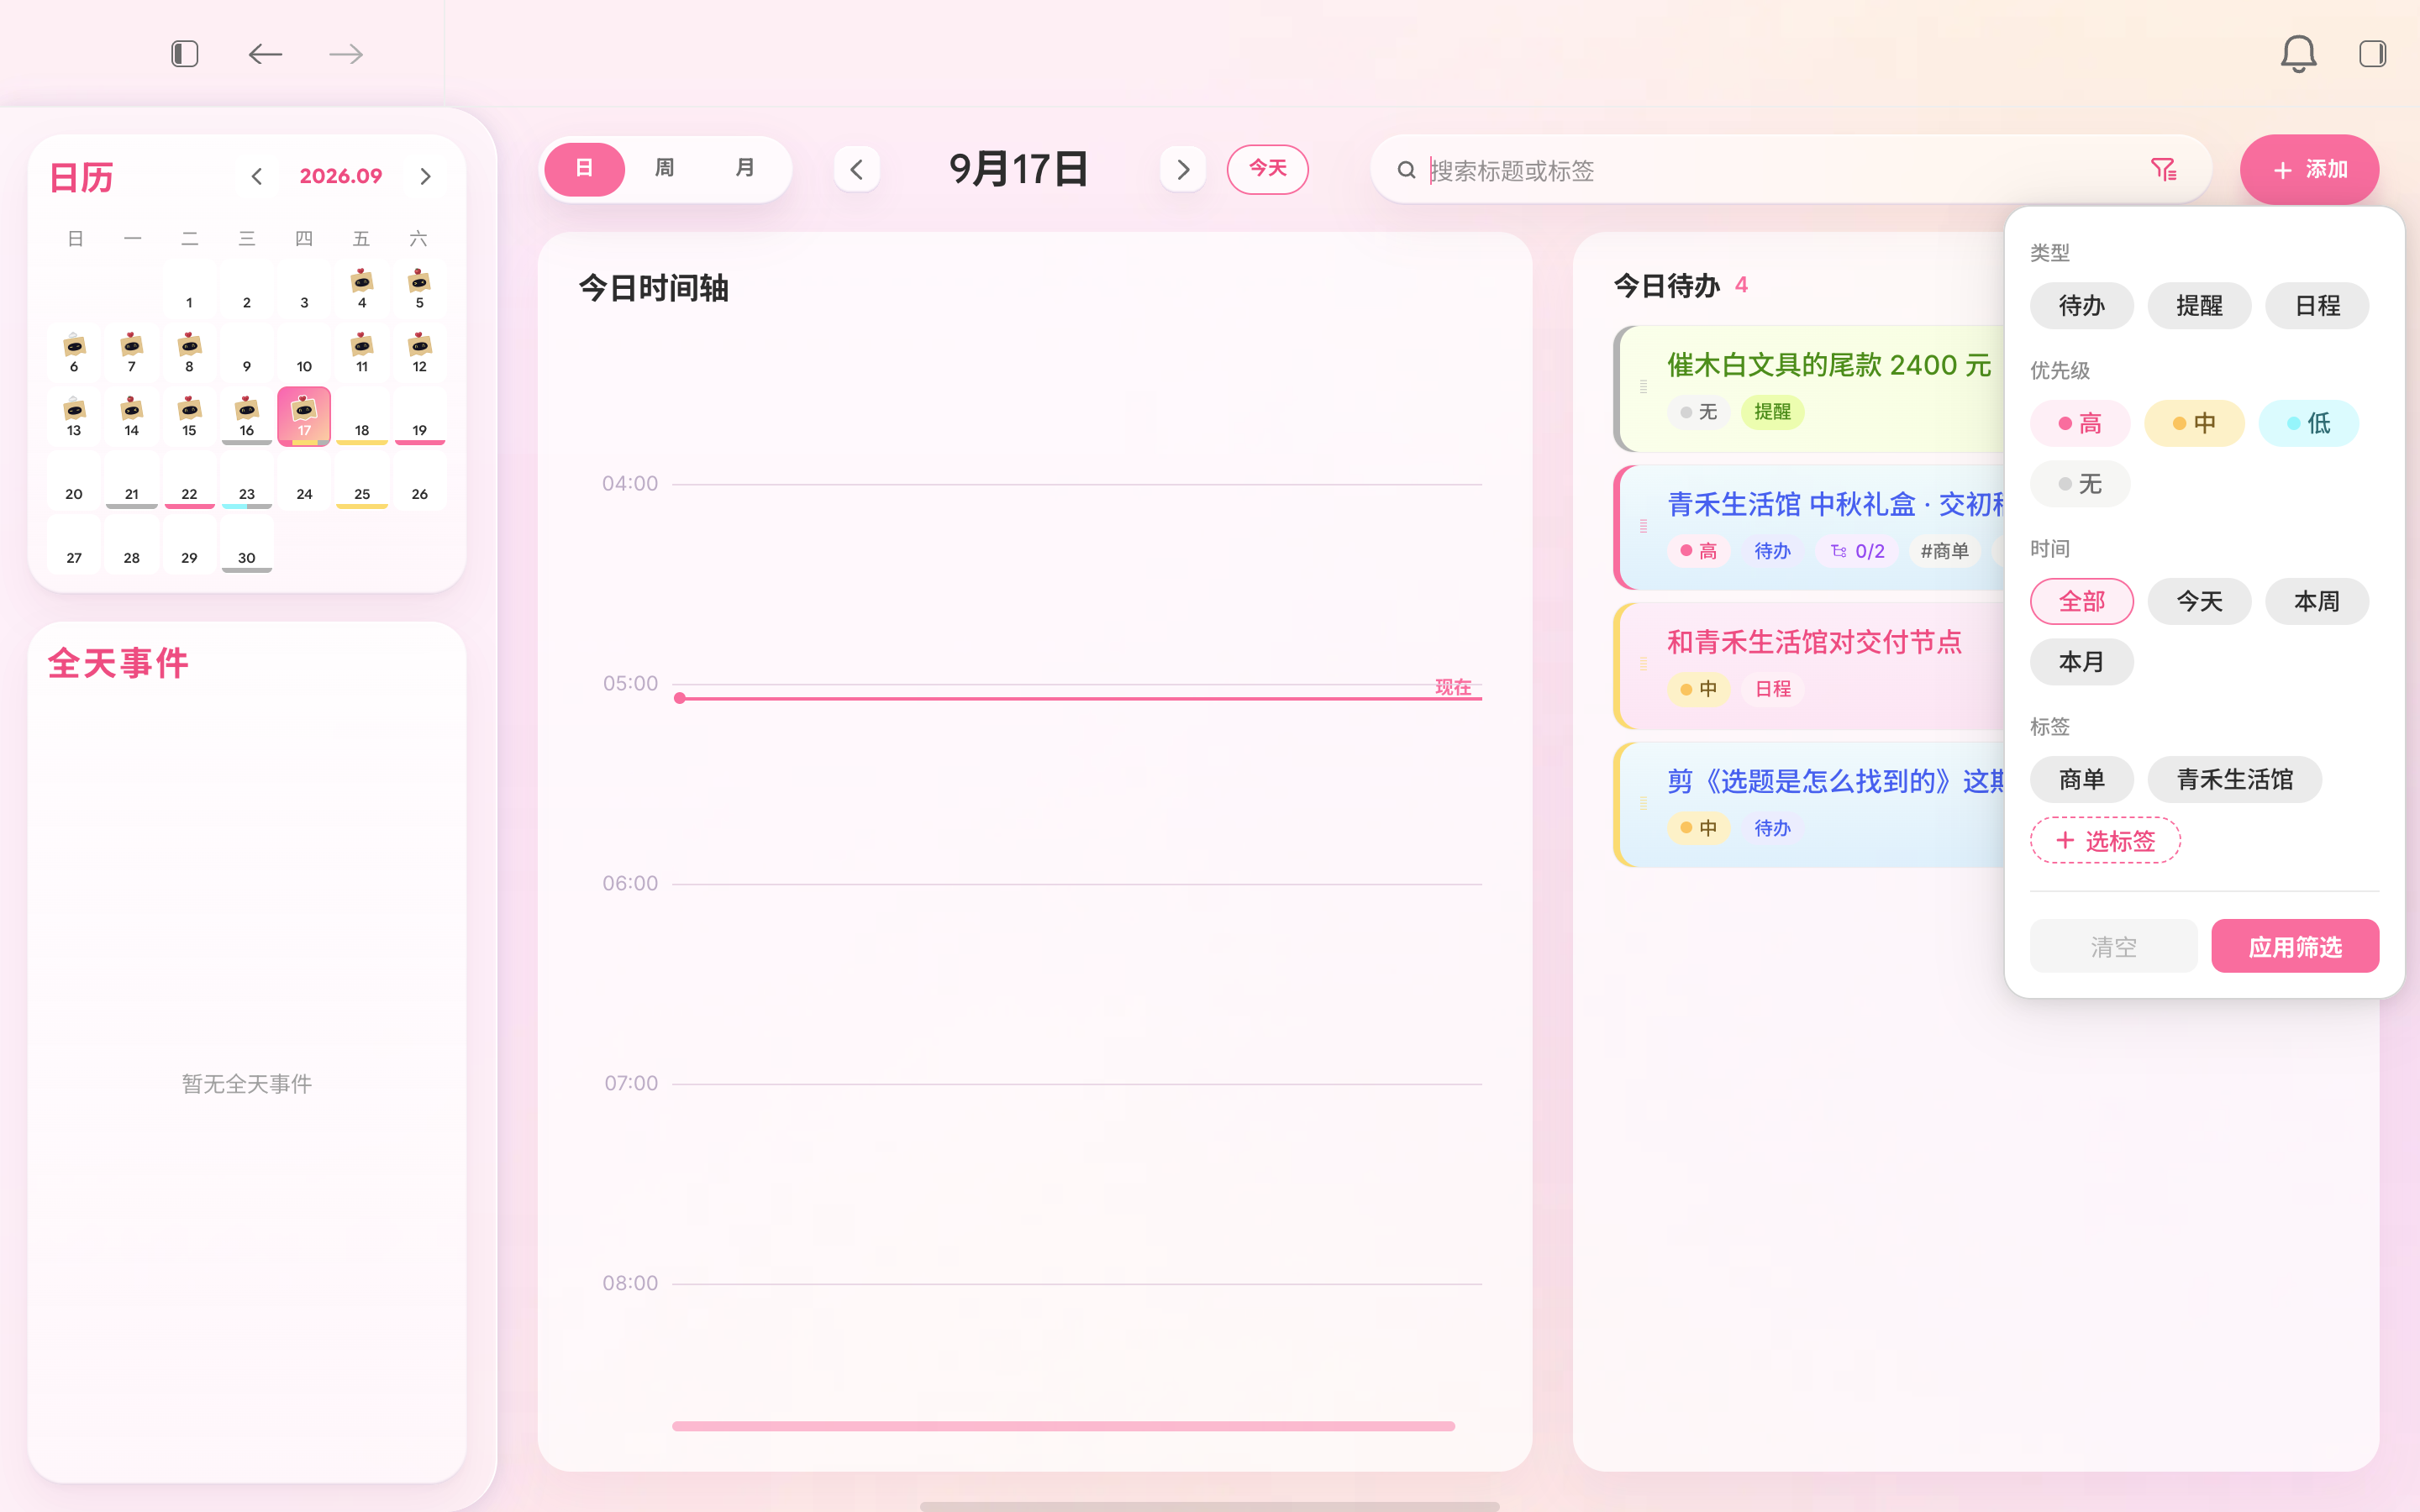
Select the funnel beside Search to filter by type, priority, tags, and time. You can select multiple options within each category, and categories combine. Time options are All, Today, This week, and This month. Select “Apply filters” to see results or Clear to restore all items.
A message appears if there is a network problem. Select Retry to reload.
Companion
The Companion page shows your companion and its name card on the left. Firefly balance and badges are at the top left. On the right are four tabs: Wardrobe, Firefly Shop, Personality, and Companion Diary. Select the Companion icon in the bottom dock to open it.
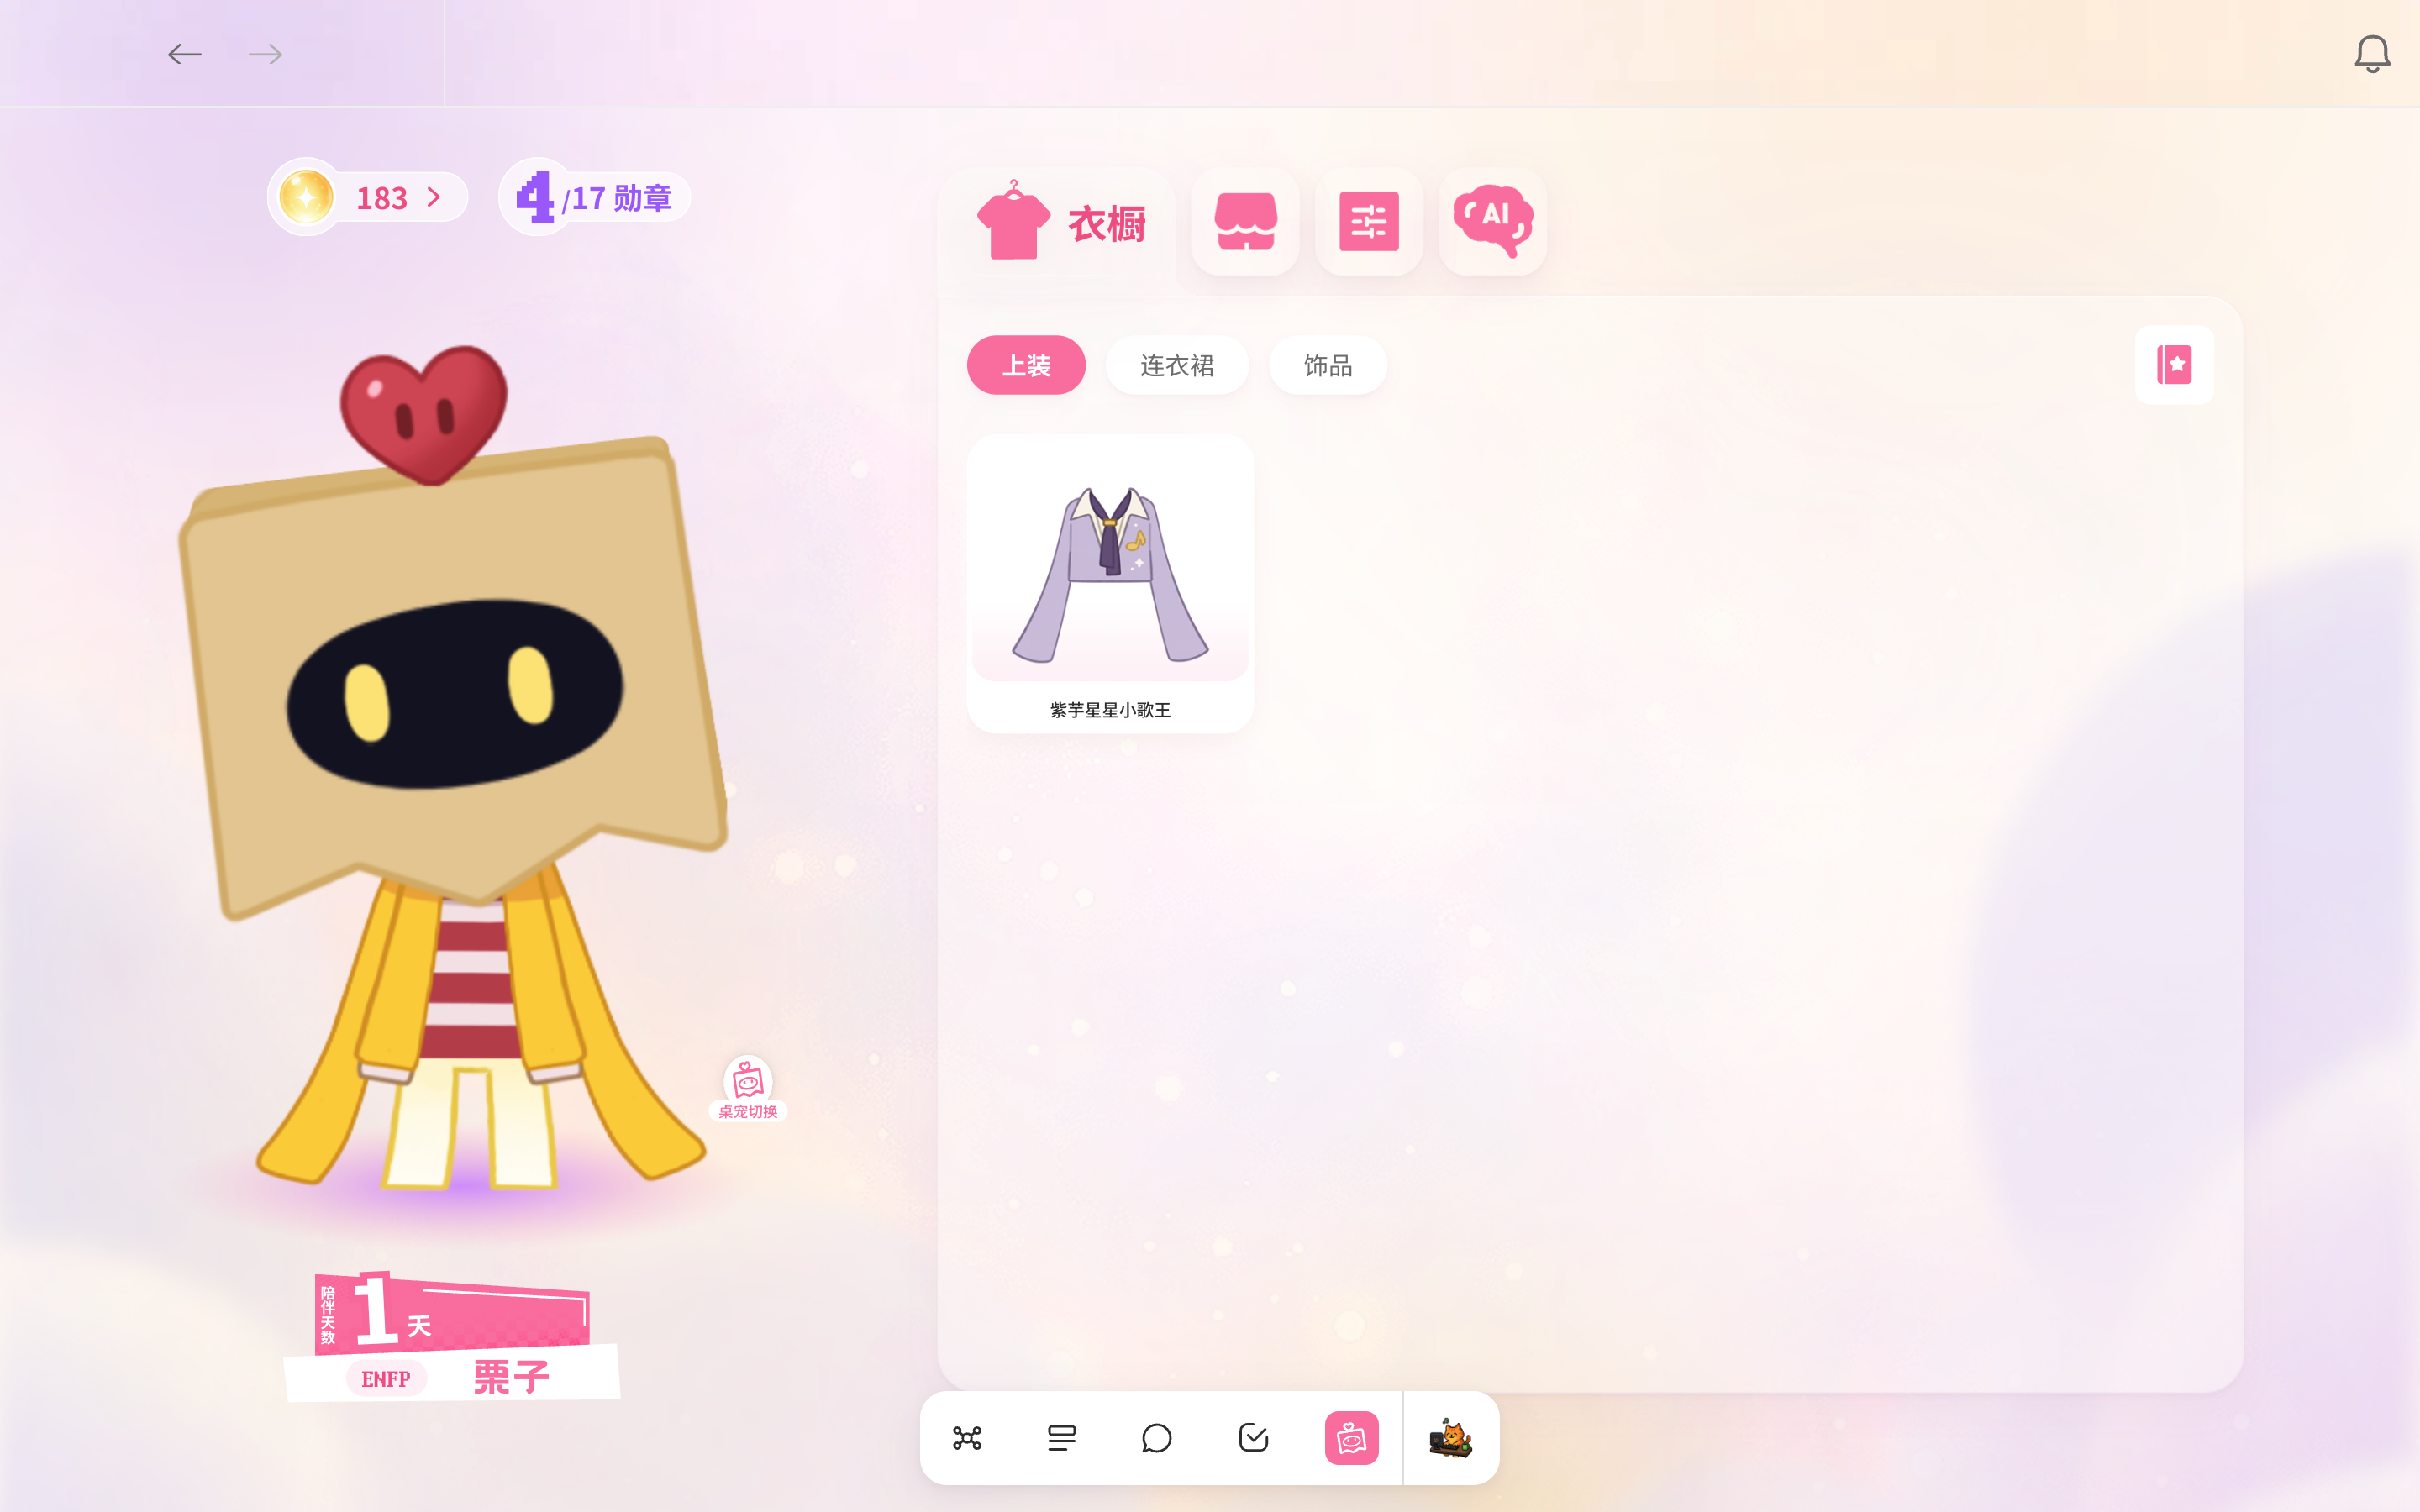
Firefly balance & ledger
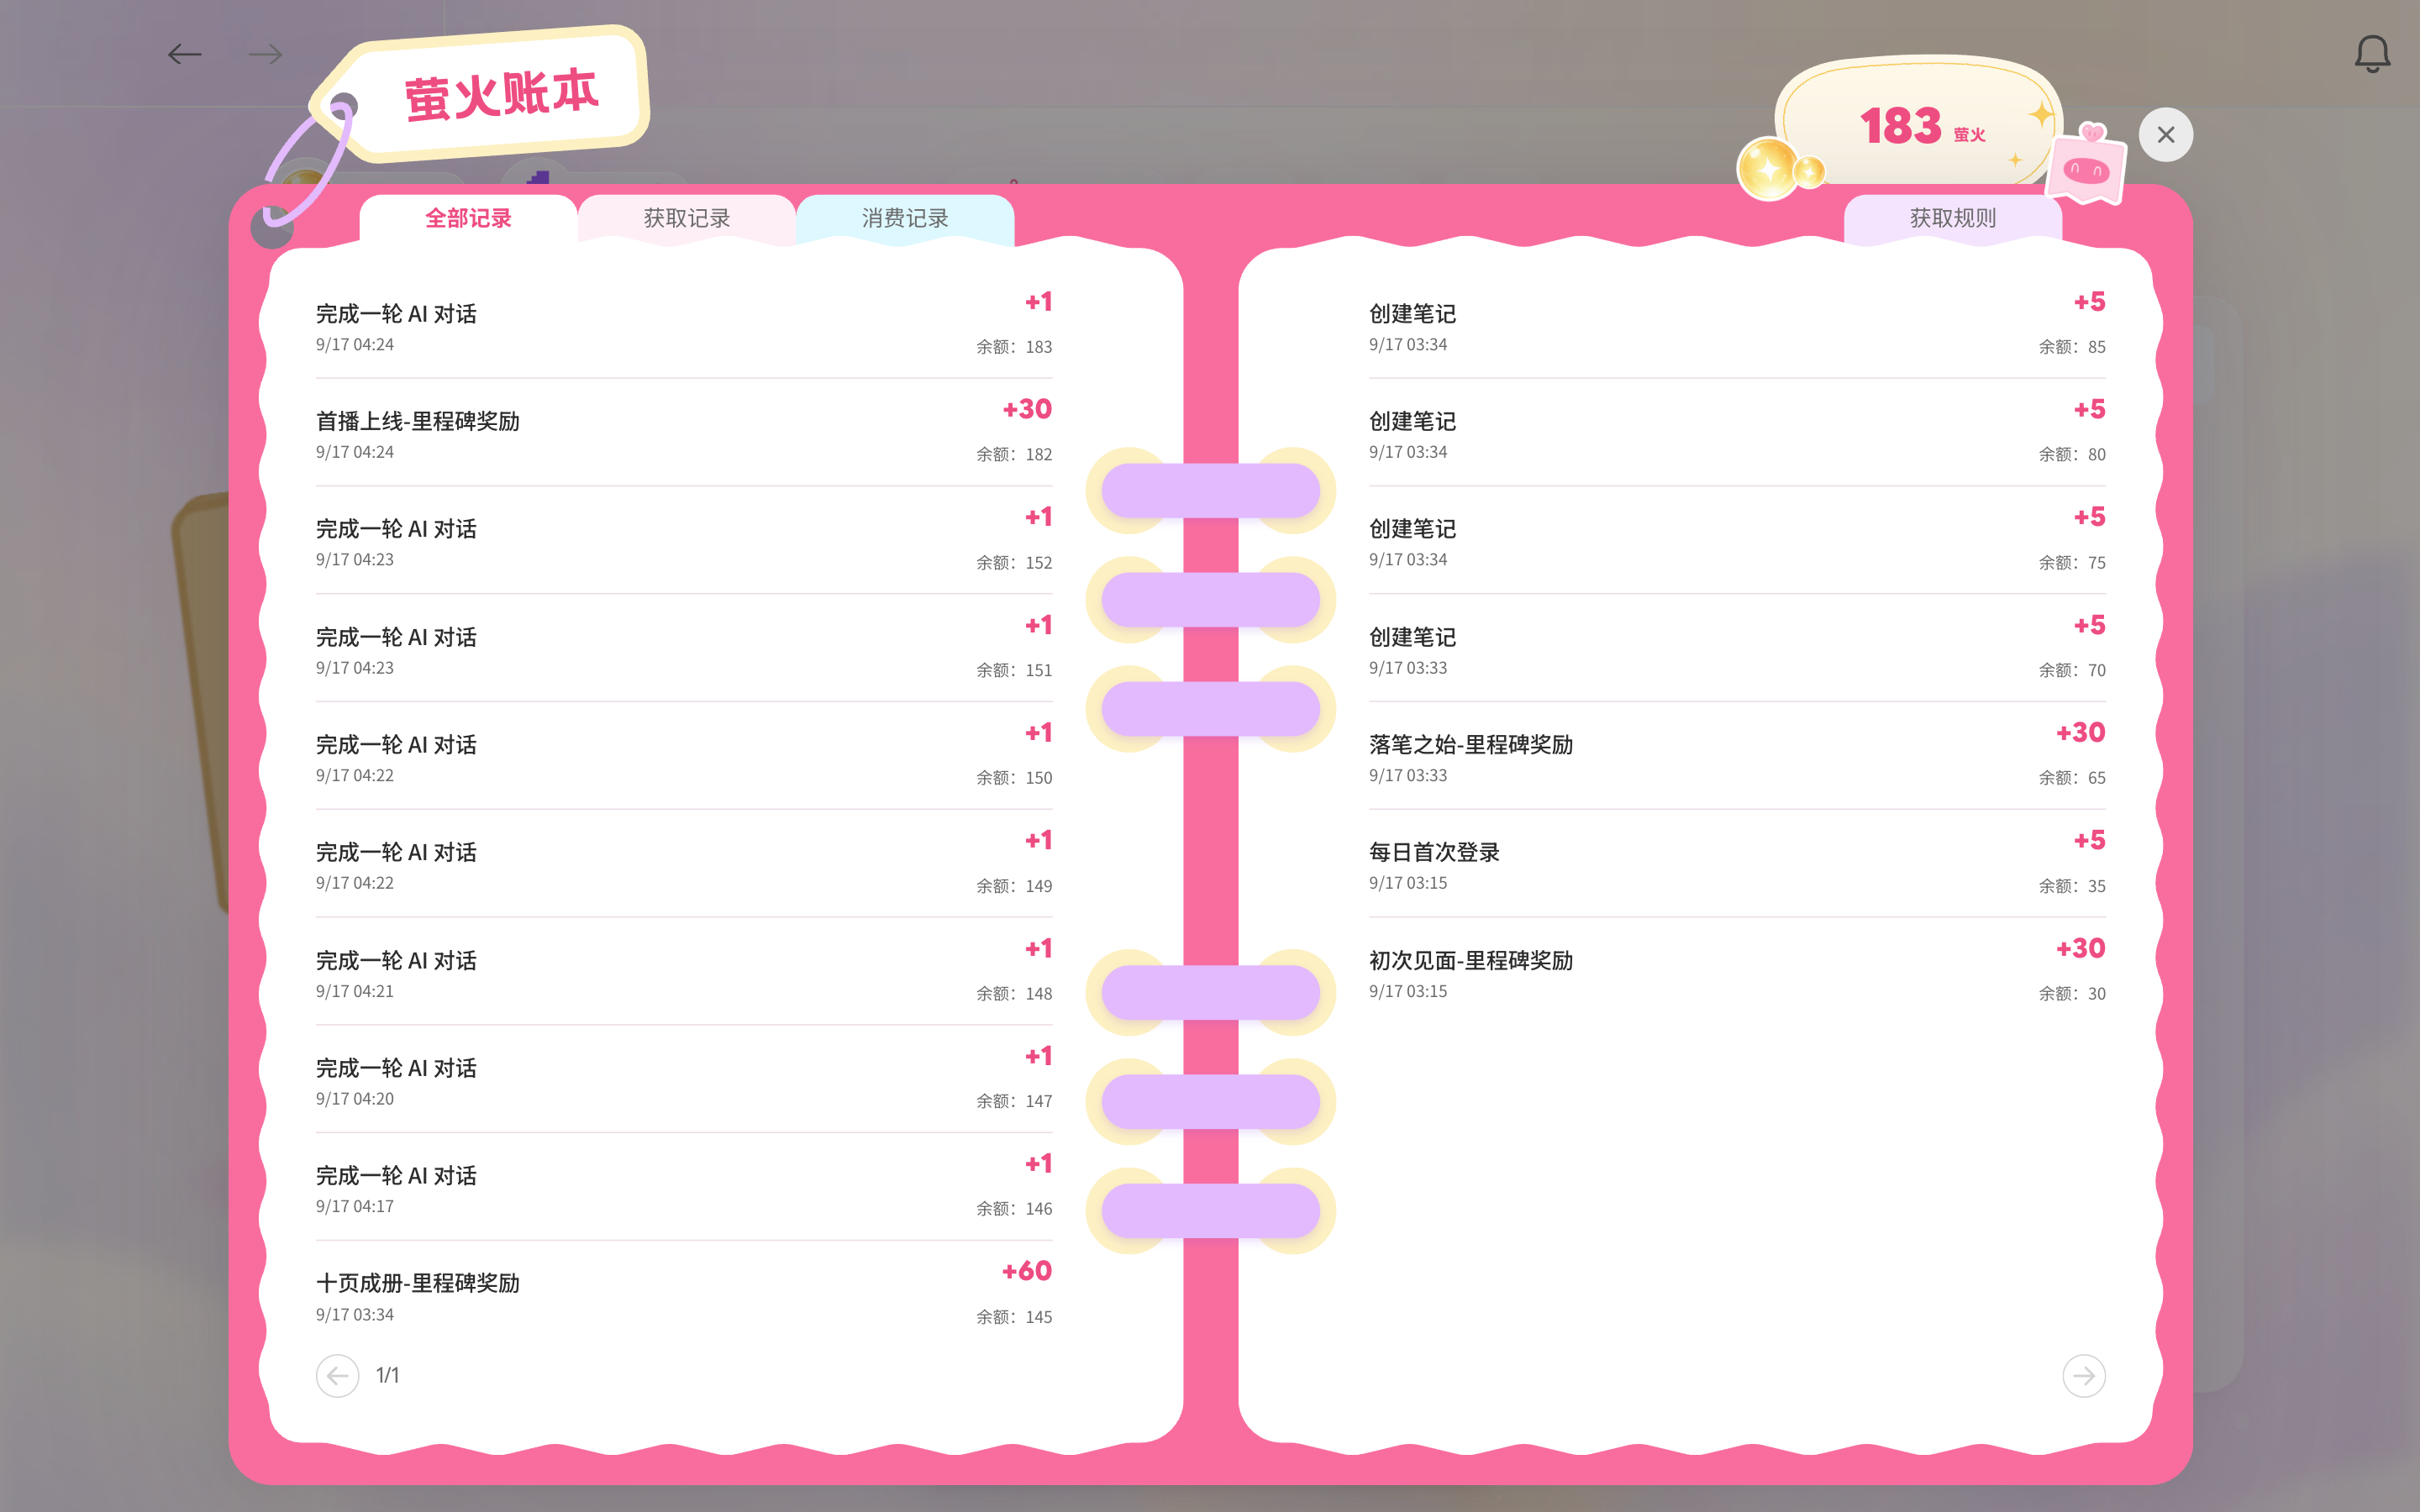
The first pill at the top left shows your current Firefly balance. Select it to open the Firefly Ledger, a pink book with turning pages and four tabs: All activity, Earned, Spent, and Earning rules. Each entry shows the event, time, amount earned or spent, and balance at that moment, with newest entries first. At the first or last page, the corresponding navigation arrow is disabled.
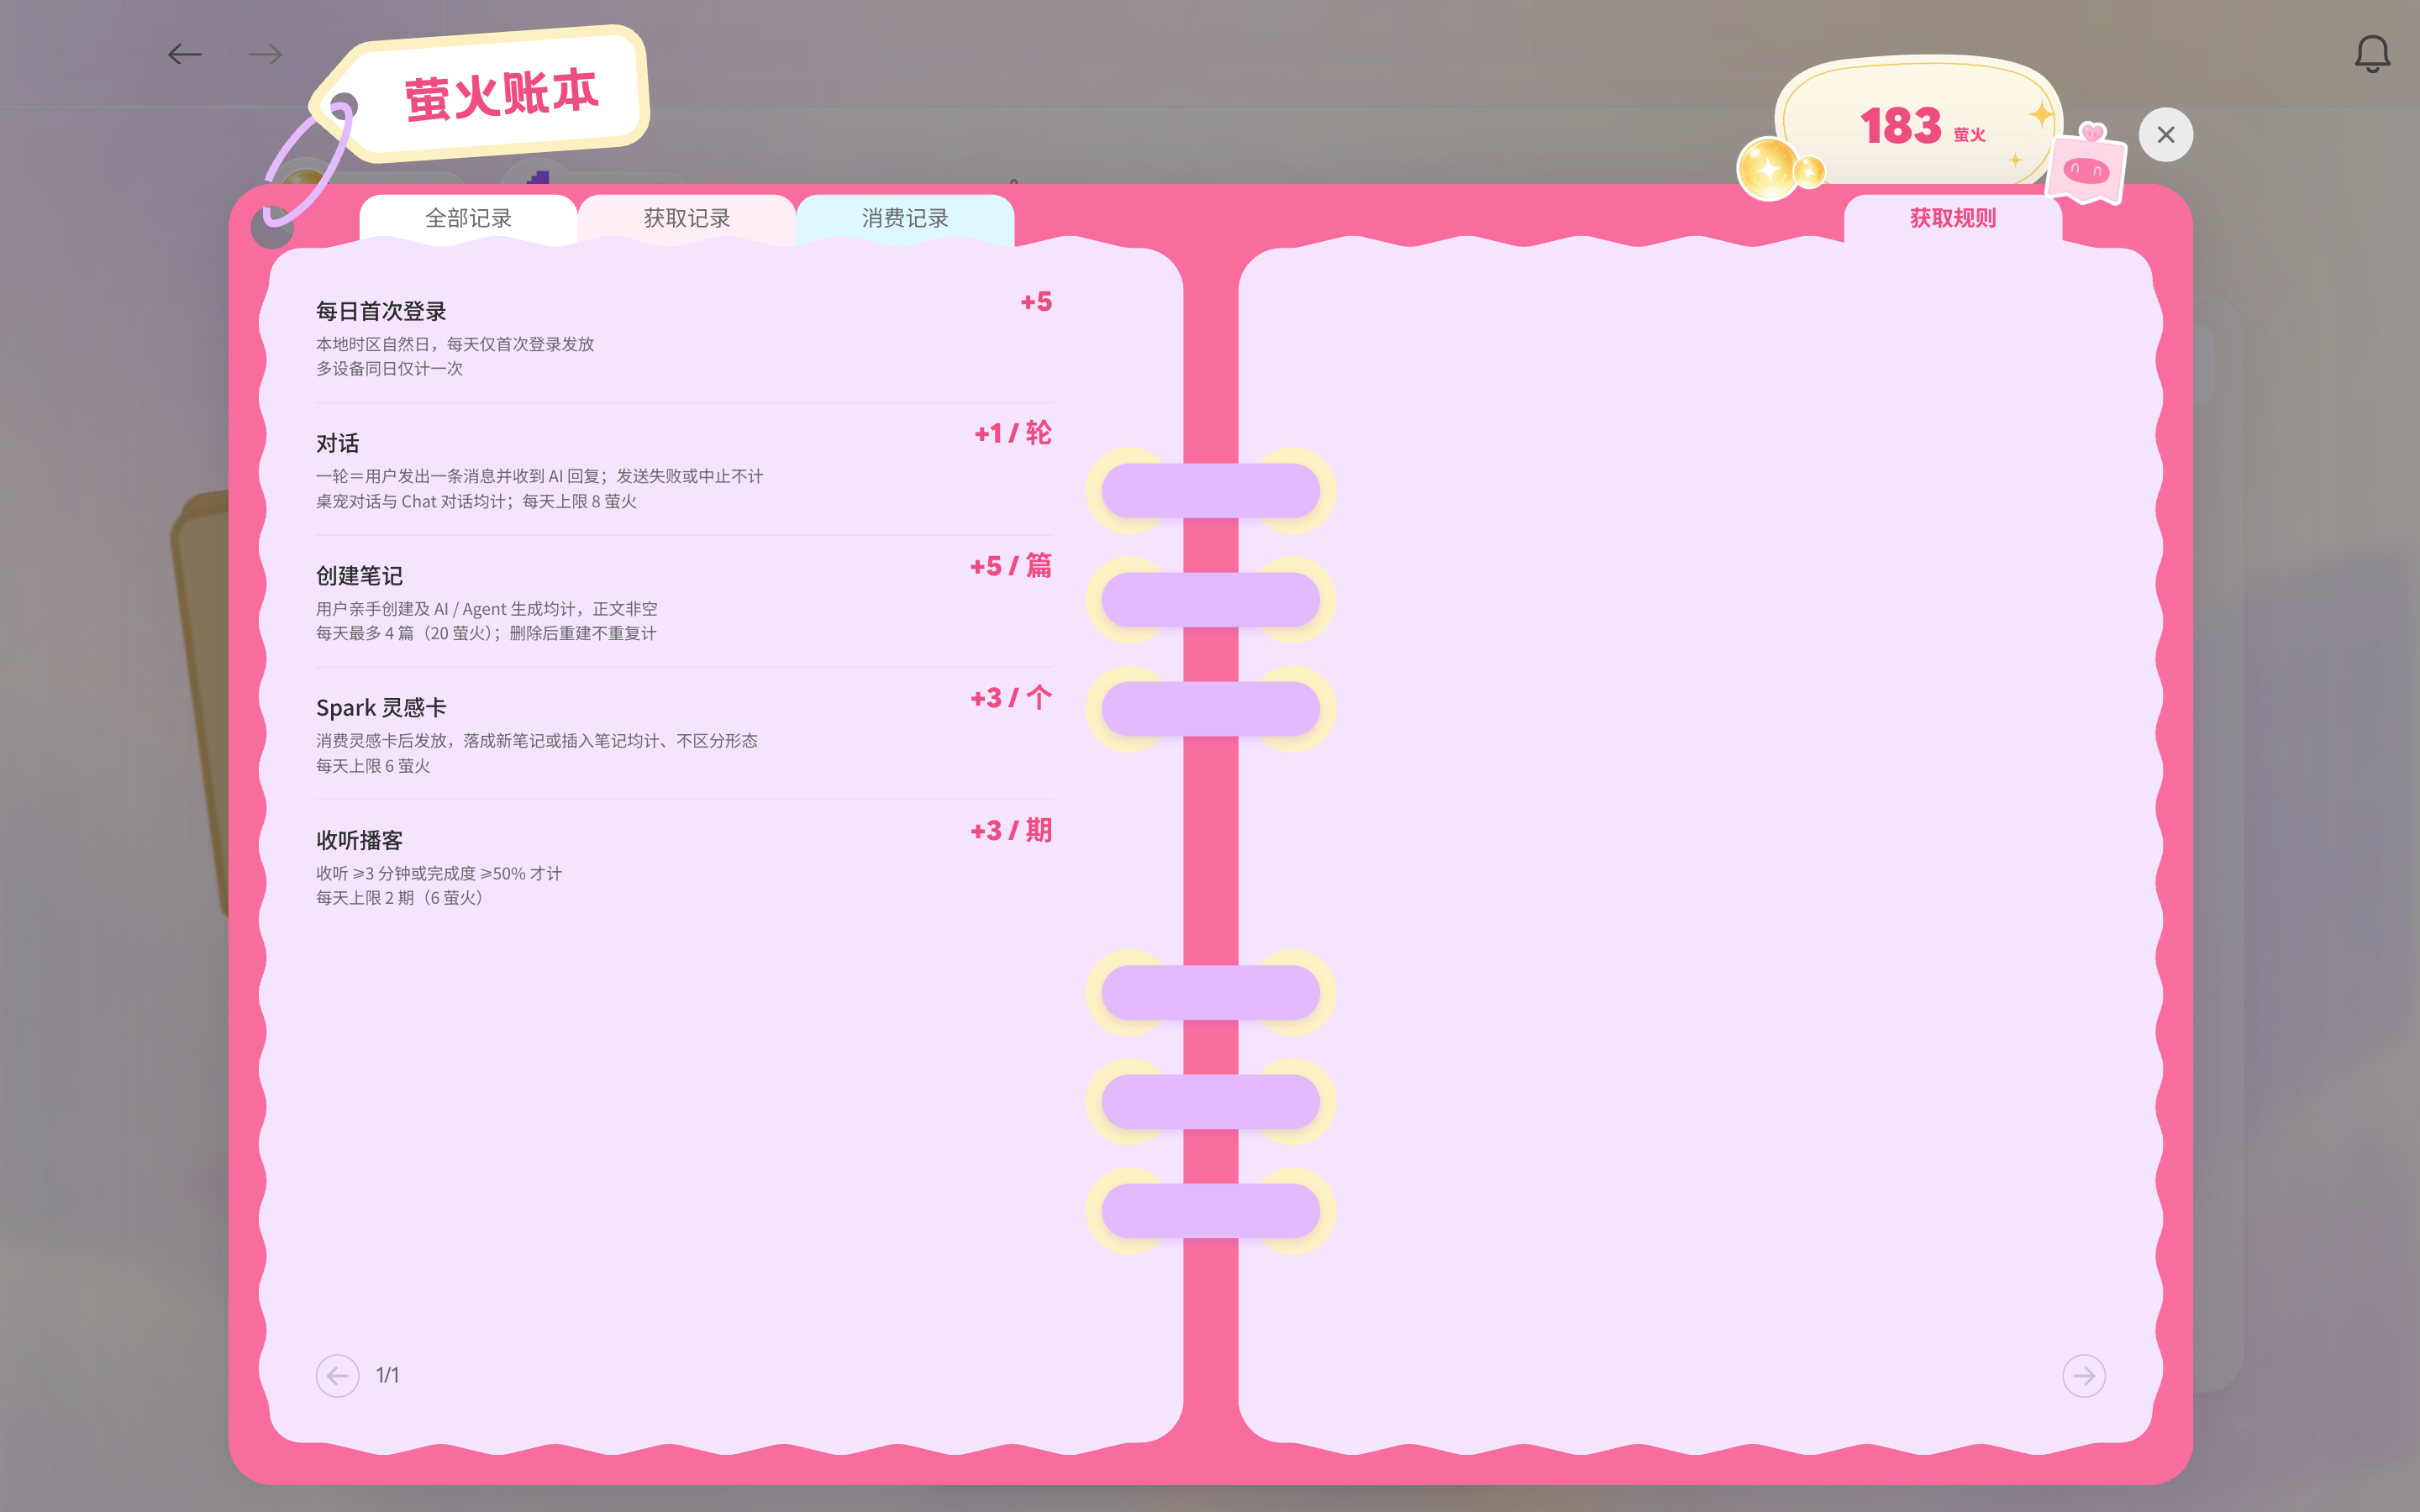
The Earning rules tab lists all ways to earn Fireflies and their daily limits: first sign-in of the day, +5; each chat exchange, +1 (up to 8 per day); creating a note, +5 (up to four notes per day, including AI-created notes); Spark cards, +3 each (up to 6 per day); and listening to a podcast, +3 per episode (up to two episodes per day). Earning badges also awards Fireflies.
Badge progress & collection
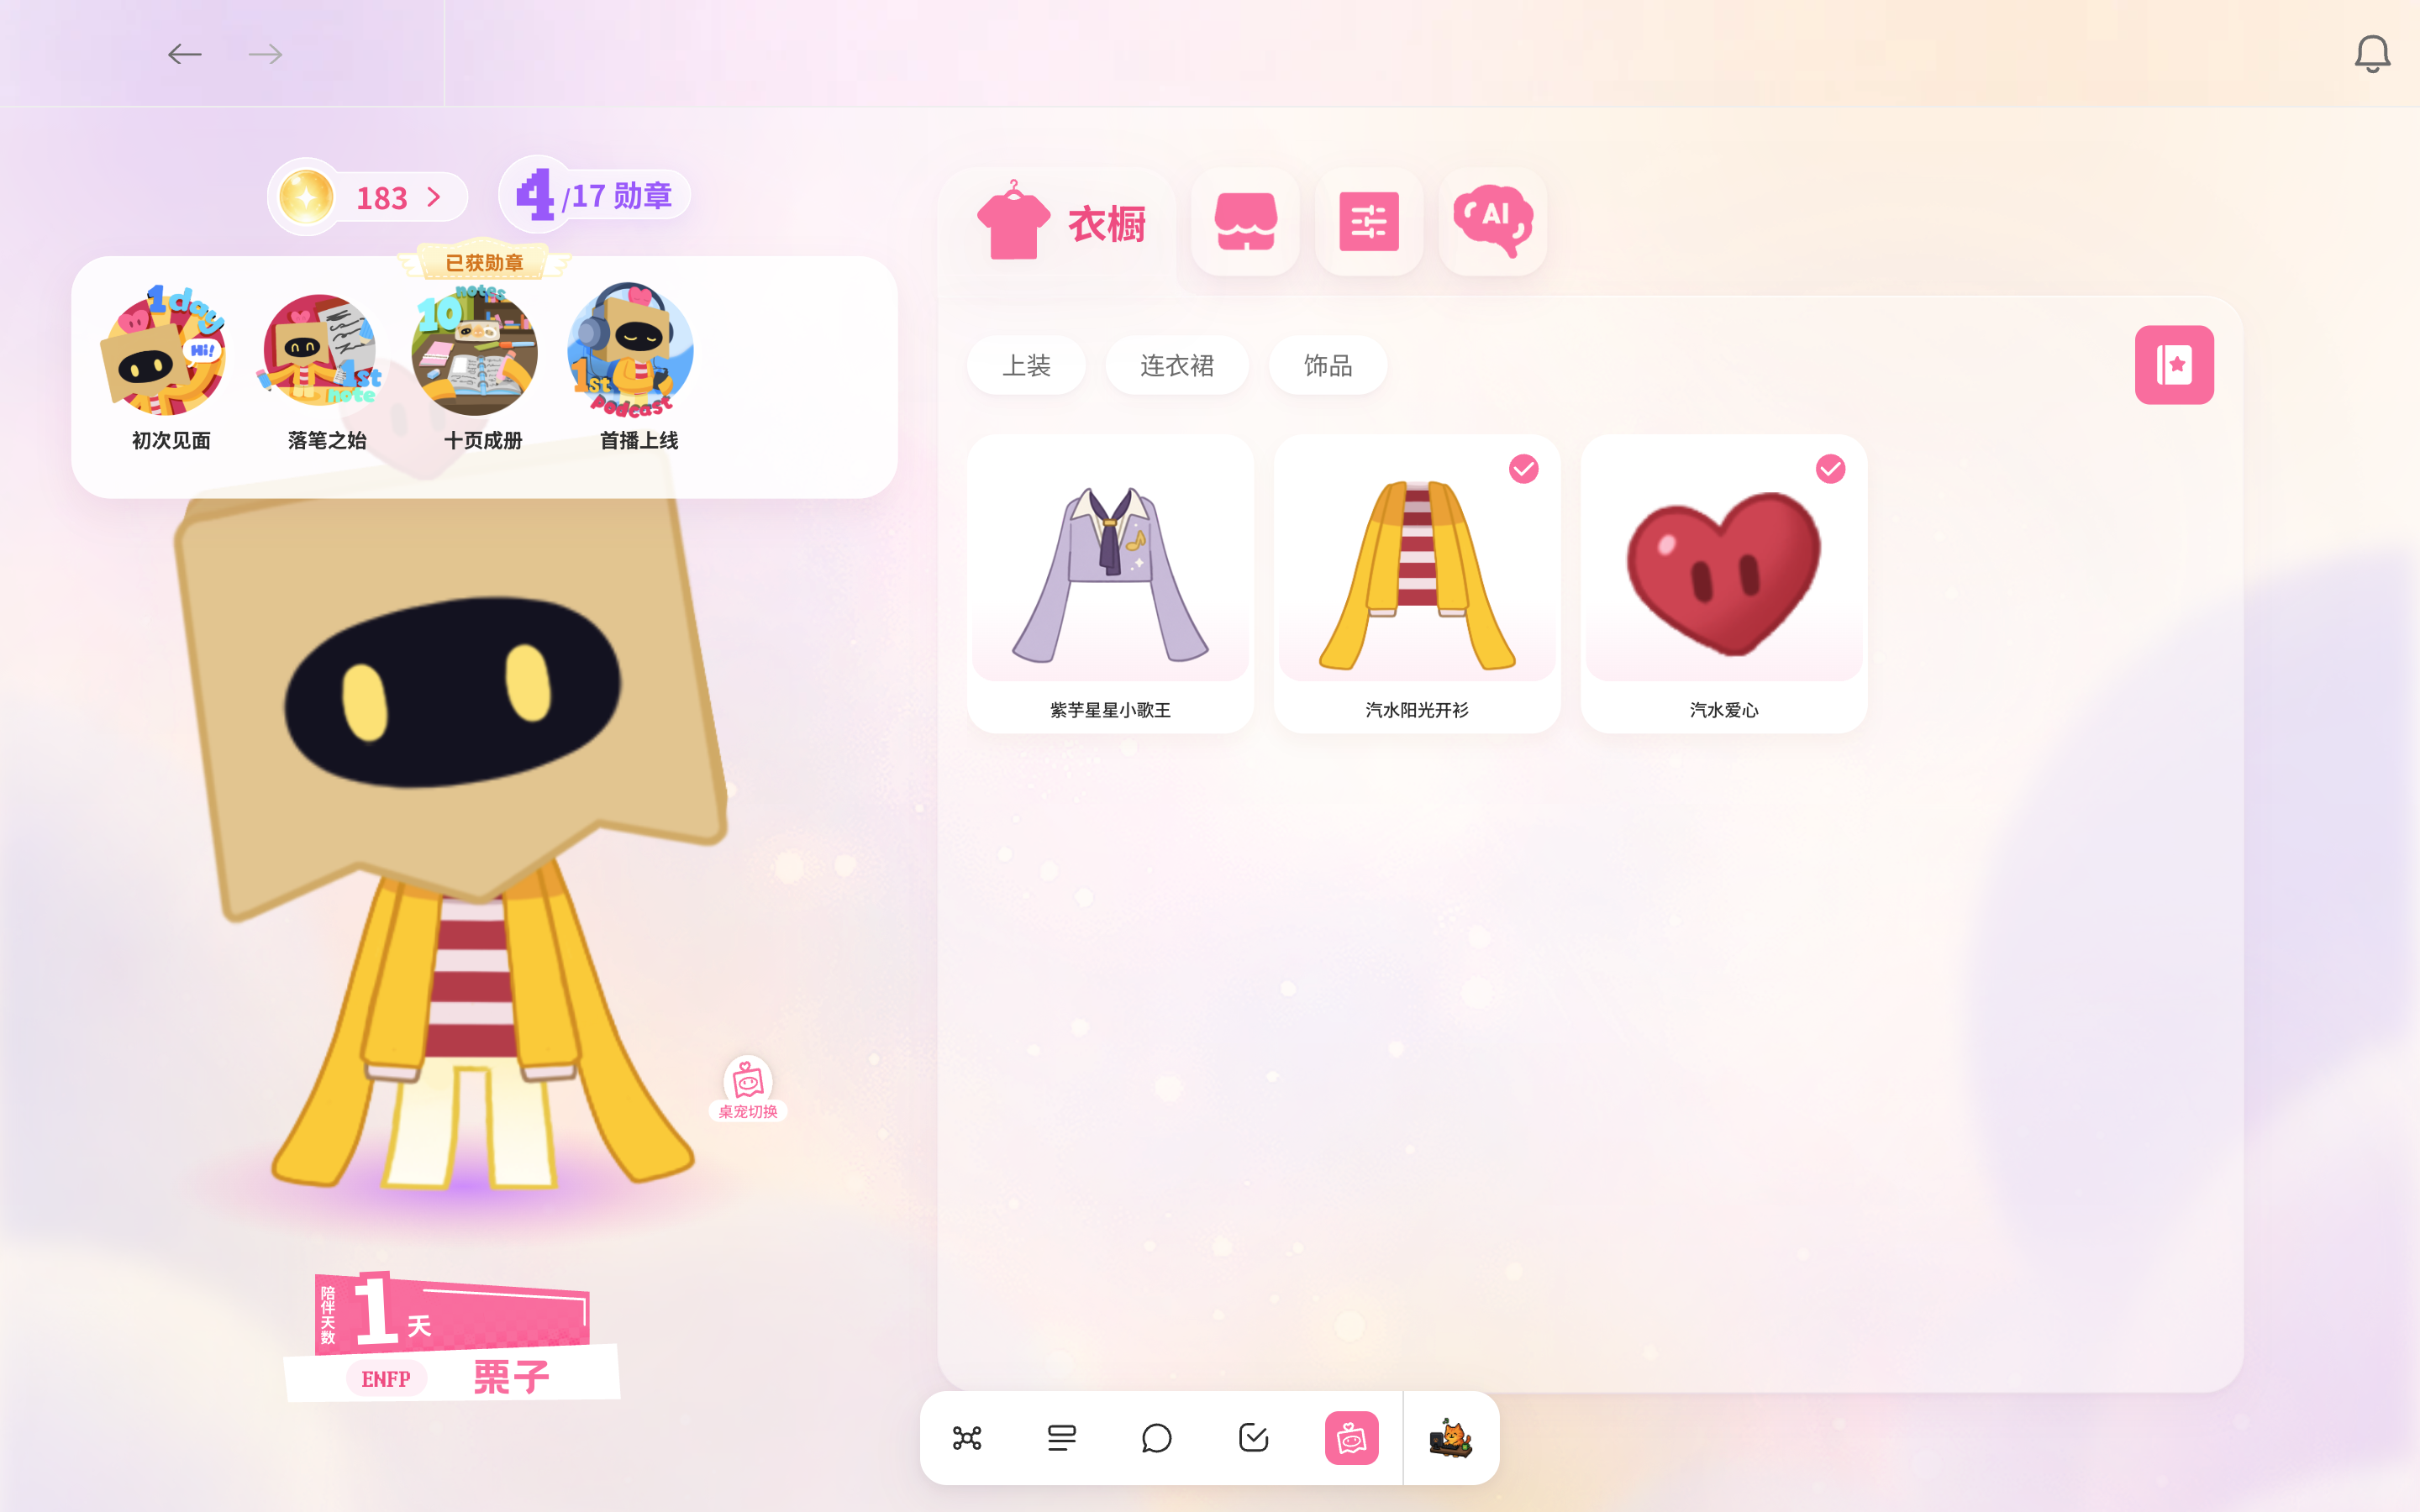
The second pill at the top left shows how many badges you have unlocked, such as 4/17. Hover over it to see a horizontally scrolling preview of earned badges. Select it to open My Badges, organized into Time, Knowledge, Creativity, and Content tabs. Unlocked badges show the date they were earned.
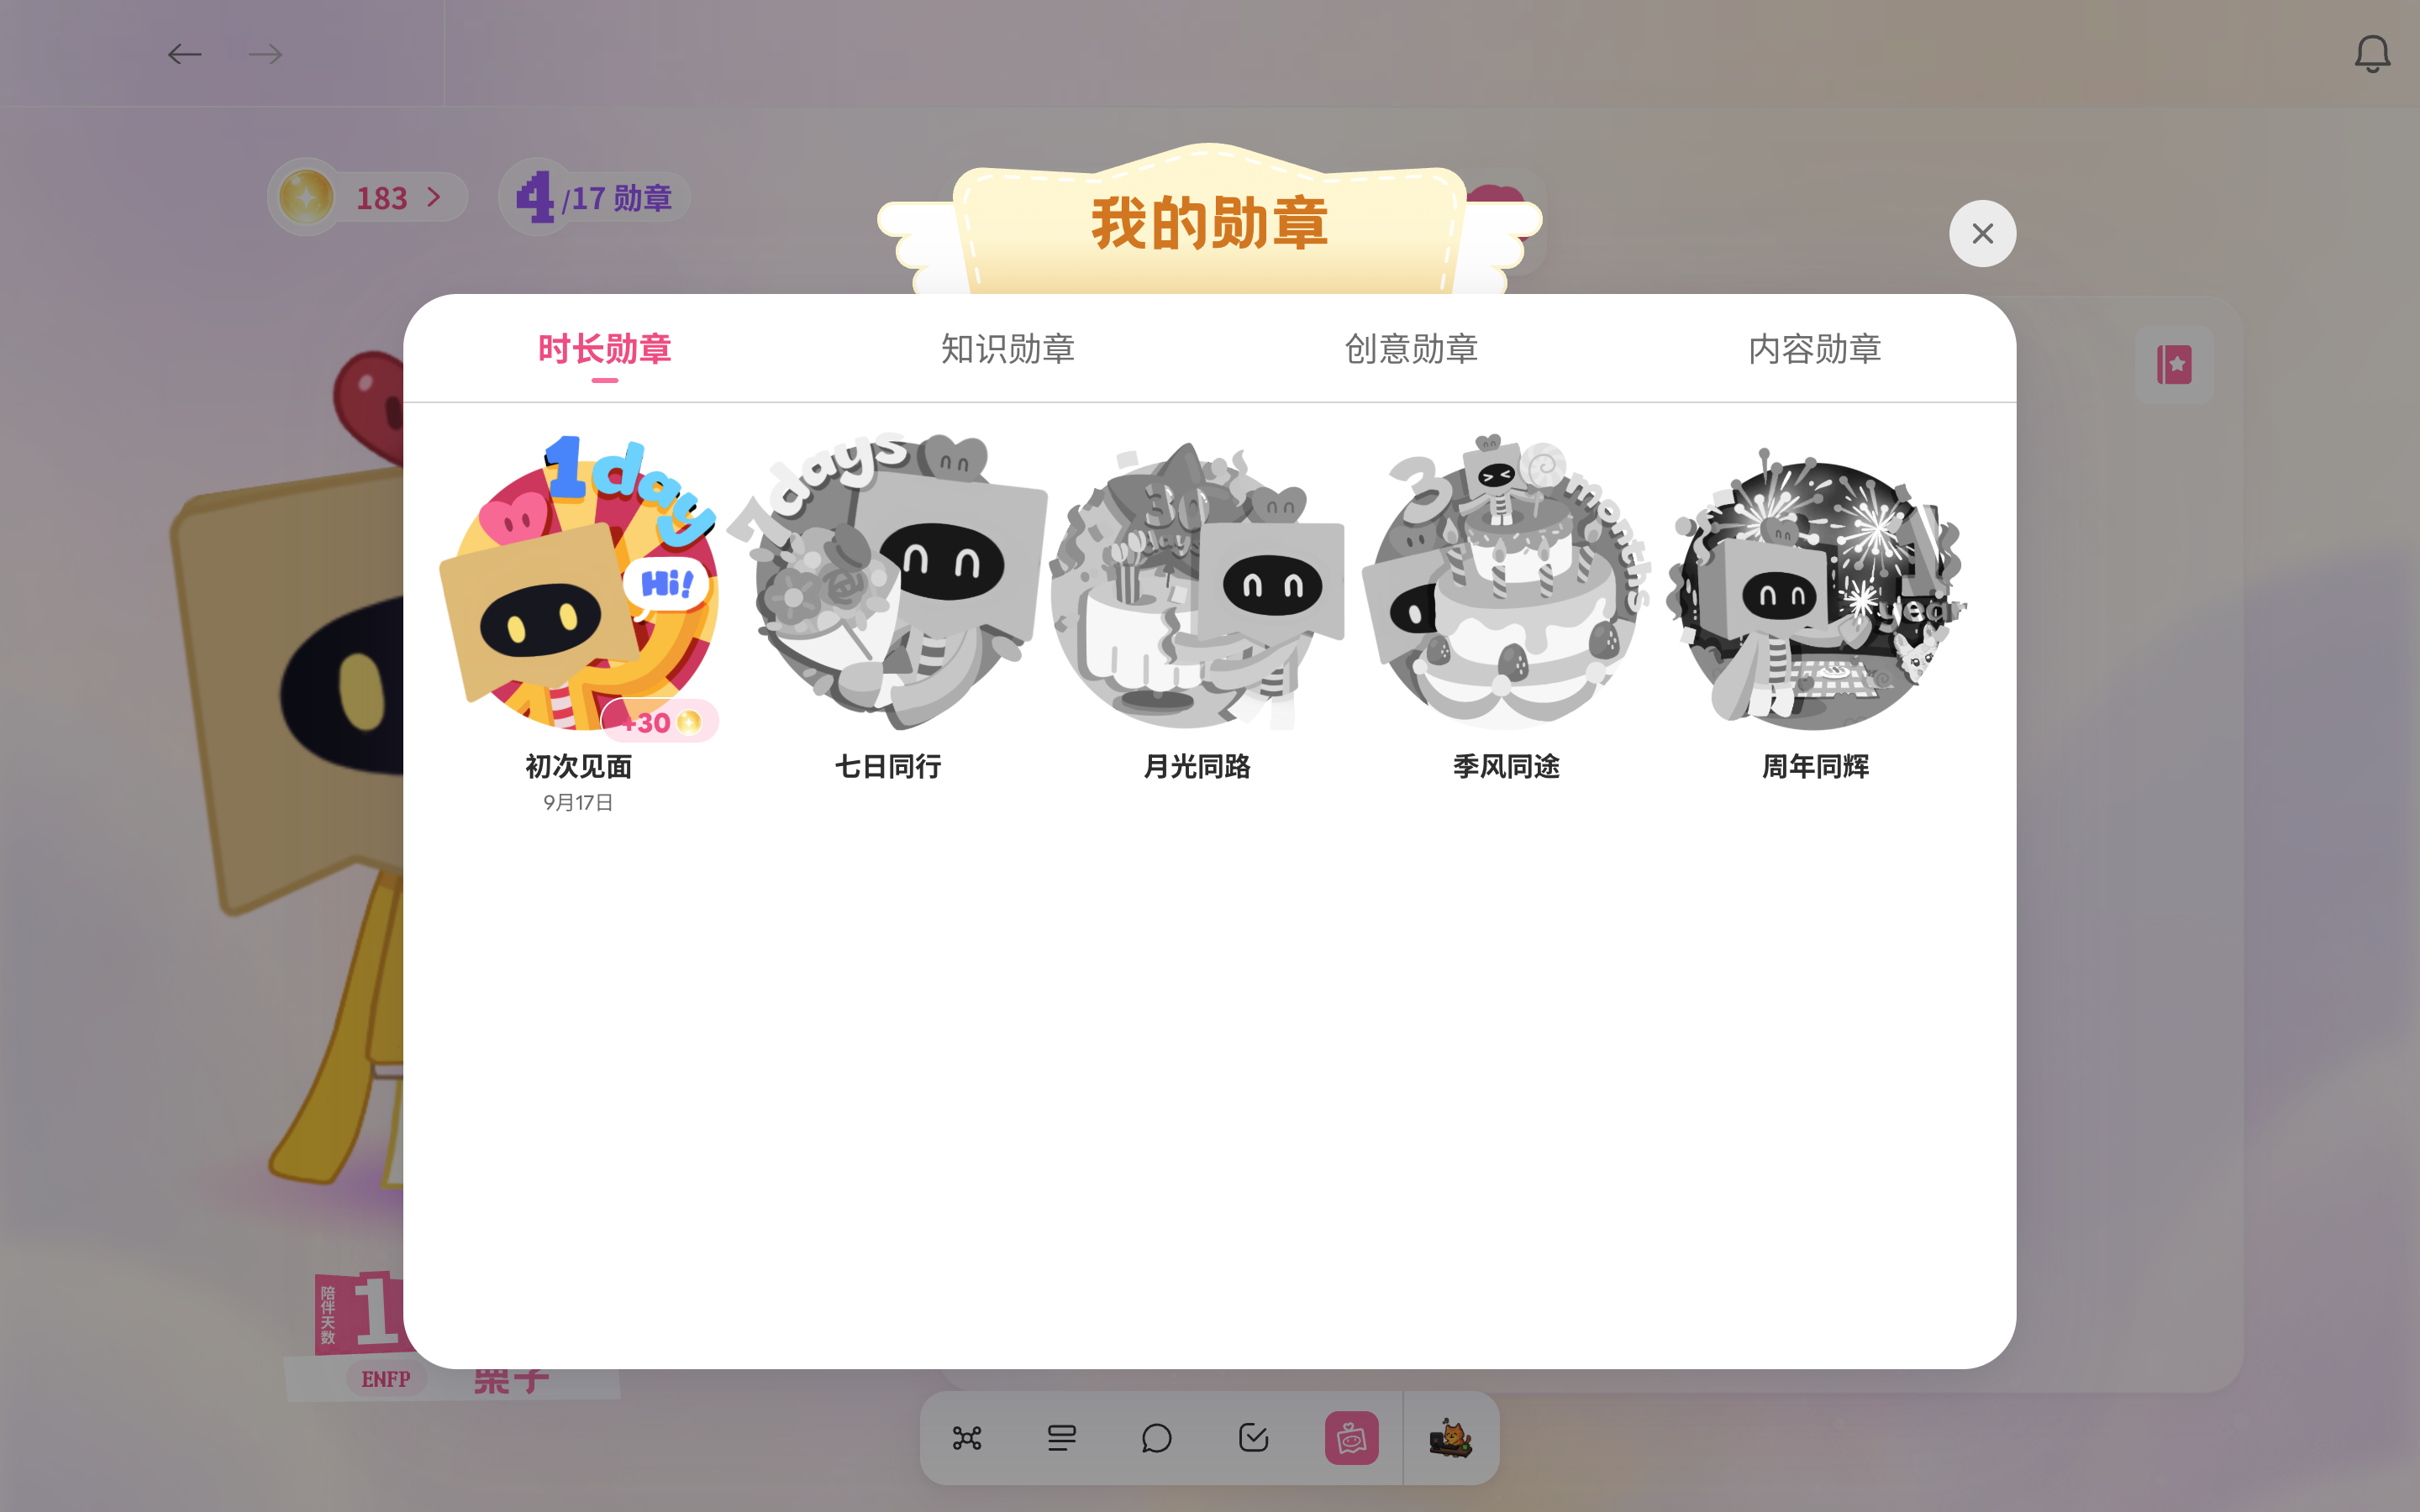
When you earn a badge, a “New badge unlocked” celebration shows its artwork, name, and Firefly reward. Select “Got it” to close it.

Name card & renaming
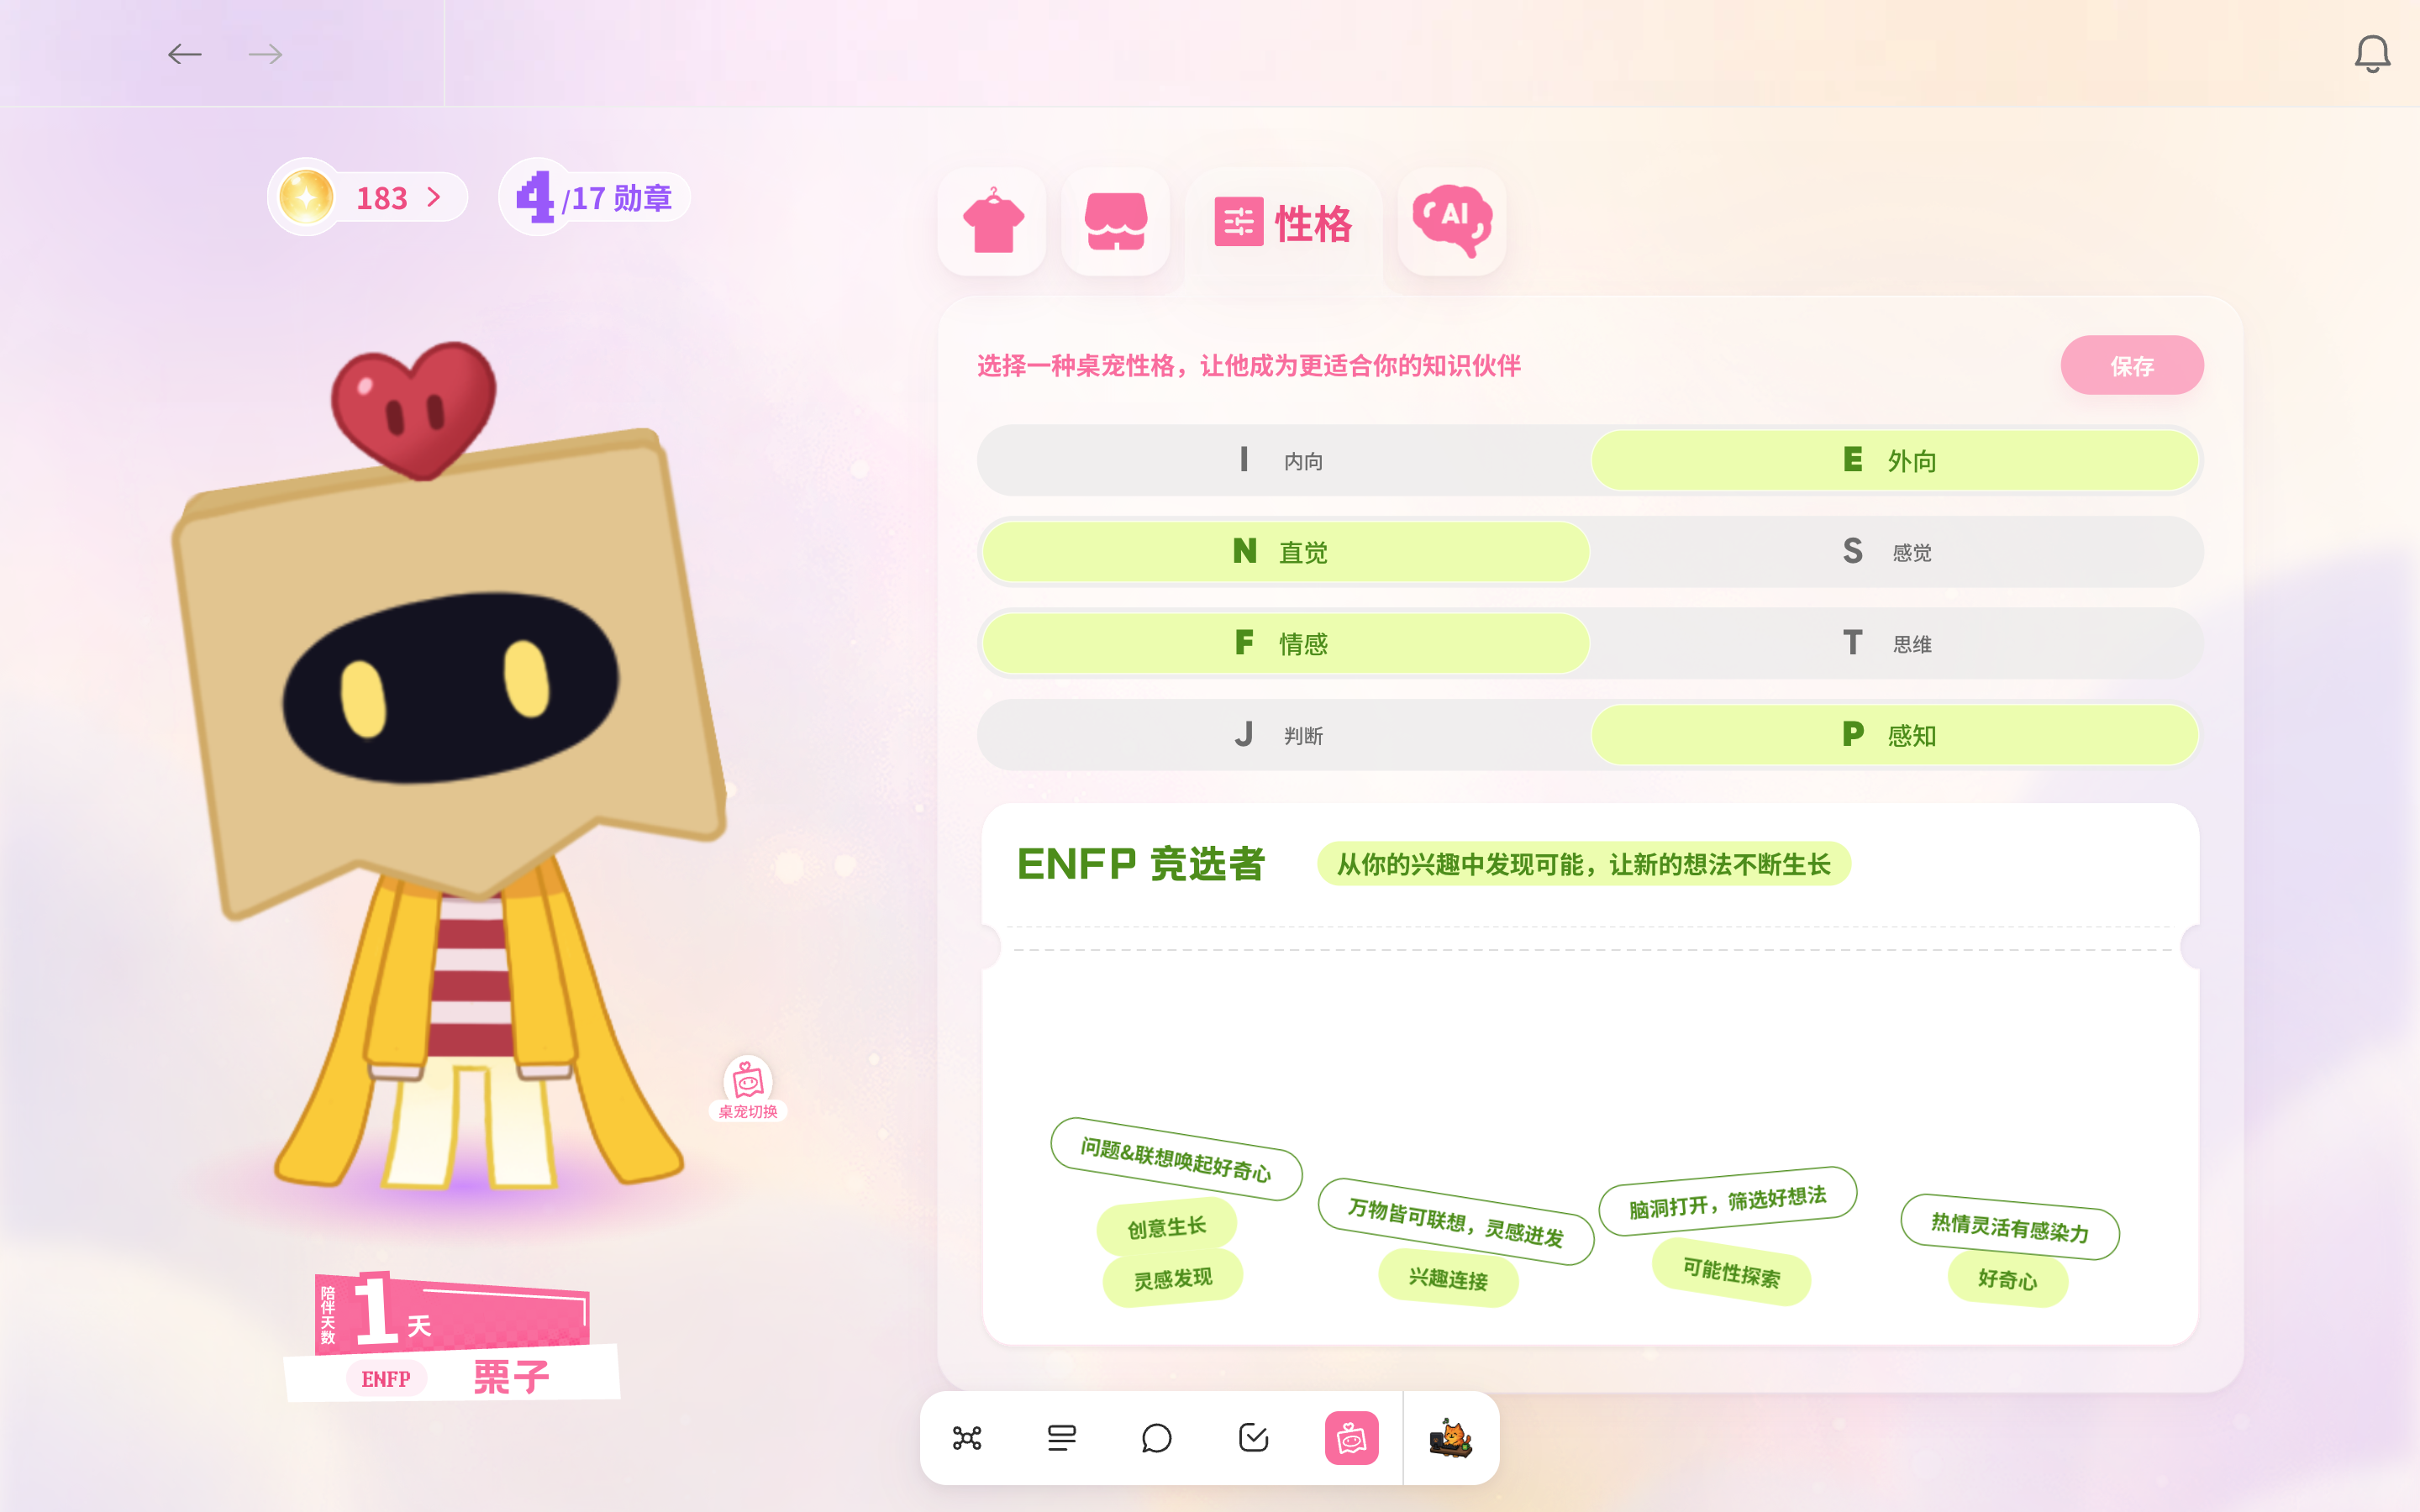
Your companion’s name card at the bottom left shows your days together, its personality abbreviation, and its name. Use the Personality tab on the right to adjust its personality: choose one side of each of four preference pairs. The matching personality name, a short description of how you interact, and several keywords appear below.
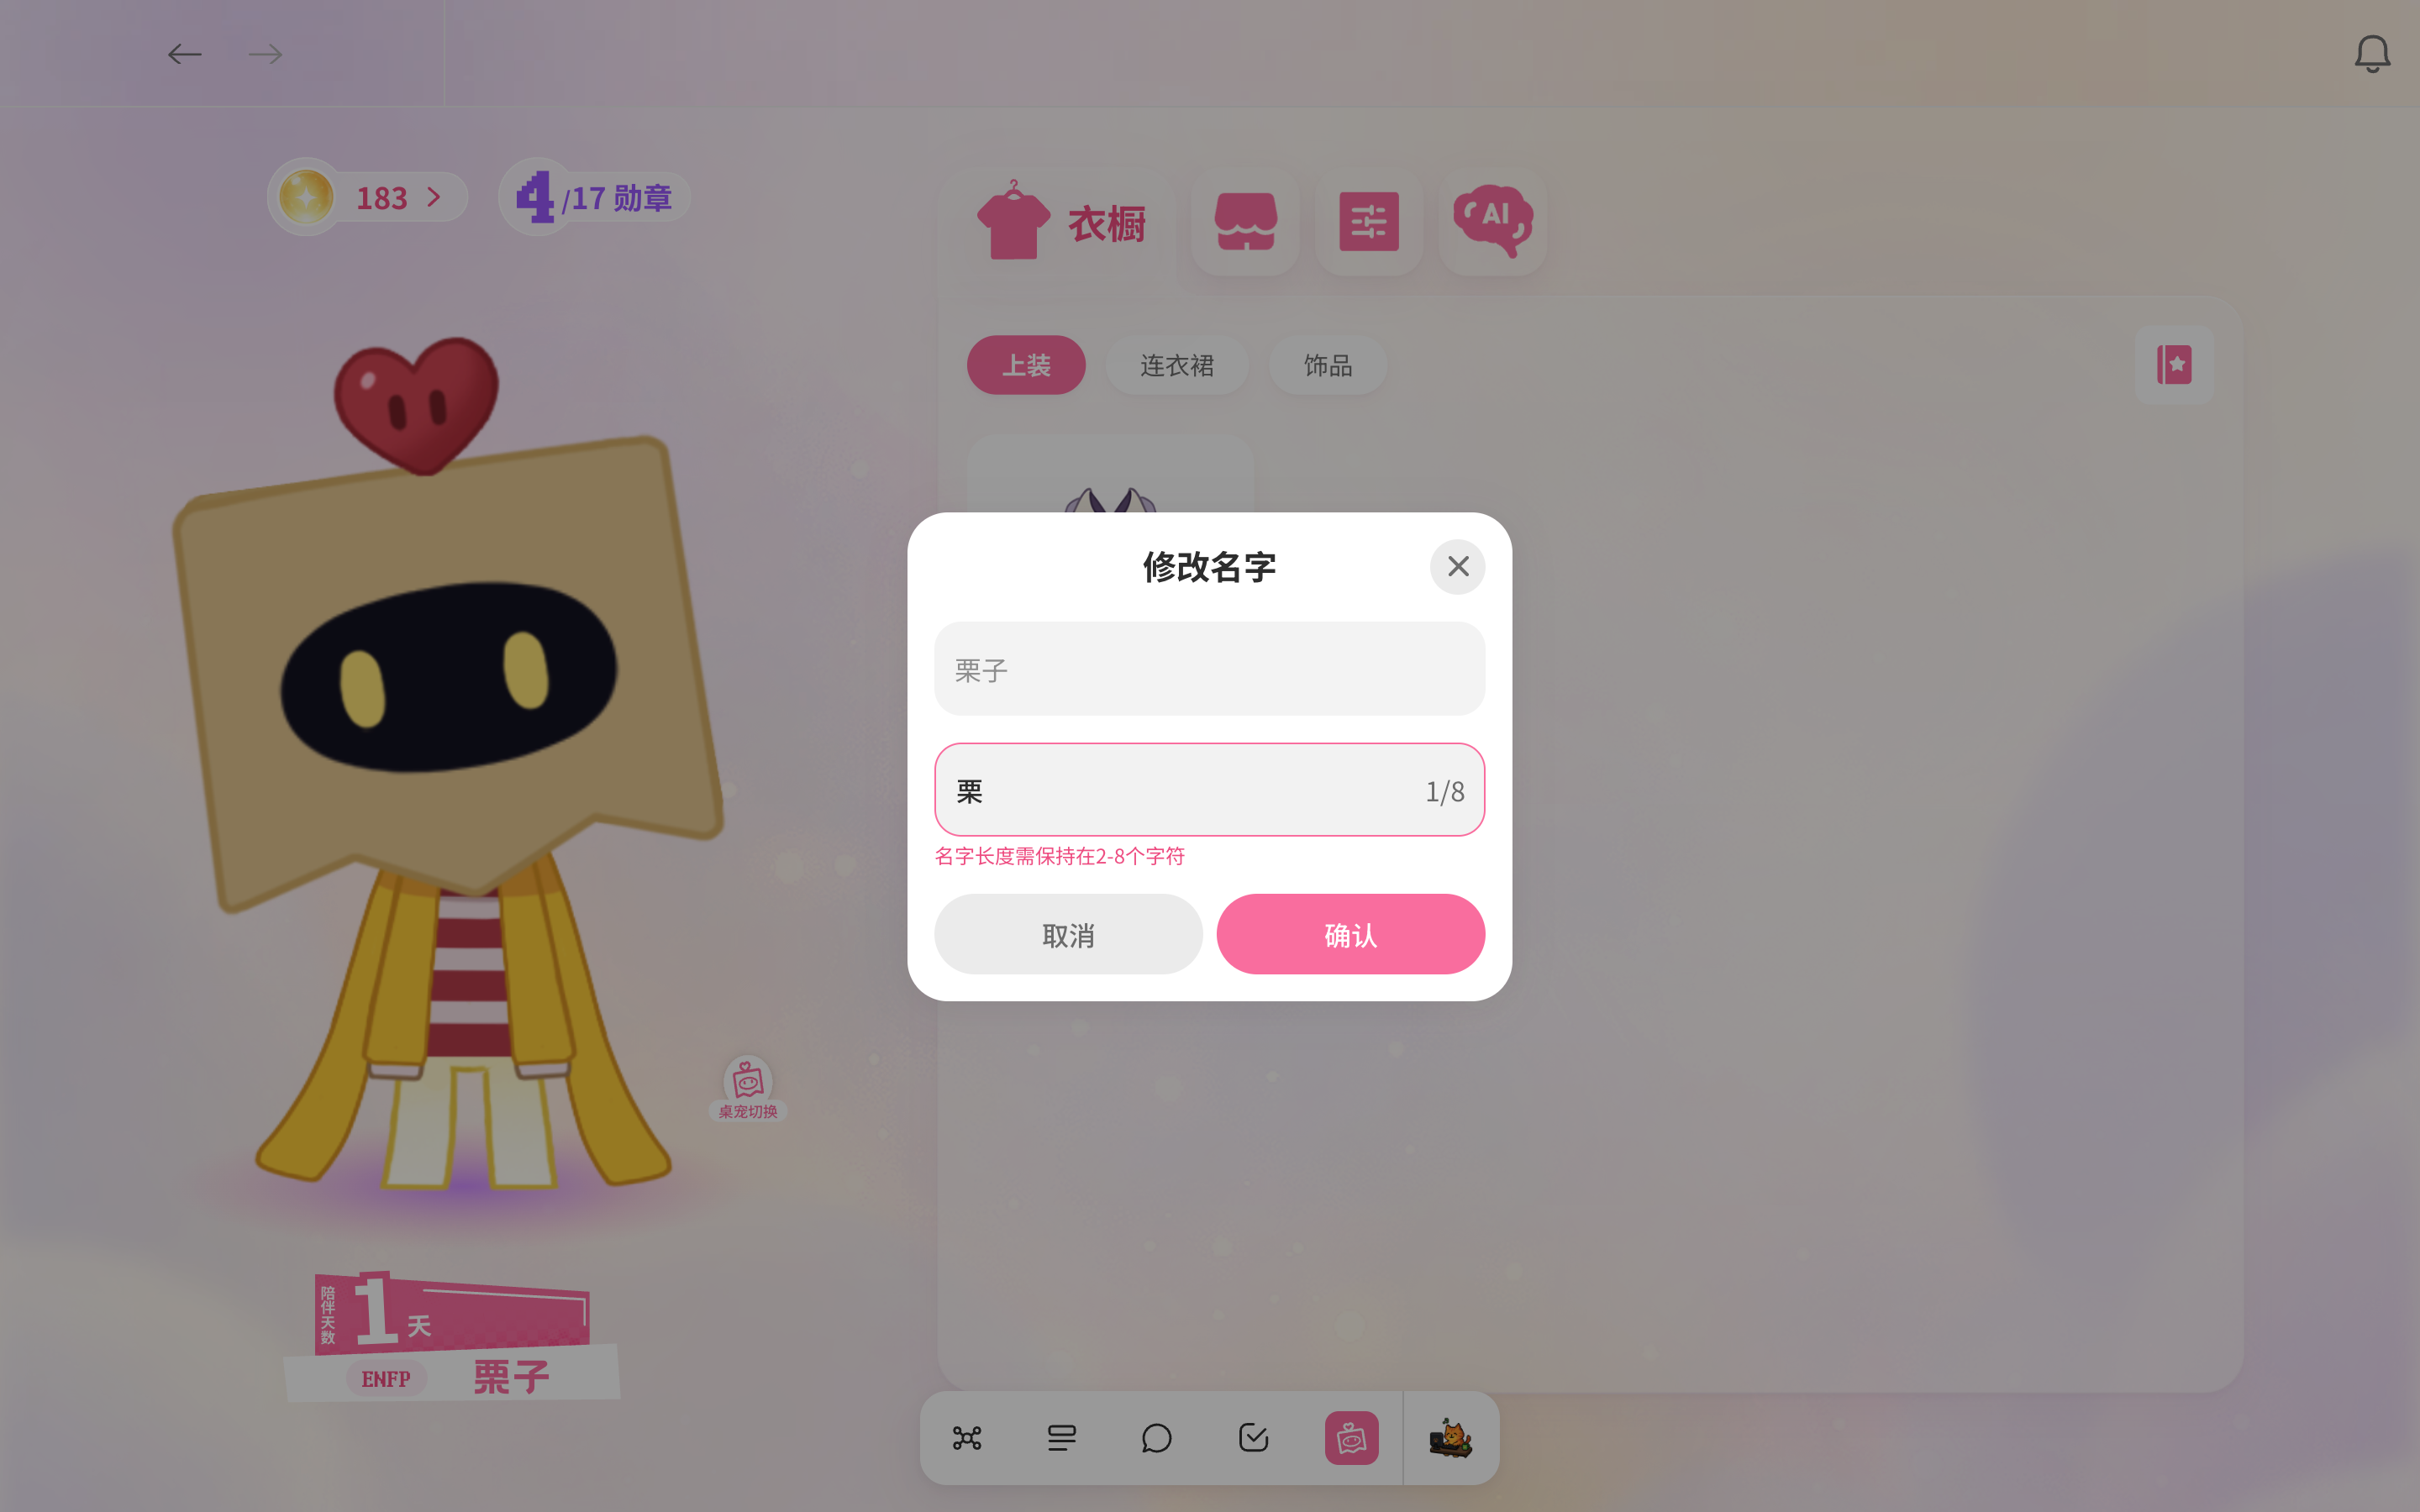
Select the name on the card to open Rename. Names must be 2–8 characters long. If the name is outside that range, selecting Confirm shows “Name must be 2–8 characters” beneath the field.
Wardrobe: outfits & collection
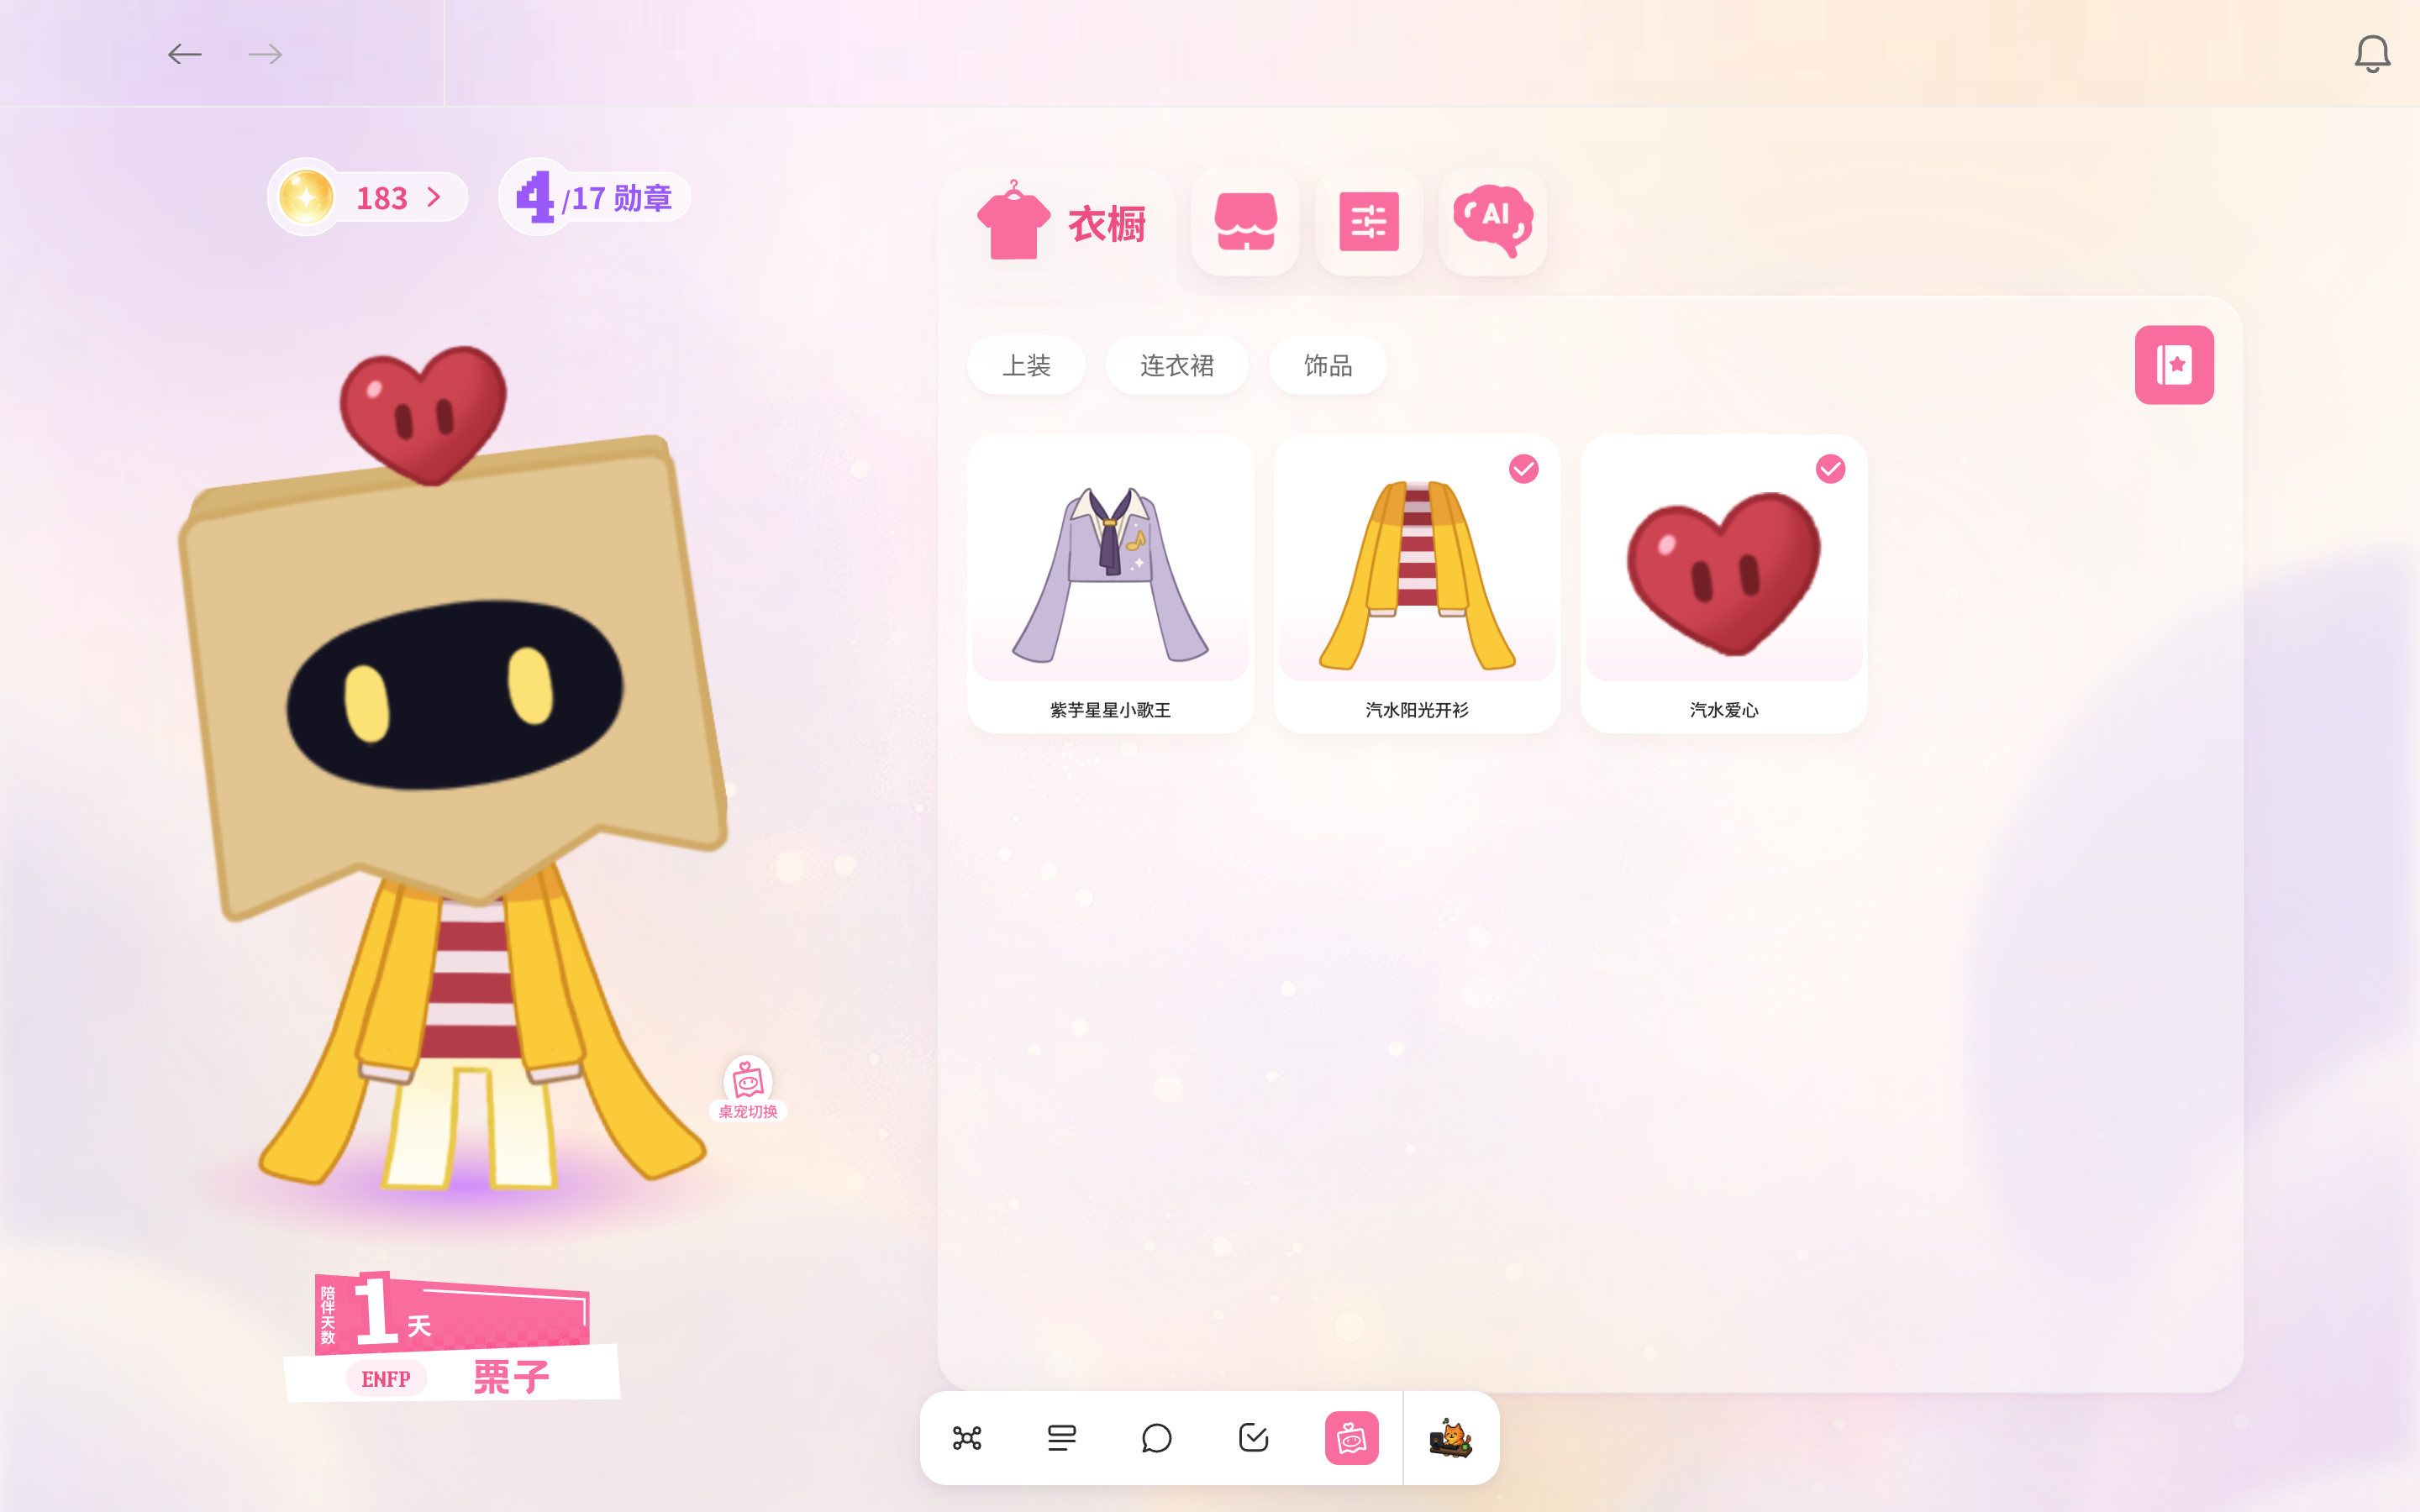
Wardrobe is the first tab on the right, with three categories: Tops, Dresses, and Accessories. Select an item to put it on your companion; equipped items show a check mark. Only one item per category can be worn at a time. Select it again to remove it. The wardrobe displays only items you own.
Select the collection button at the top right to see your collected outfits in a gallery. Equipped items have a check mark in the top right. You can view unlock requirements for items you do not own in the Firefly Shop.
Firefly Shop: redeem outfits
The second tab is the Firefly Shop, with Tops, Dresses, Bottoms, and Accessories. Available items show a price and Redeem button, while owned items are marked Owned. Locked items show “🔒 Locked,” their unlock requirements, and live progress, such as “7 days together” or “Unlock with 10 Sparks · 0/10.”
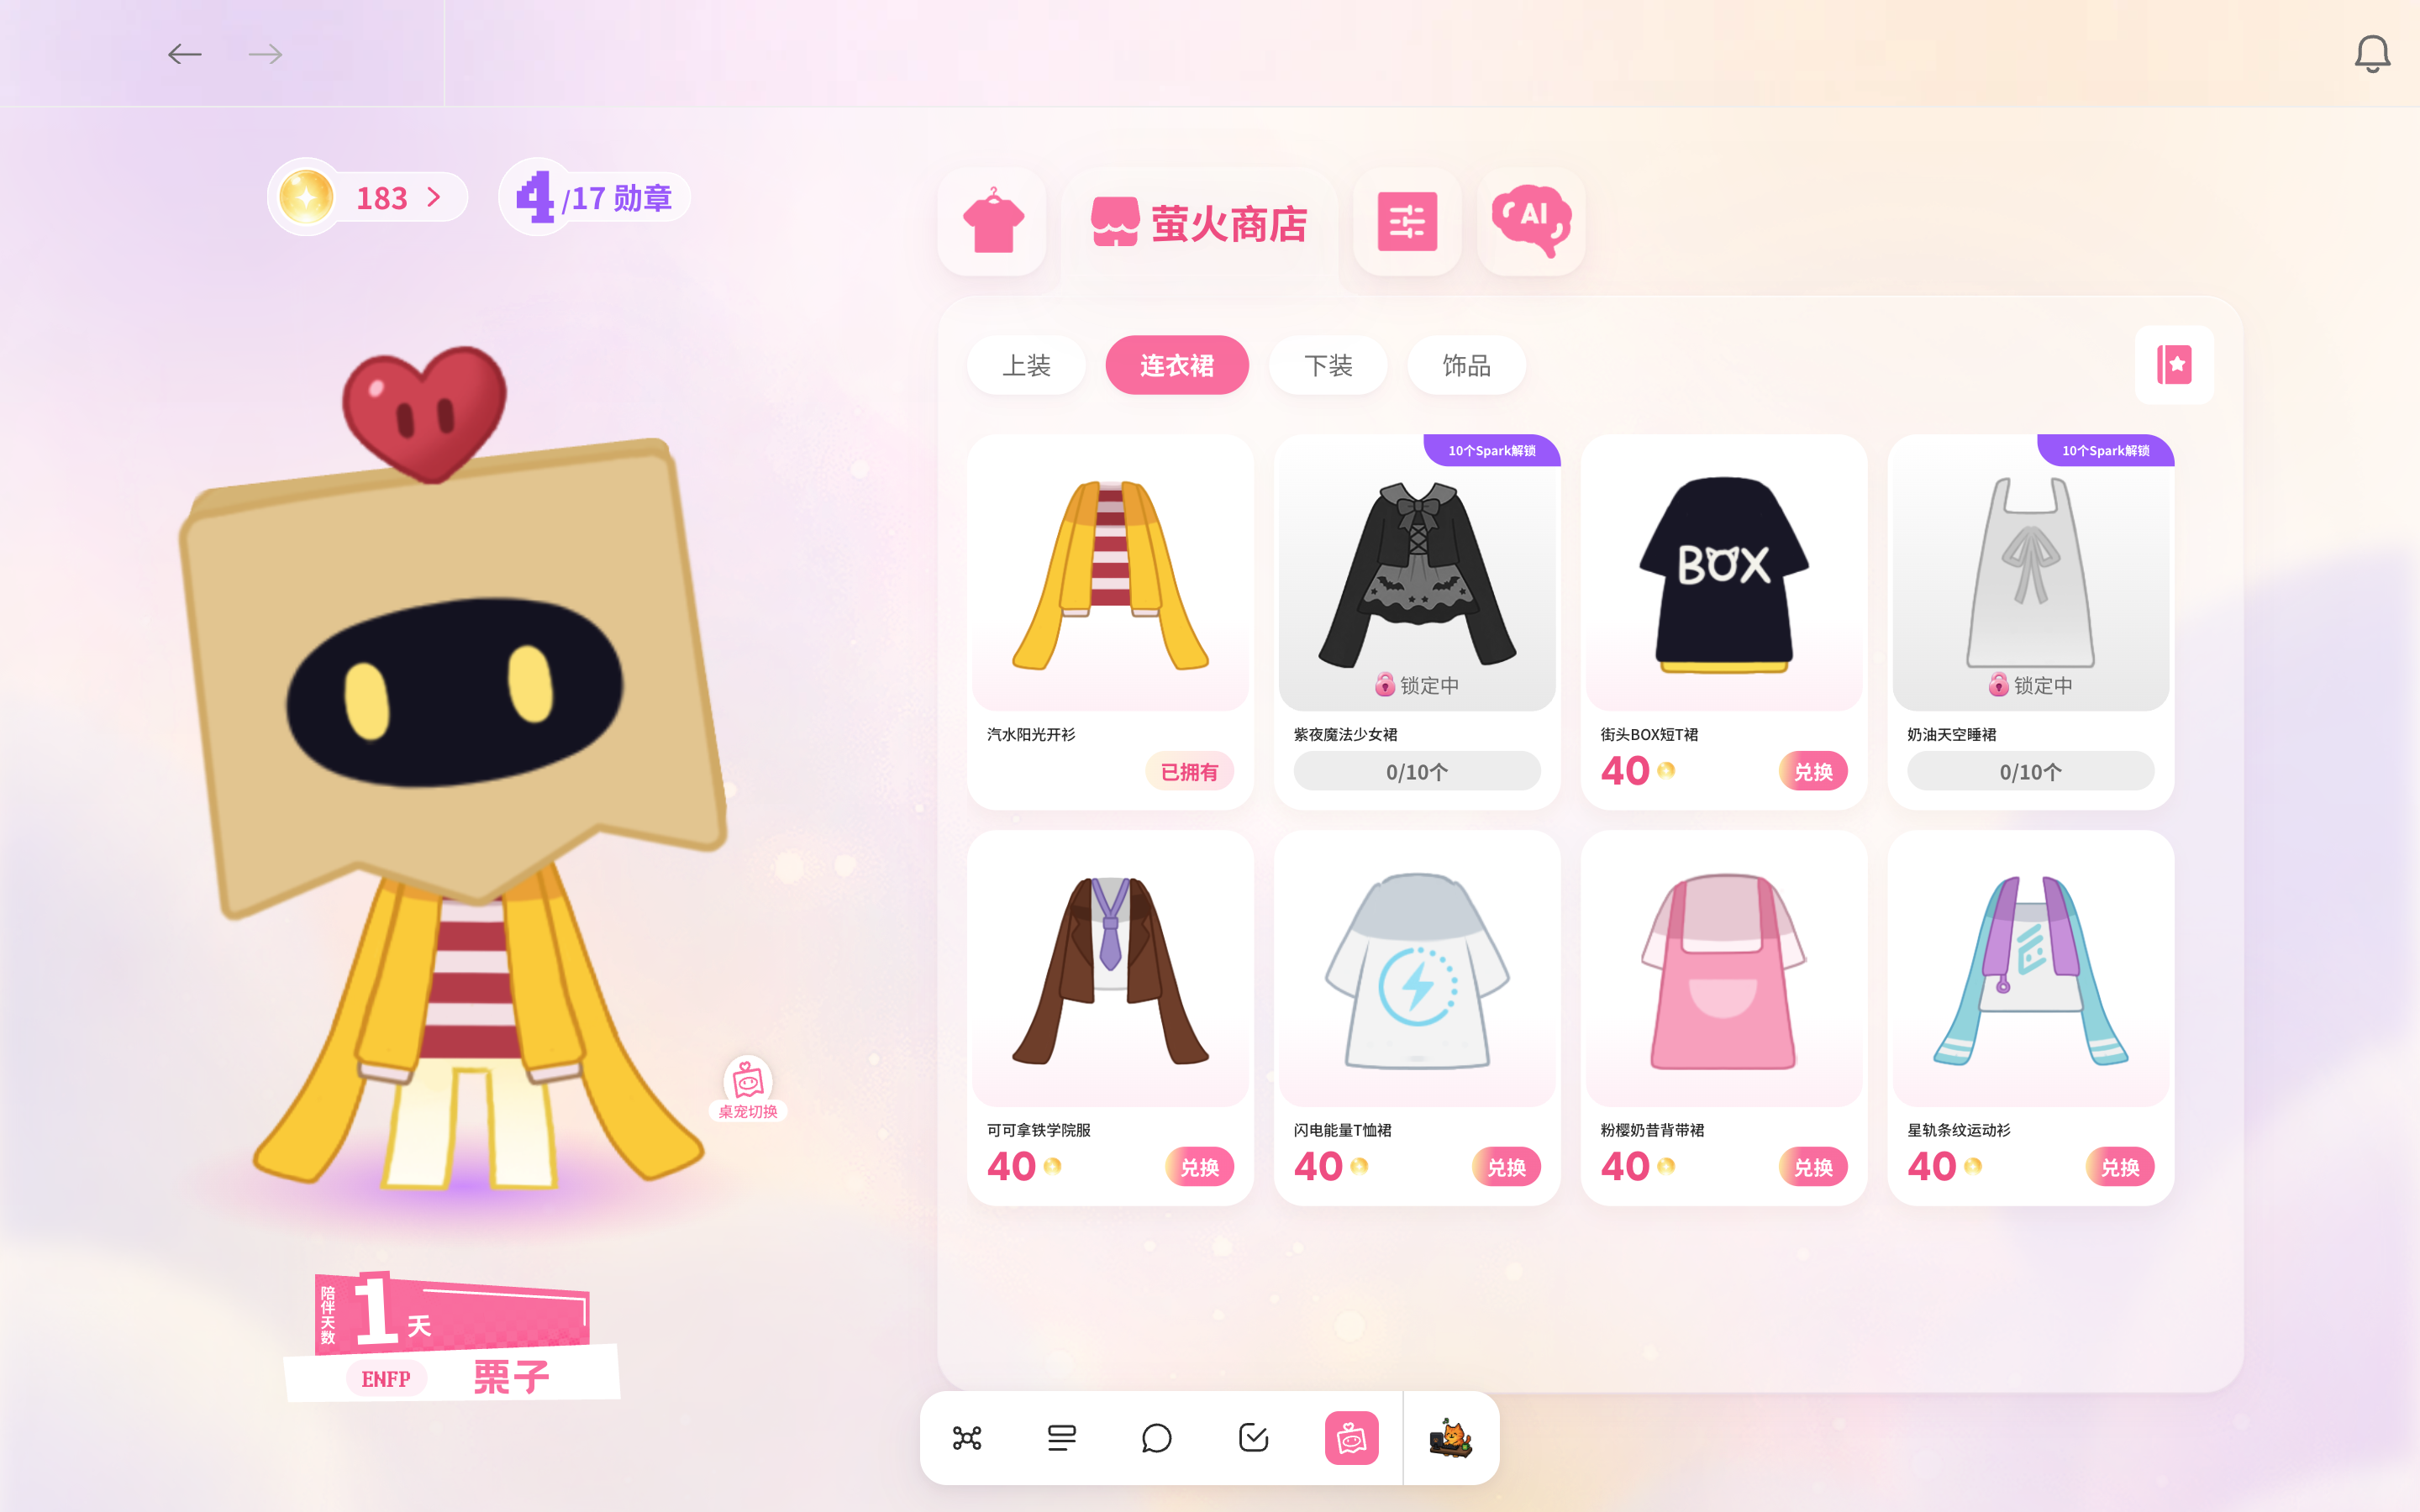
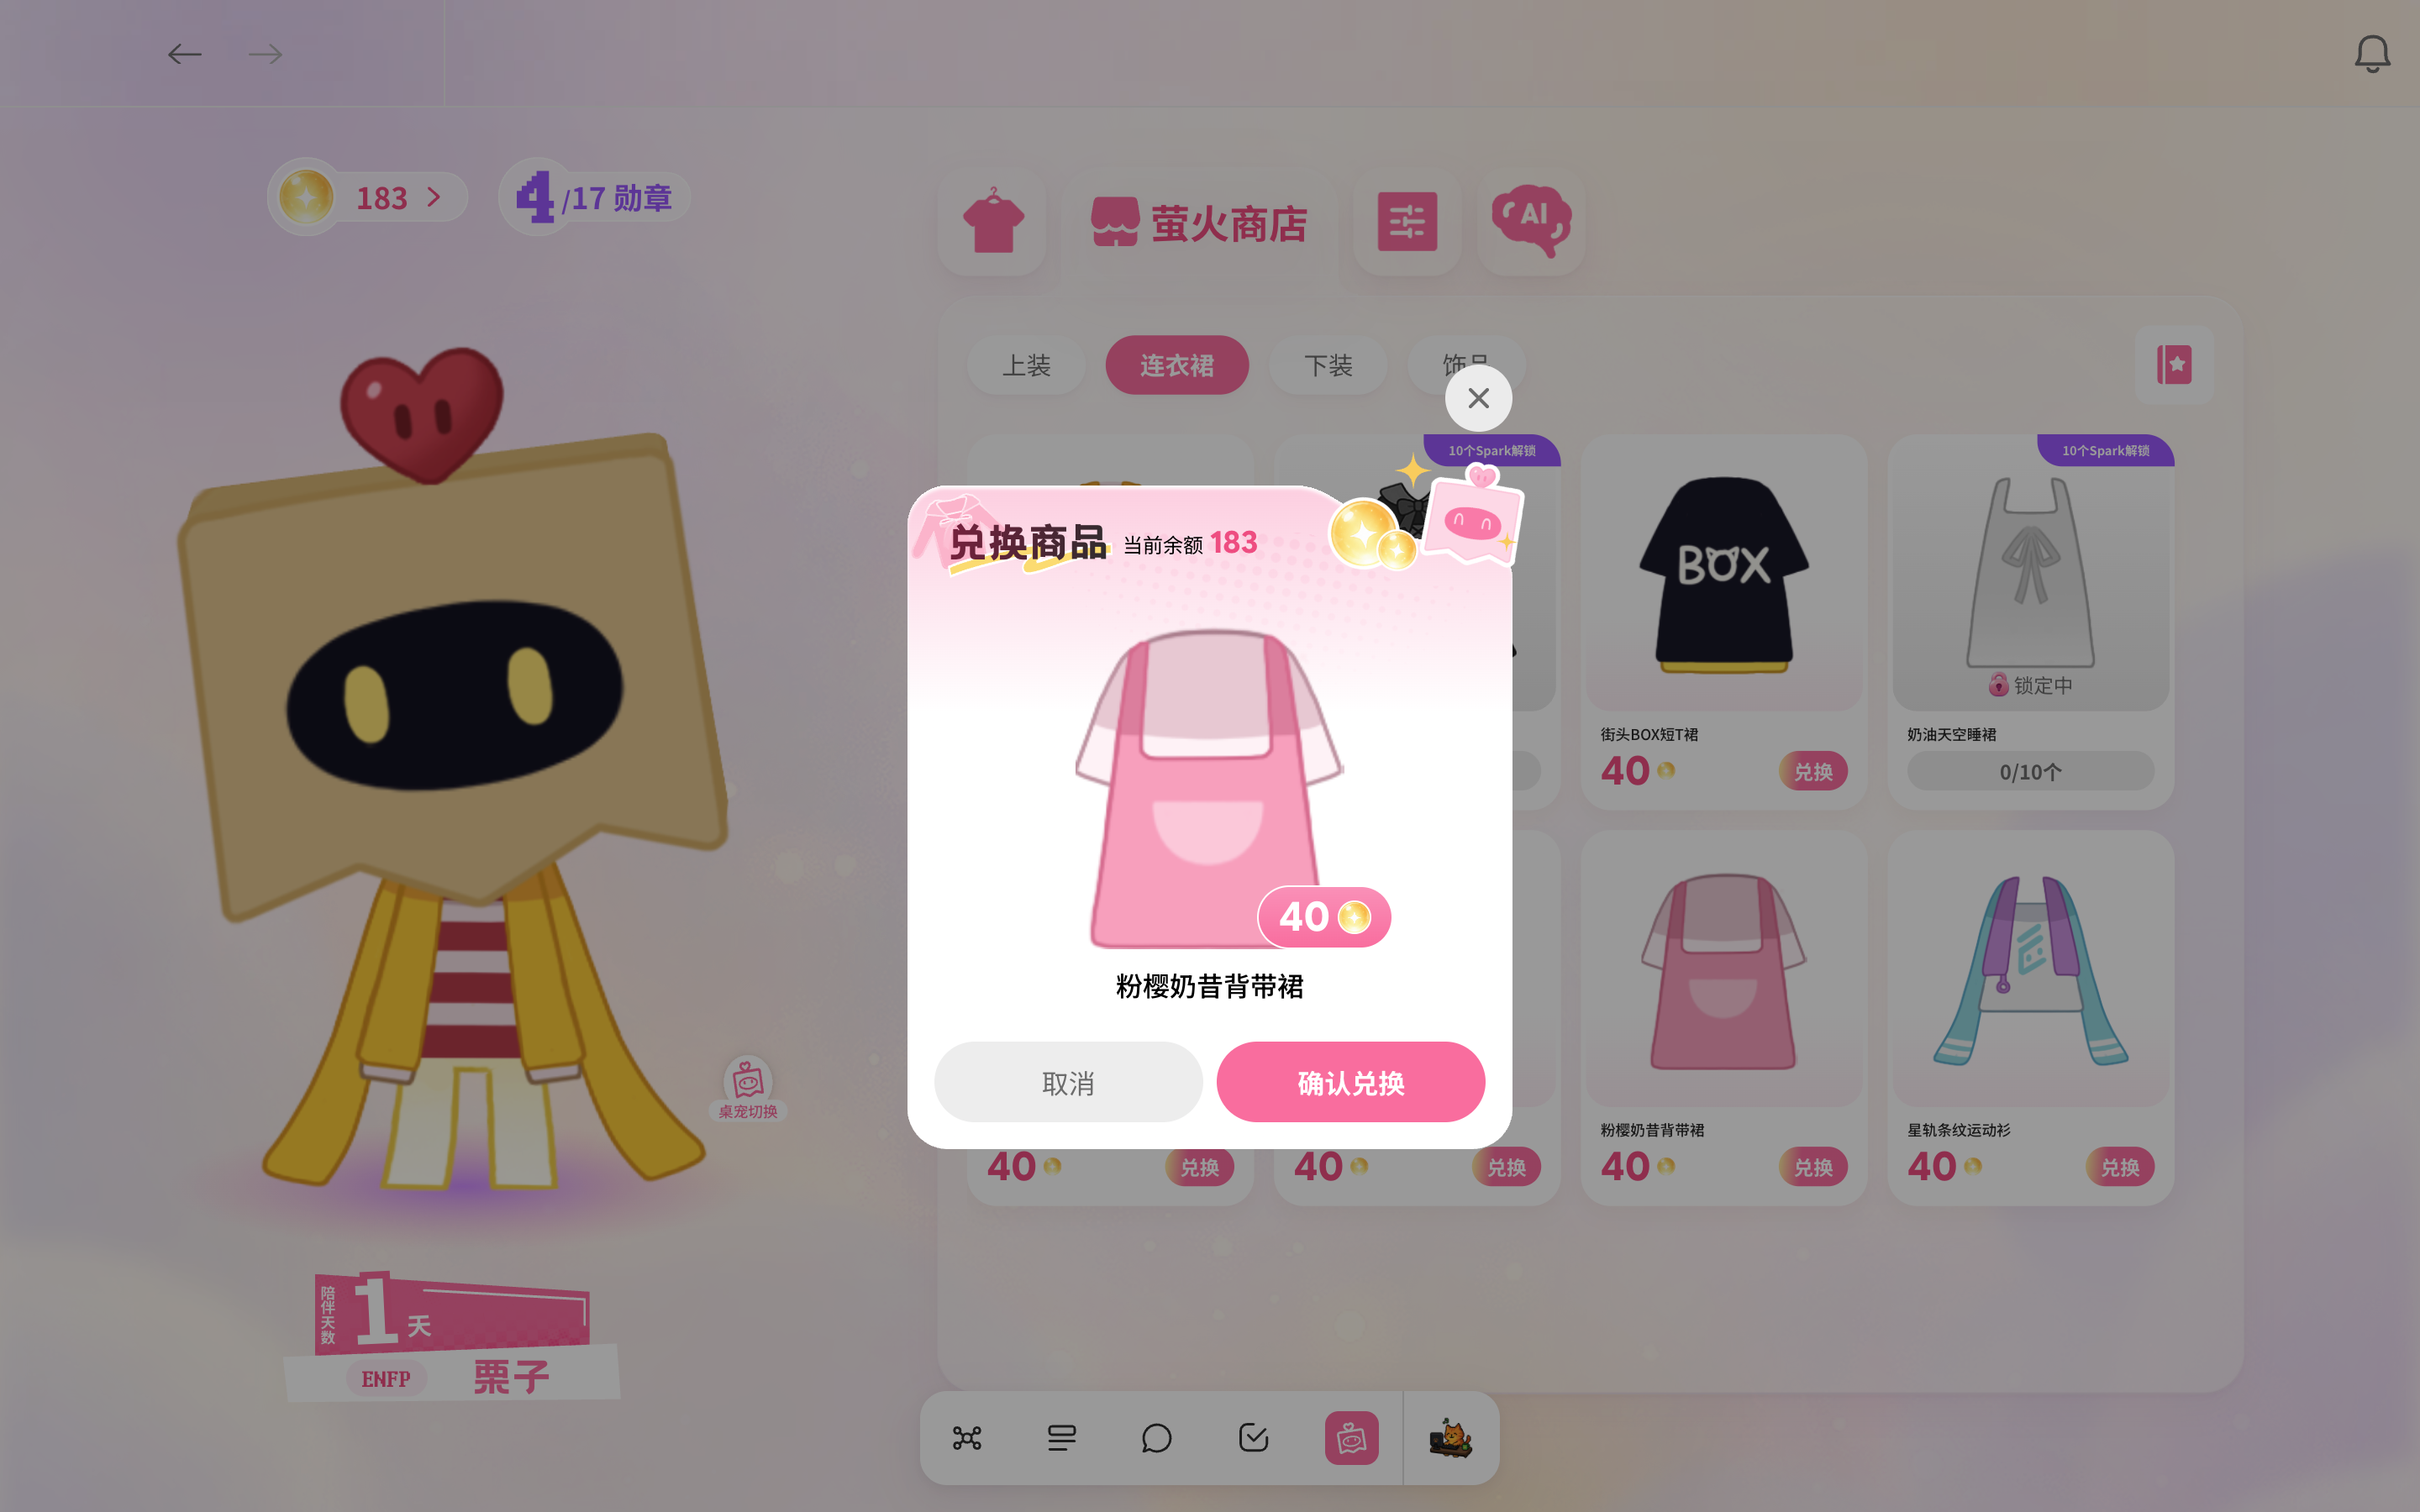
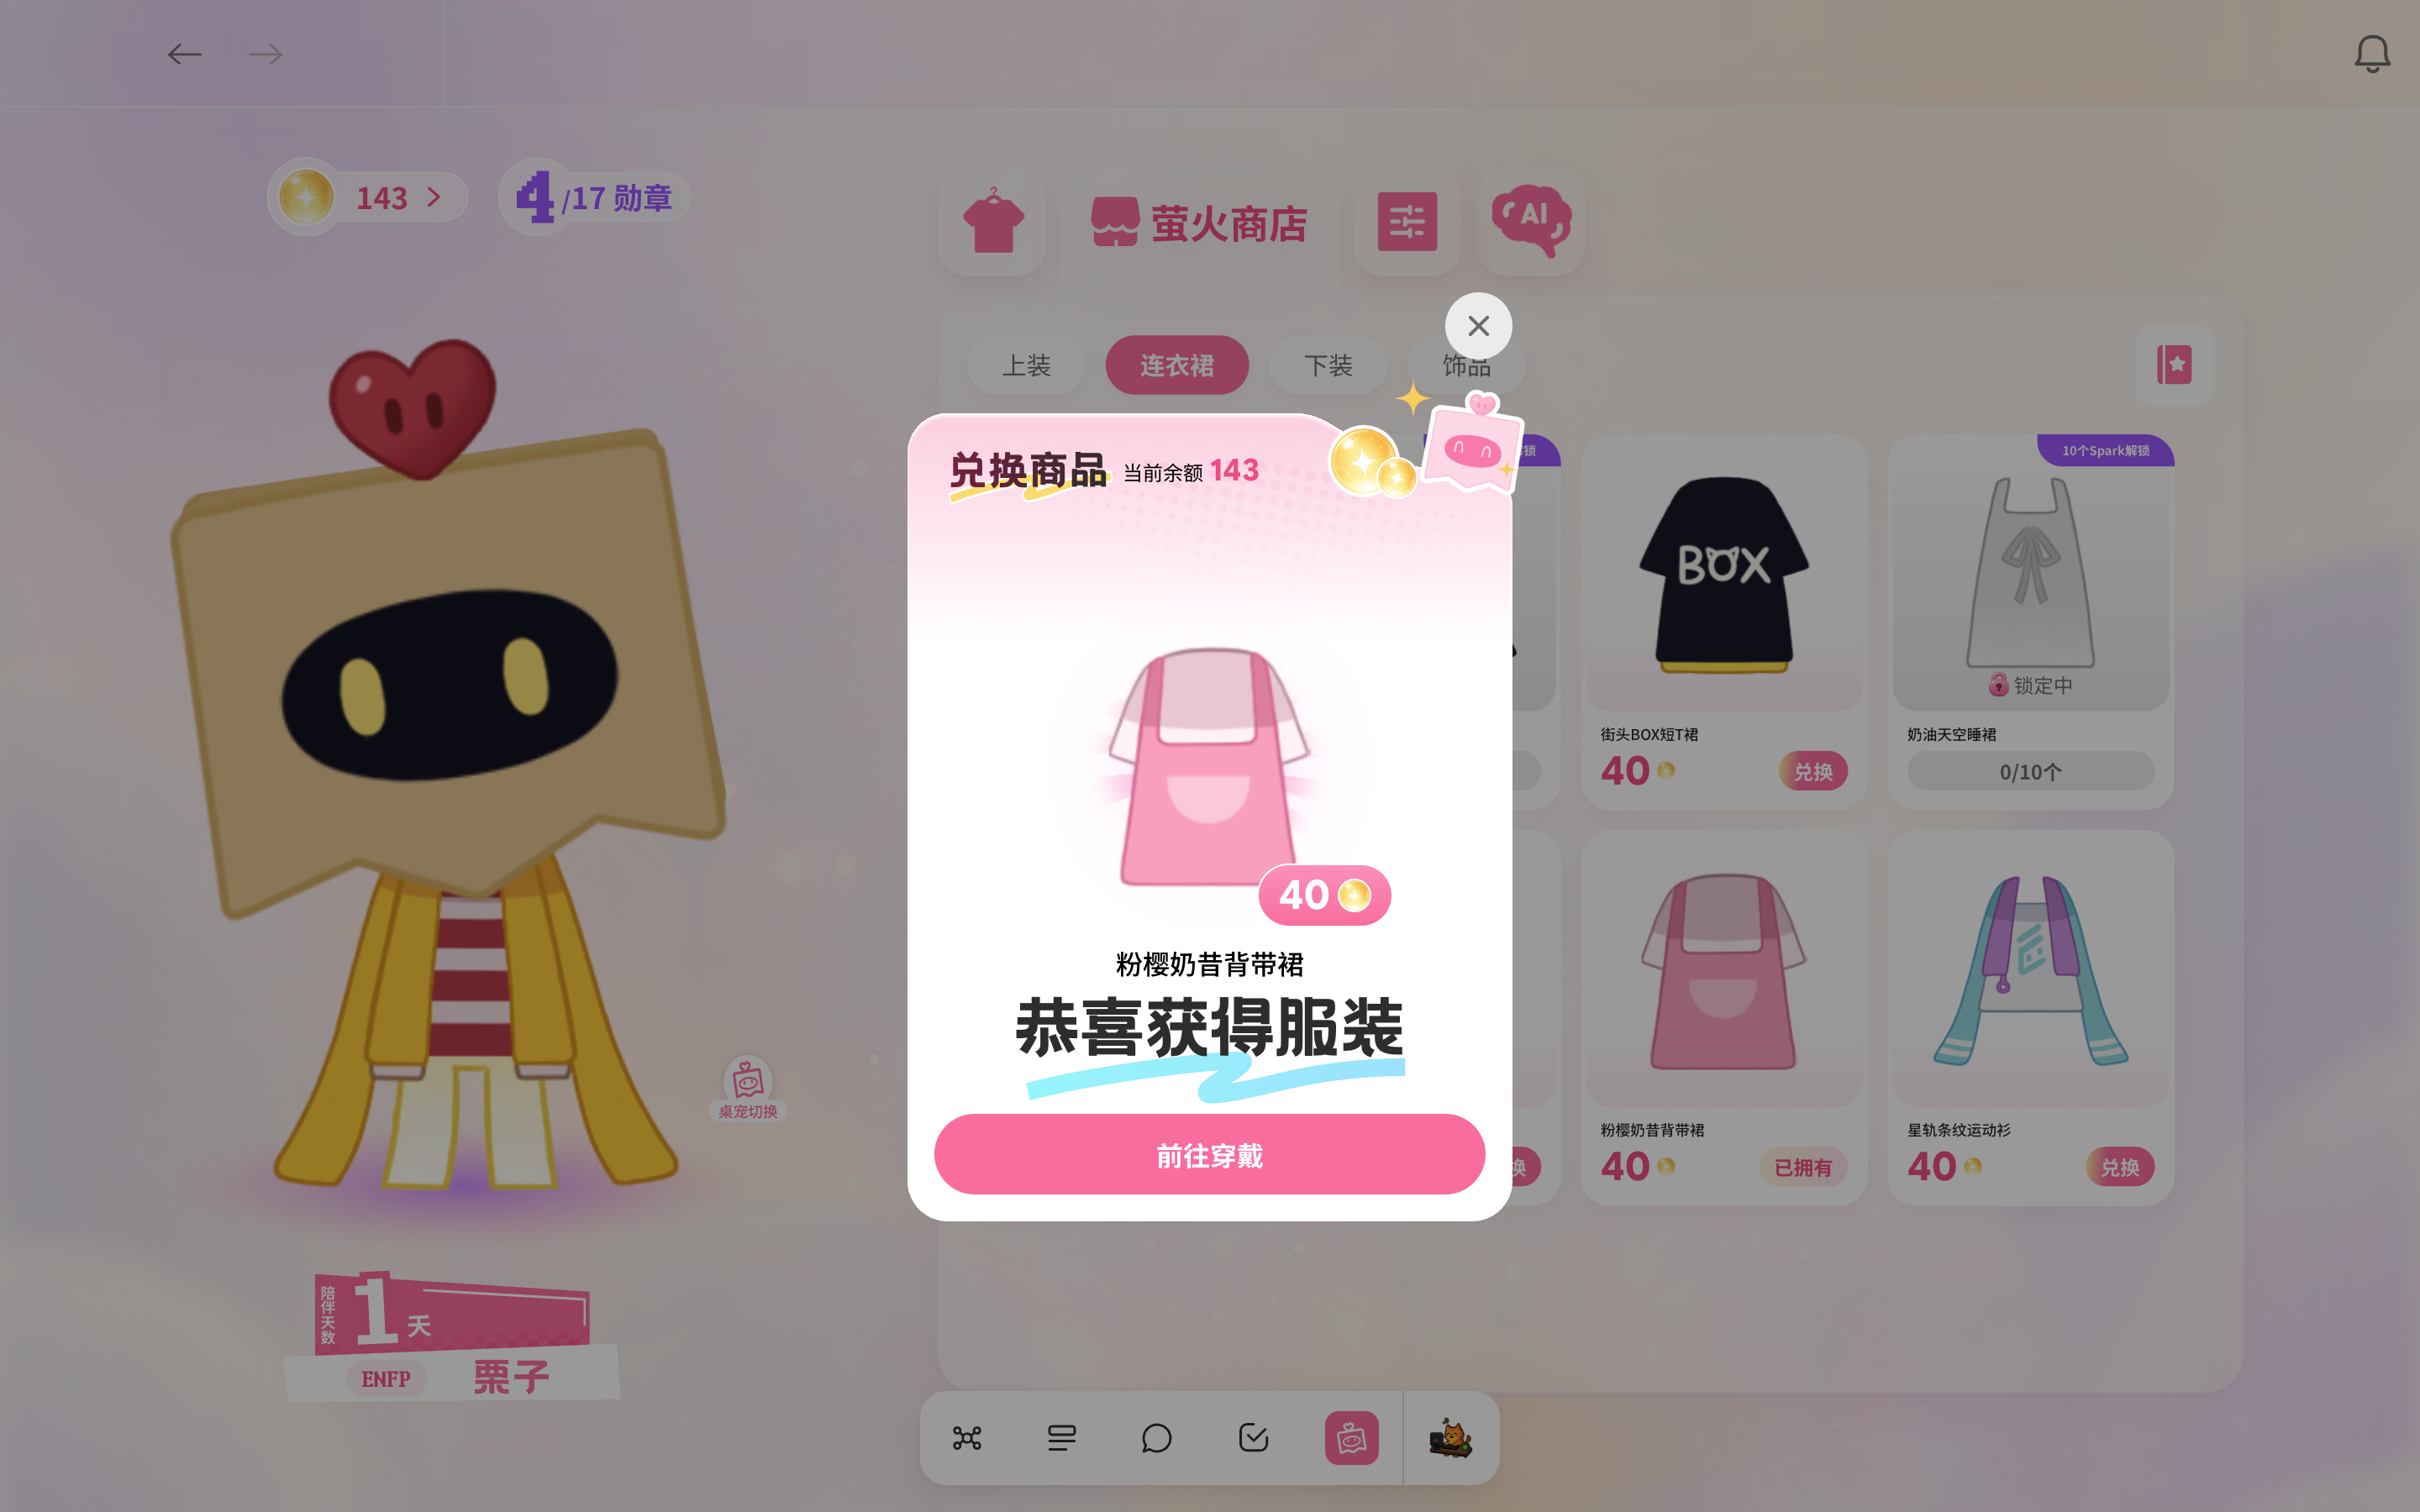
Select Redeem to open a confirmation showing the item name, price, and your balance. Select “Confirm redemption” to complete the purchase. The dialog changes to a success message, your Firefly balance decreases, and the outfit is added to your wardrobe. If your balance is too low, the confirmation button is disabled and an insufficient Fireflies message appears.
Companion Diary
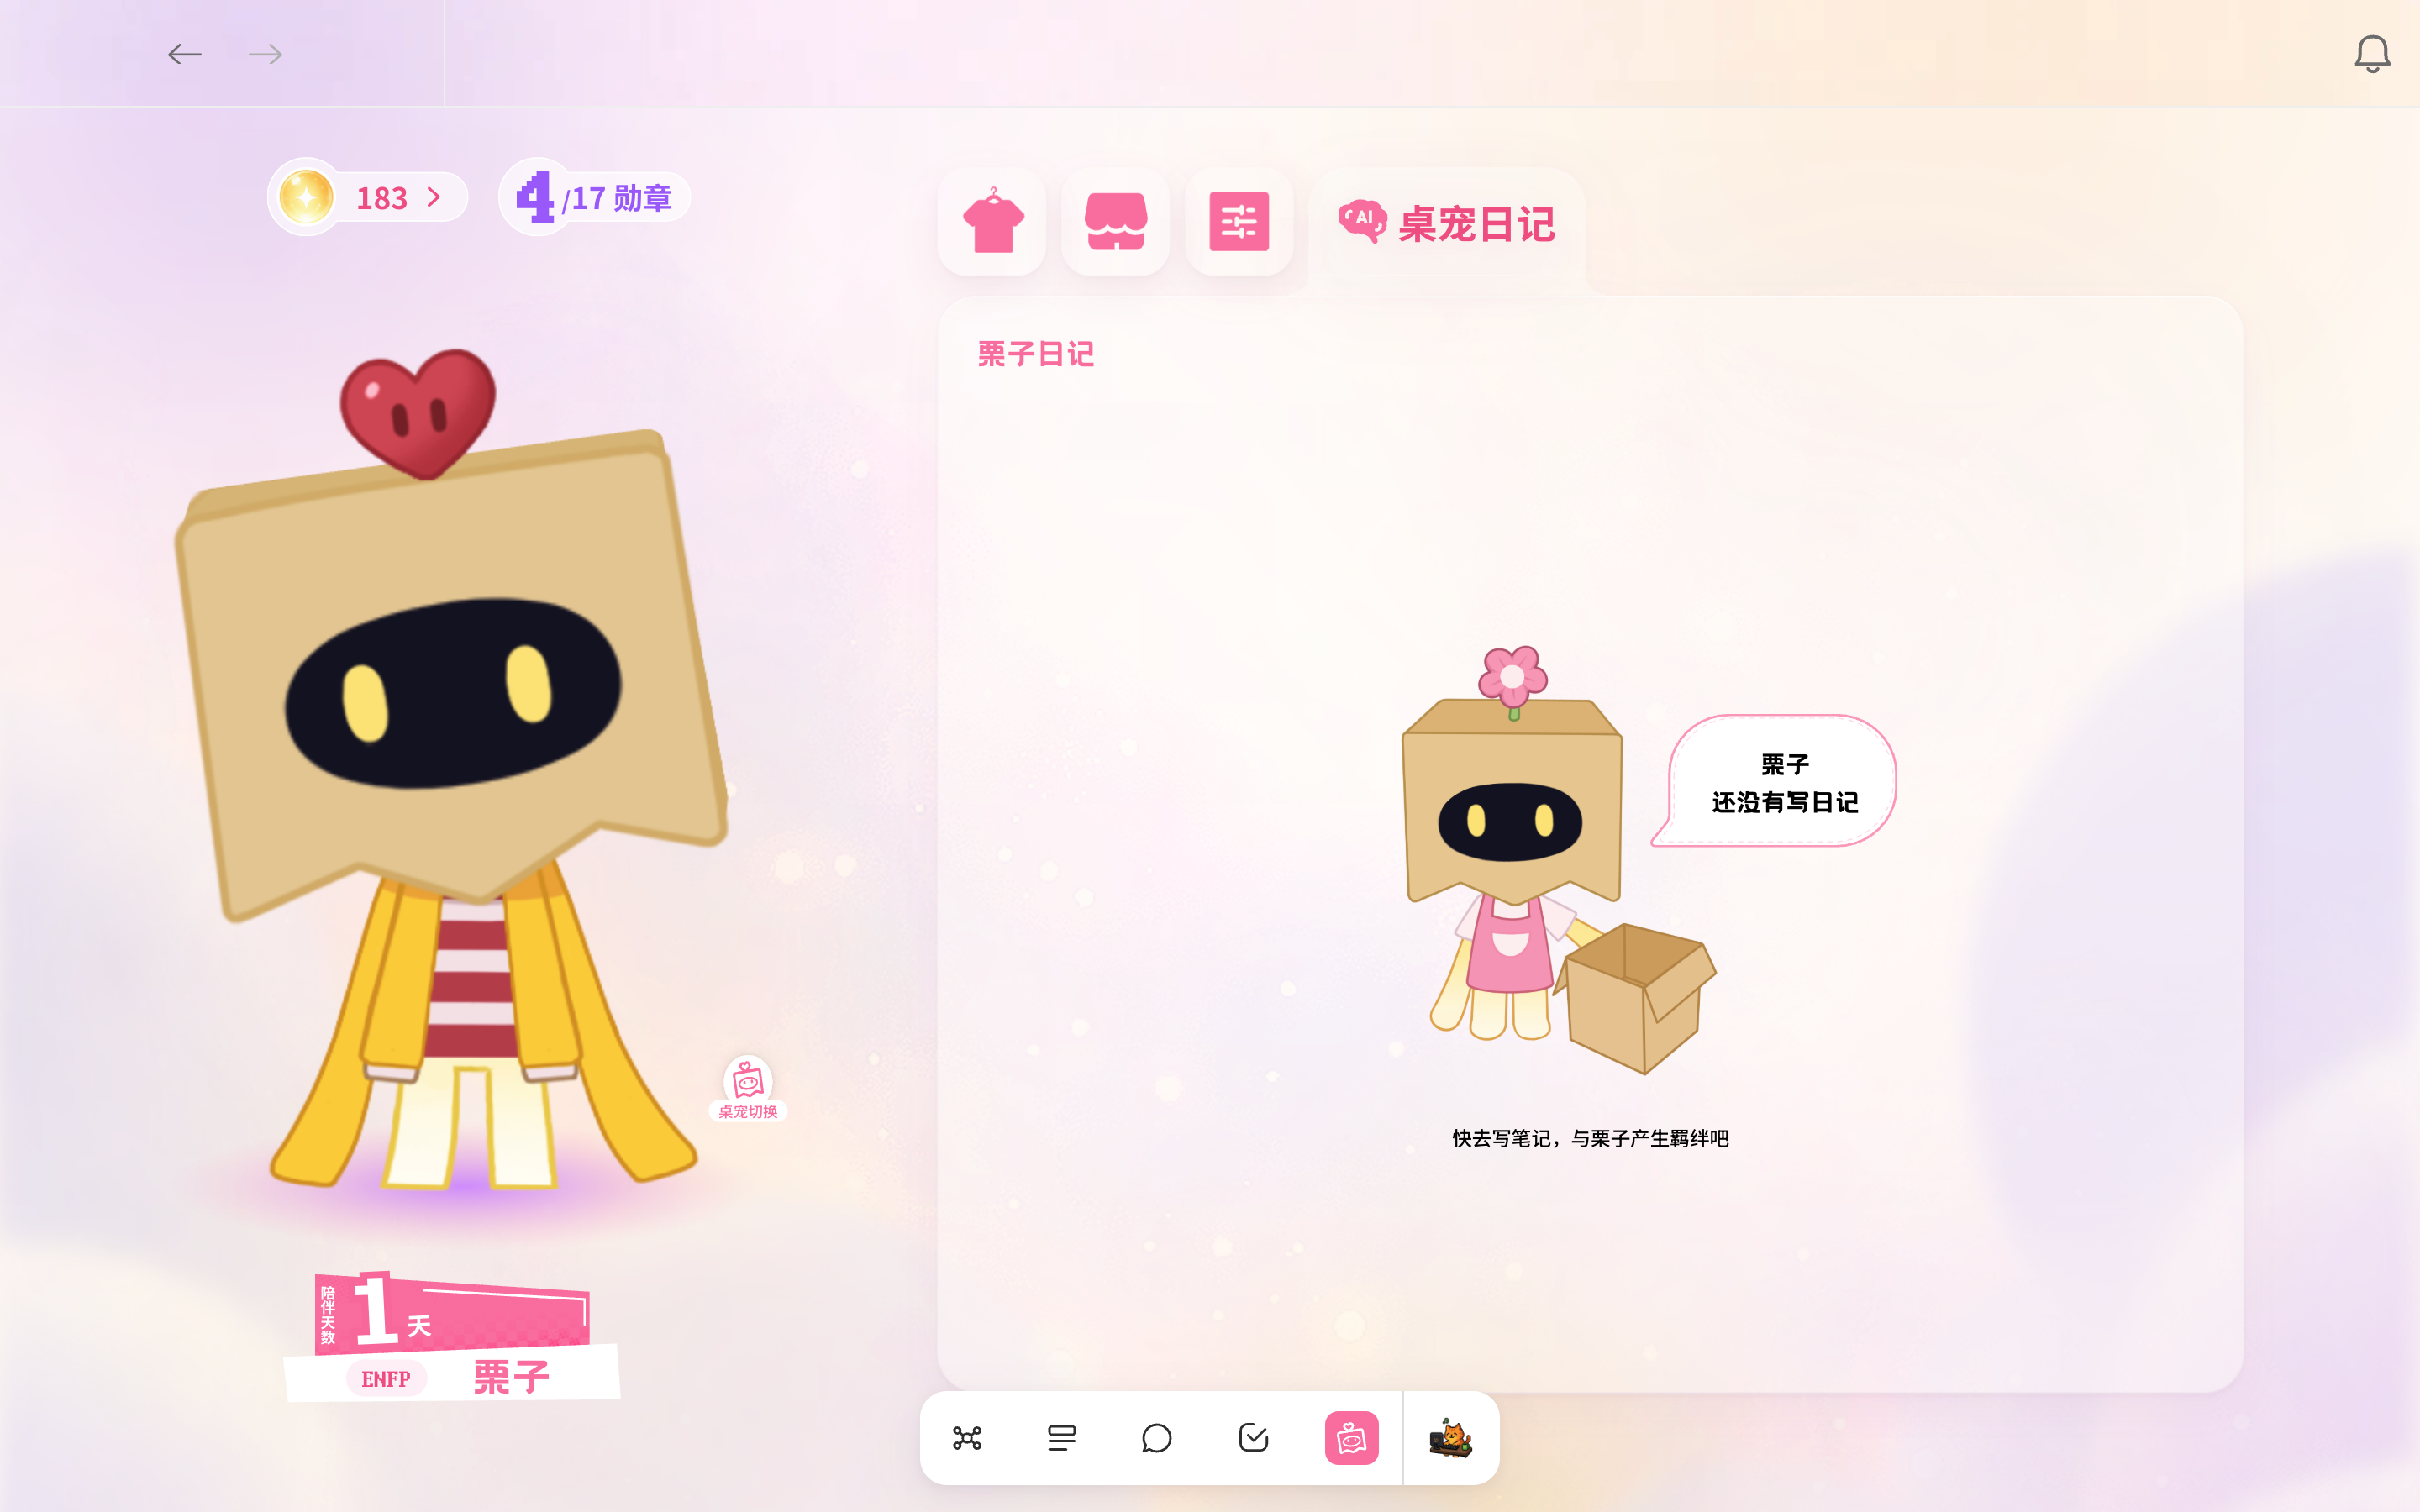
The fourth tab, Companion Diary, records the day from your companion’s perspective. Entries are read-only. If there are no entries yet, a short message appears. Keep writing notes and spending time together, and the diary will gradually take shape.
Settings
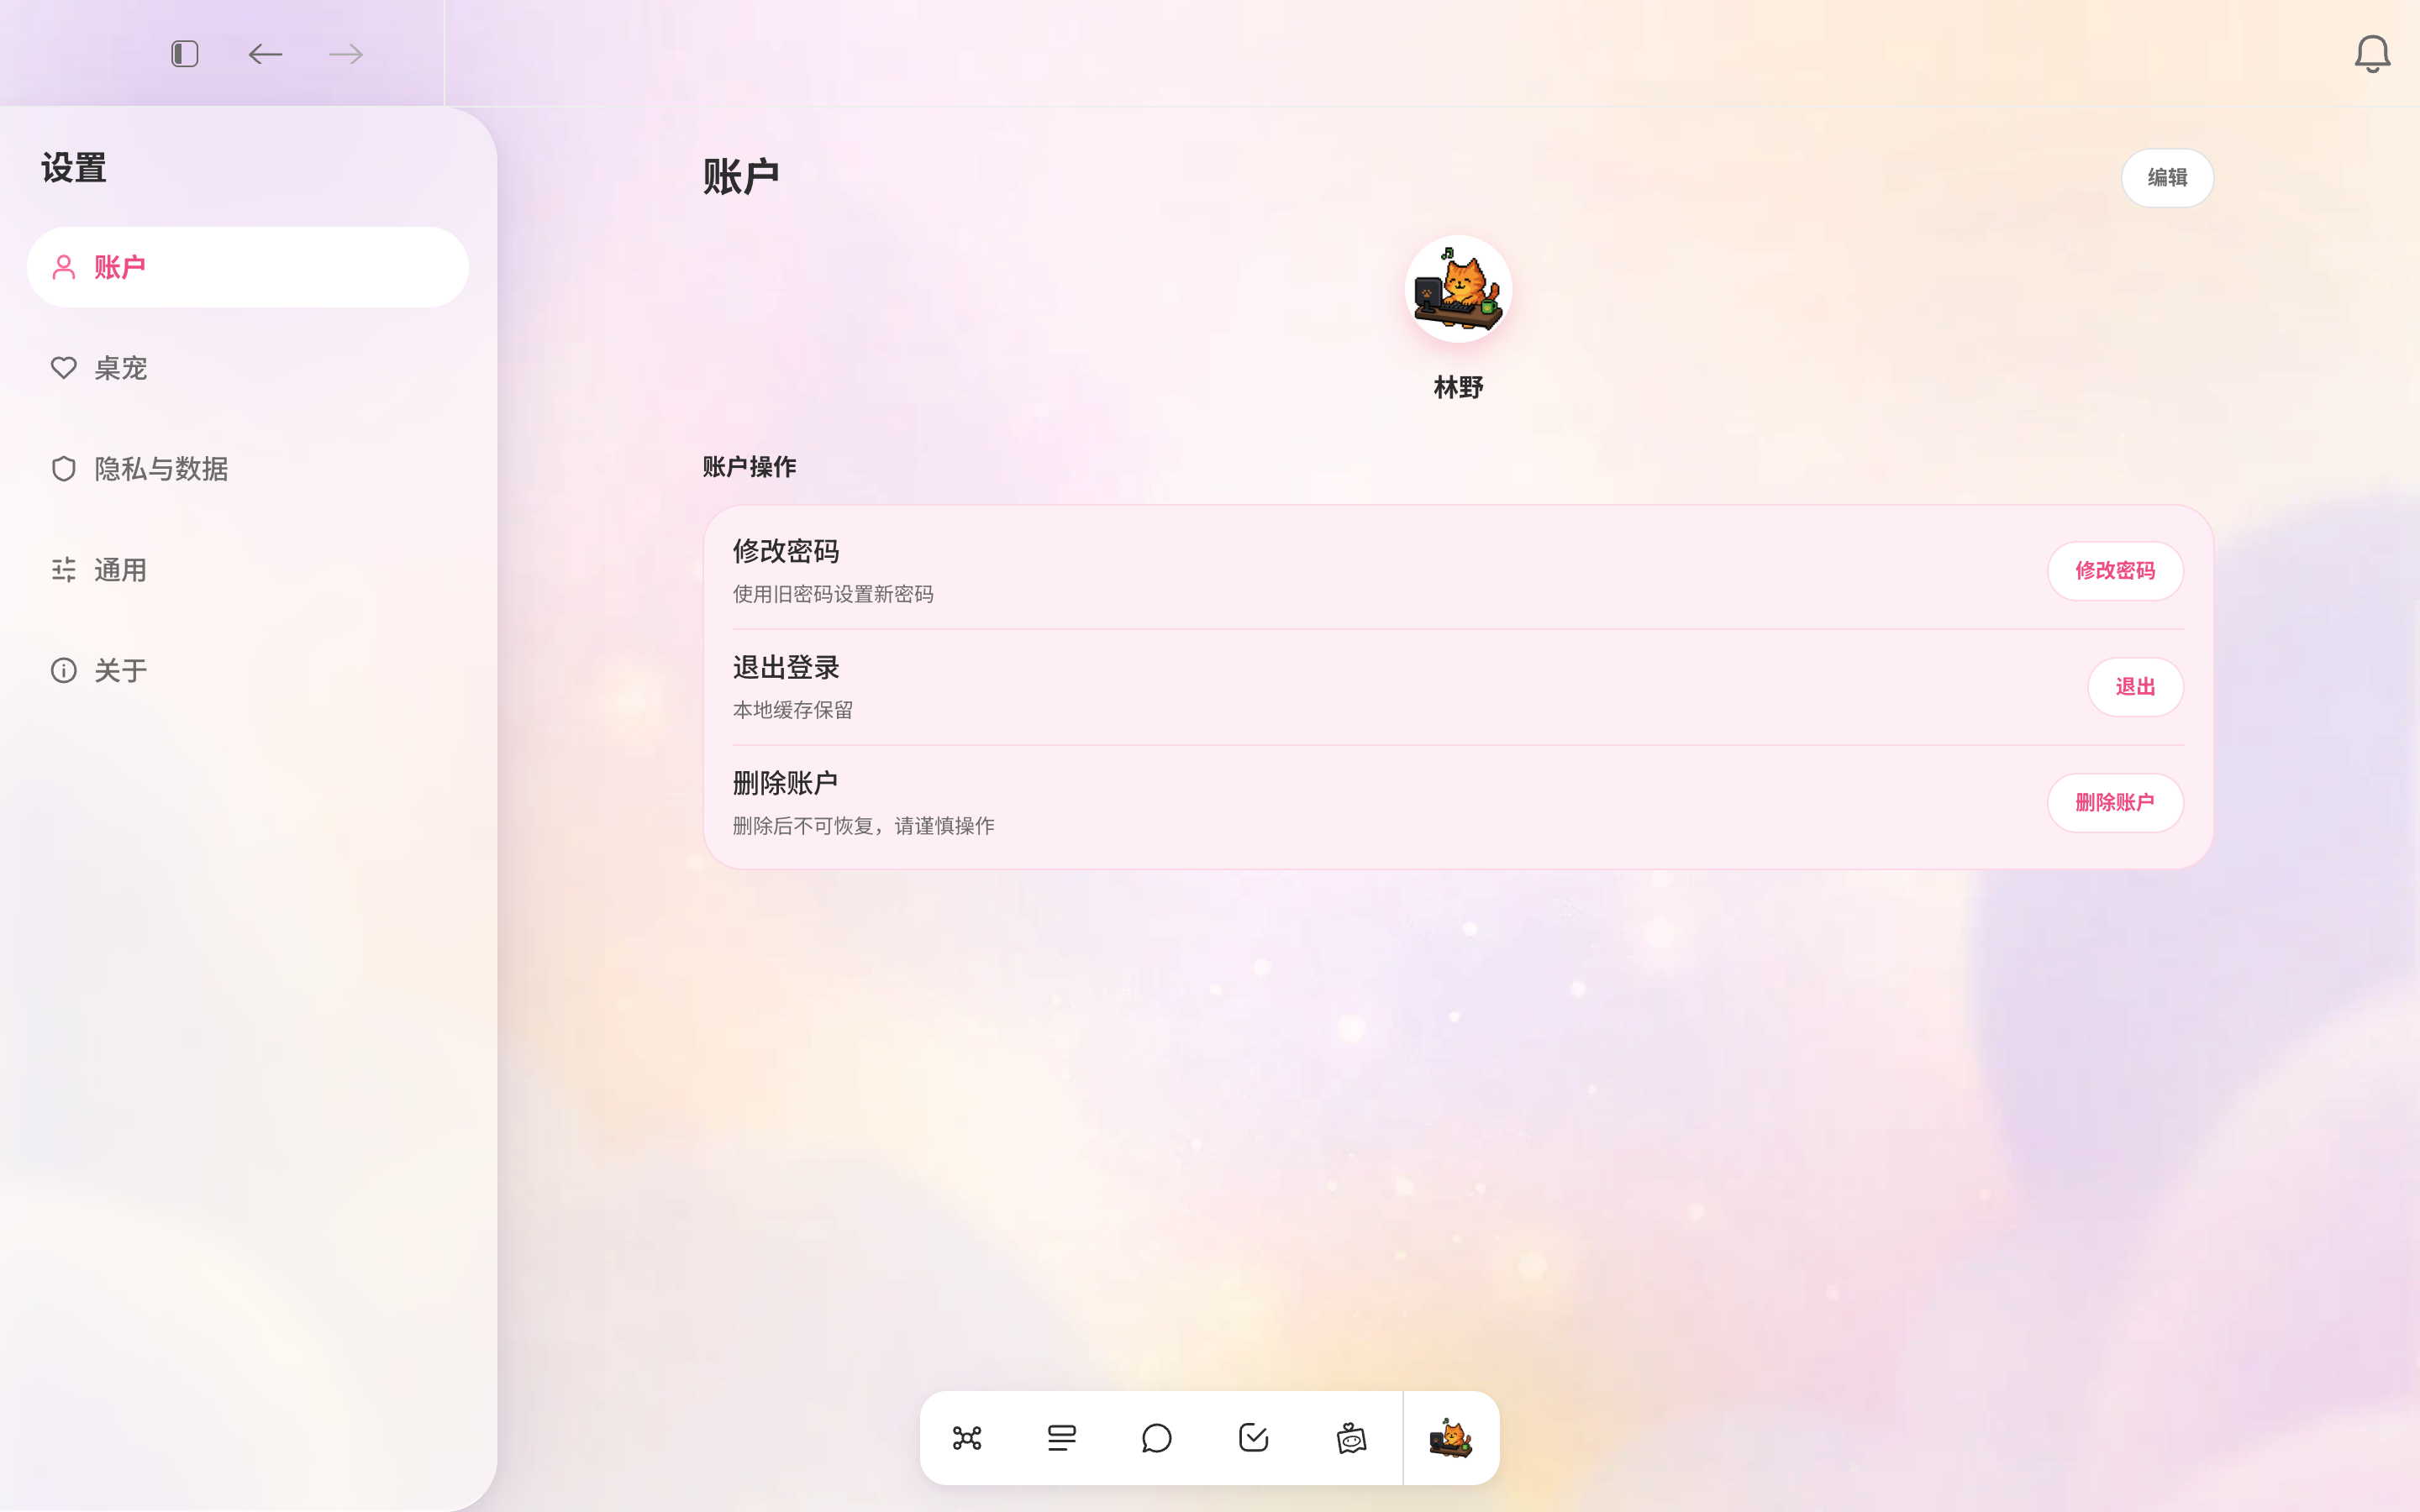
Settings brings your account and preferences together in five sections on the left: Account, Companion, Privacy & Data, General, and About. Select the rightmost icon in the bottom dock to open Settings. Account is selected by default.
Edit your profile
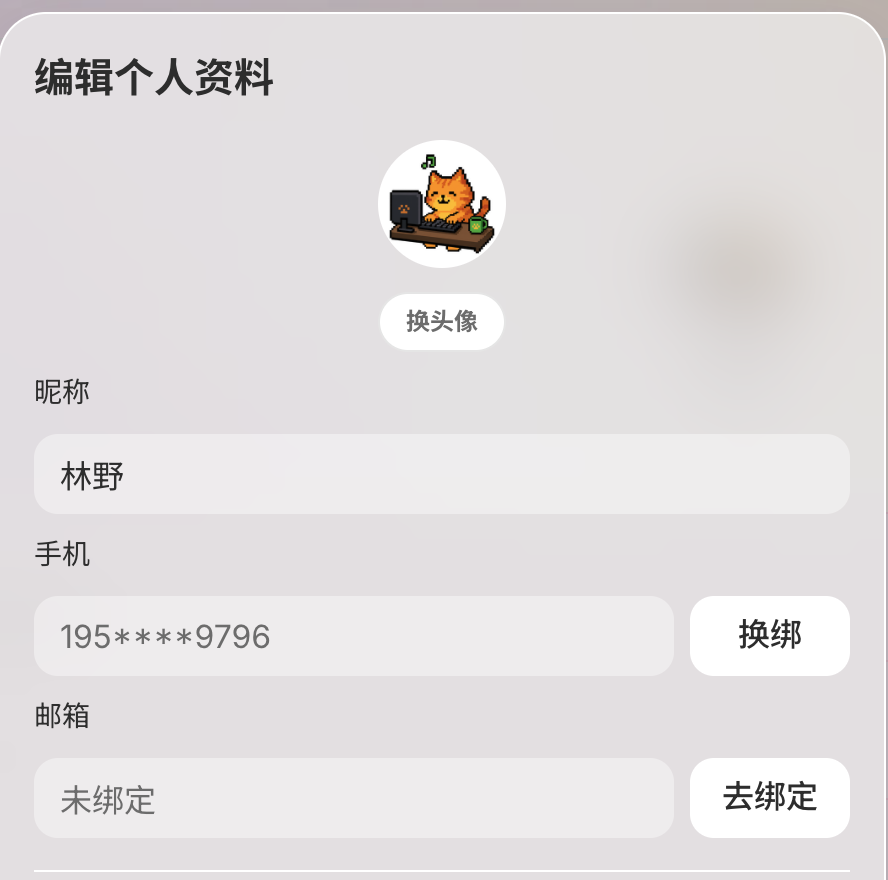
The Account page shows your current avatar and nickname. Select Edit at the top right to open Edit Profile, where you can manage your nickname, avatar, phone number, email, account ID, sign-in password, and WeChat link. Select Save at the bottom to apply your changes.
Change your nickname
The Nickname field contains your current nickname. Edit it directly; it cannot be empty and allows up to 20 characters. Select Save to update the nickname shown on your Account page.
Change your avatar
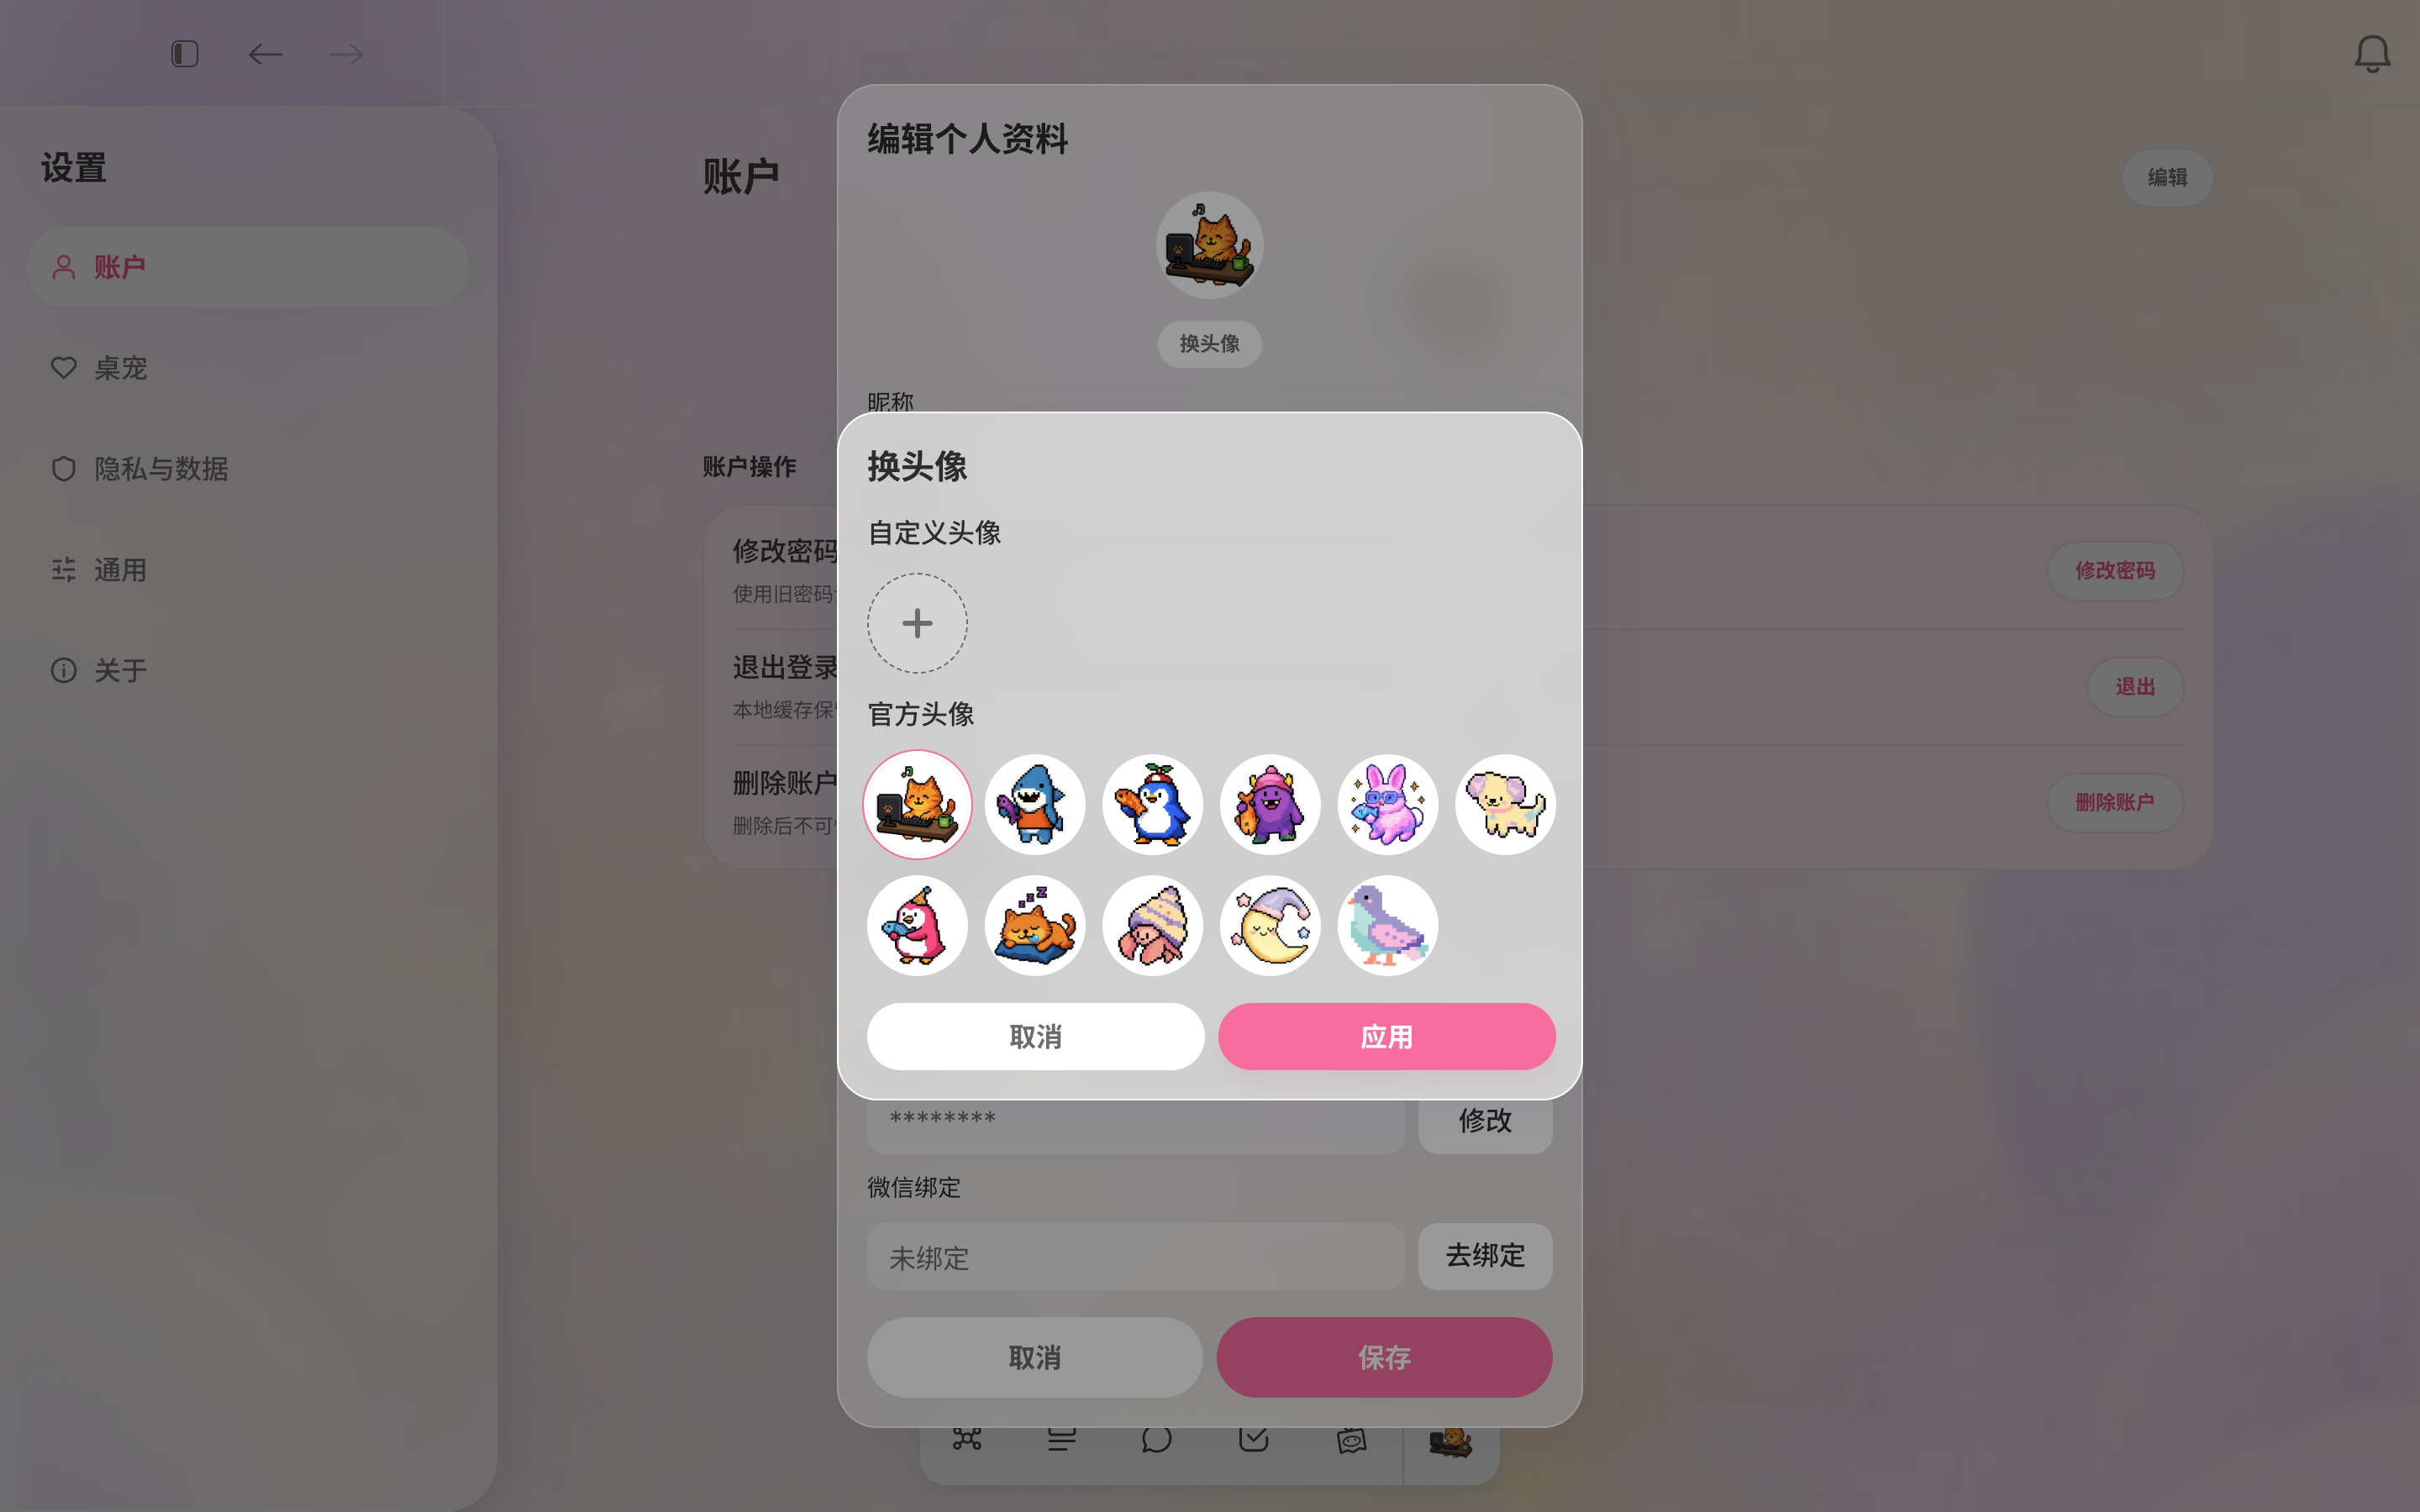
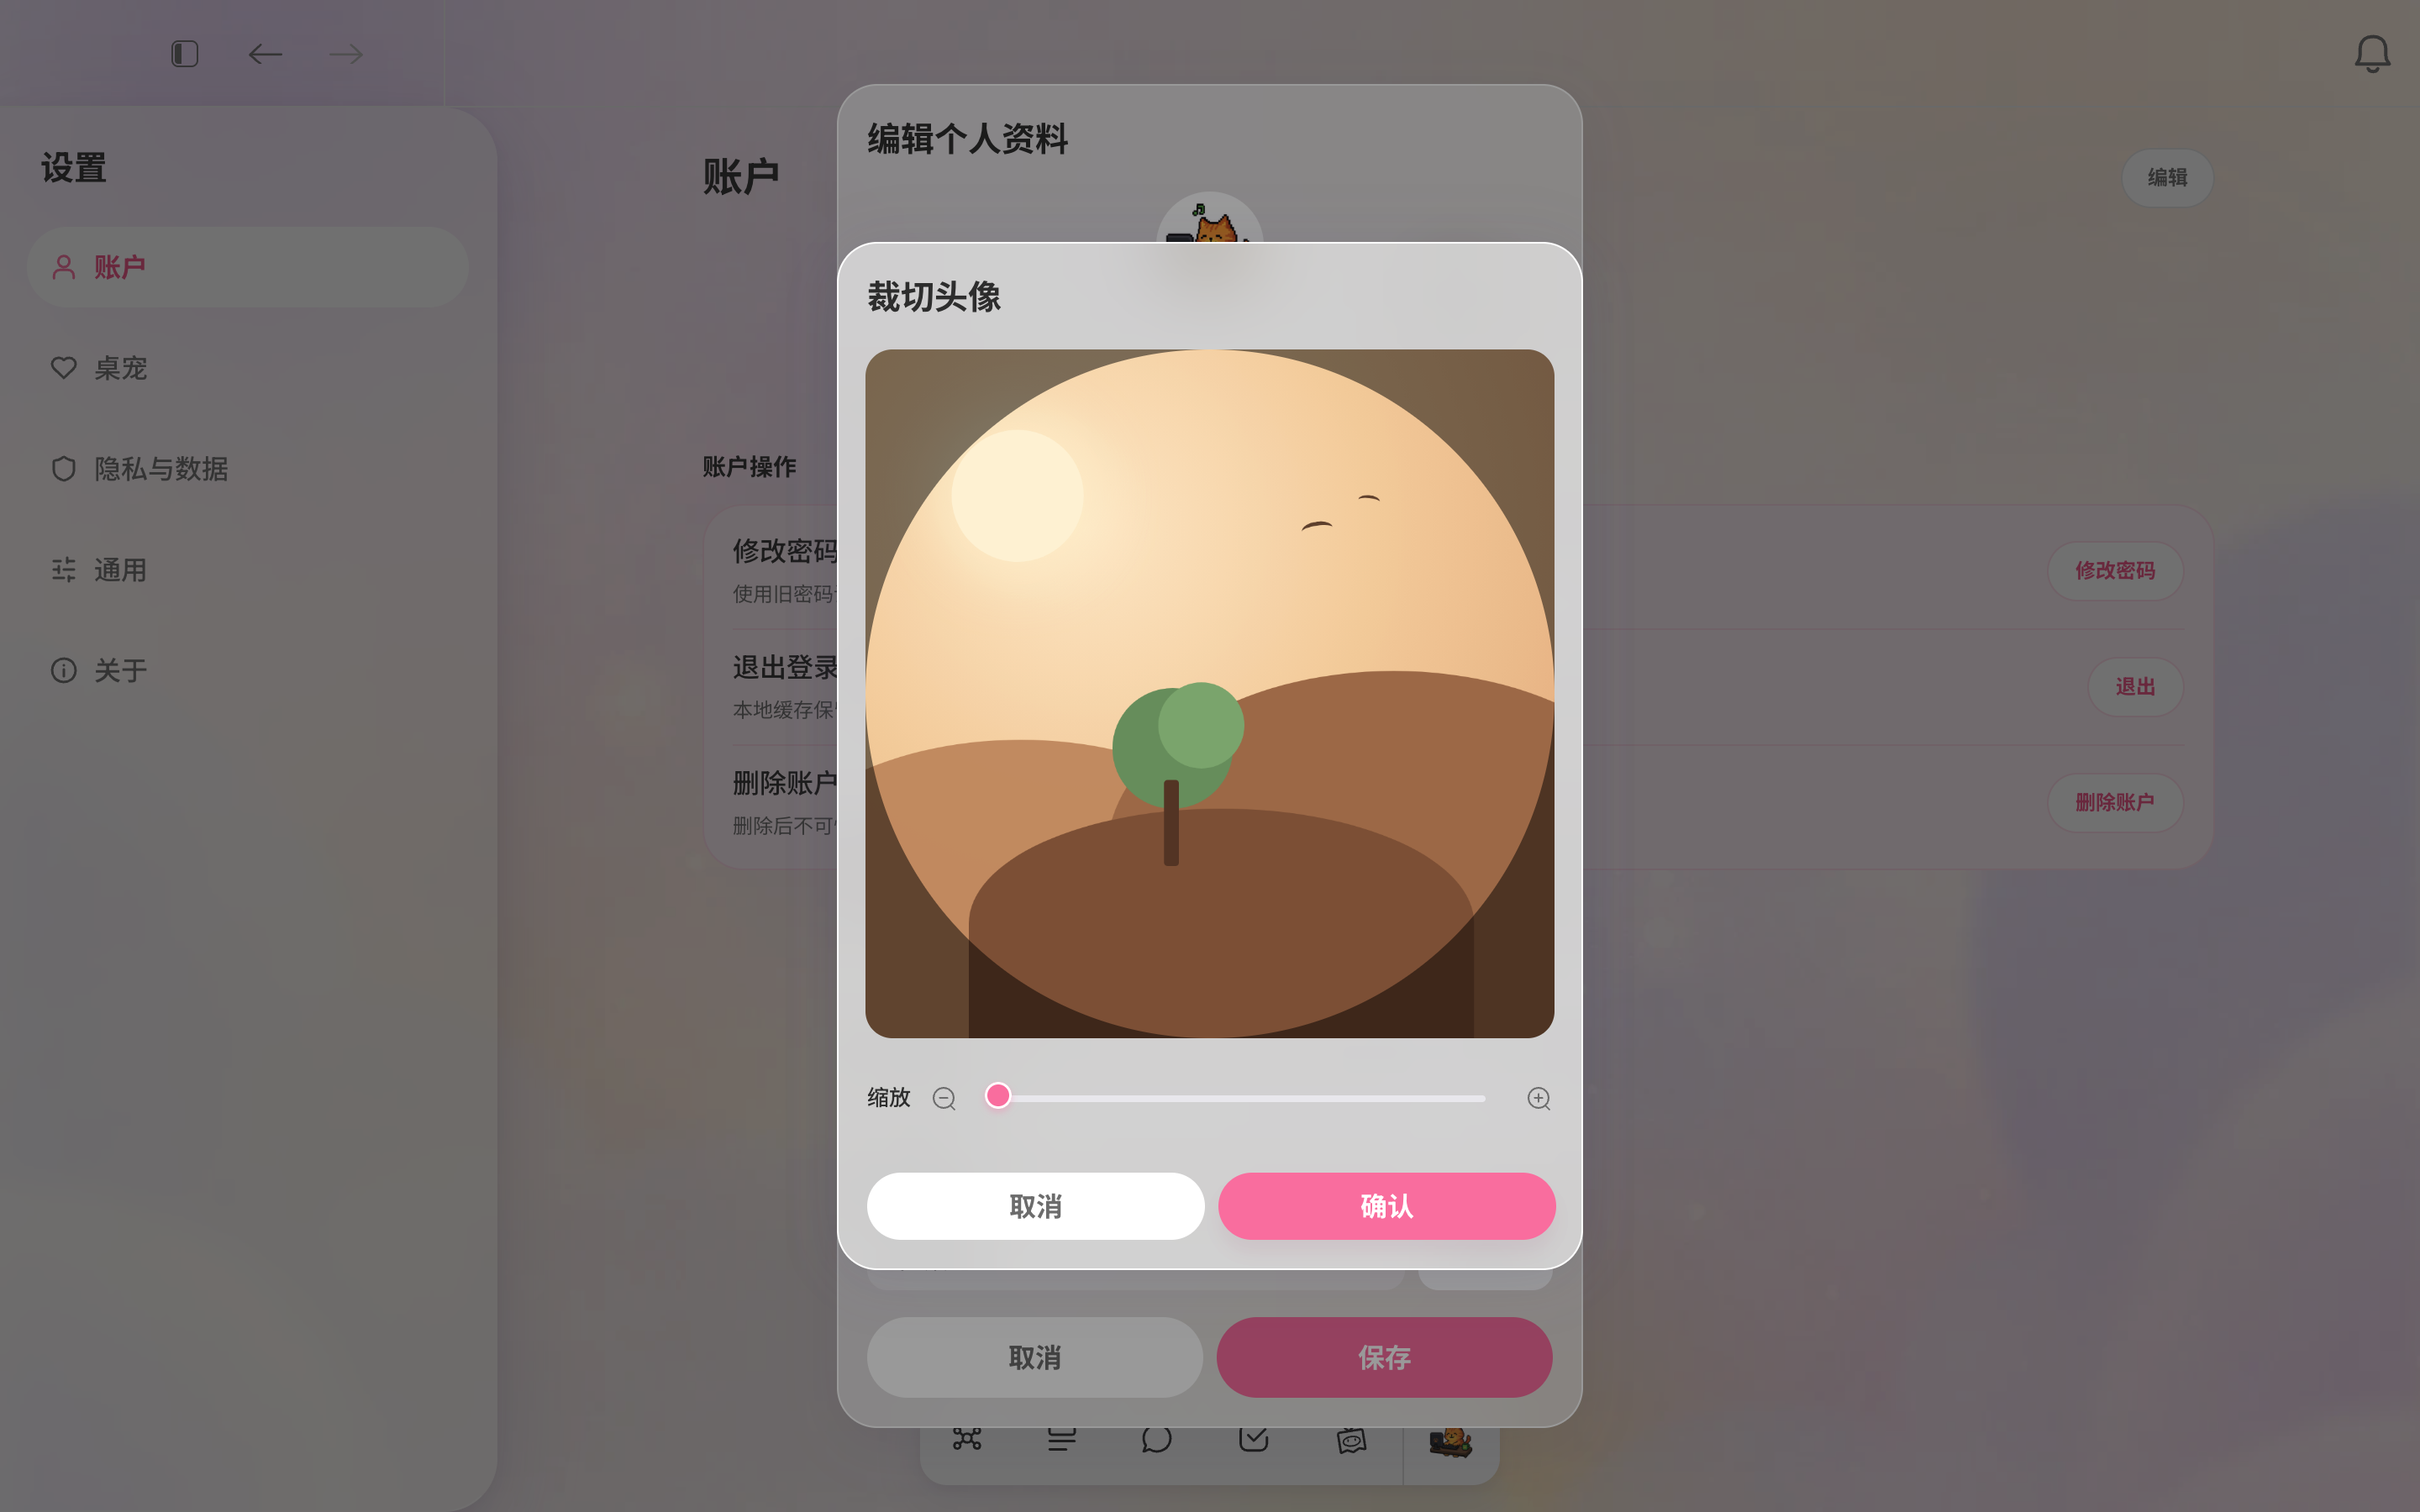
Select “Change avatar” beneath the avatar at the top of the dialog. Choose from 11 official avatars and select Apply. You can also upload a local image. After selecting it, use the circular crop preview: drag to reposition and use the 1×–3× zoom slider to resize. The image always fills the crop area. Select Confirm to create the avatar and add it to the list. Uploads must be PNG files no larger than 5 MB each.
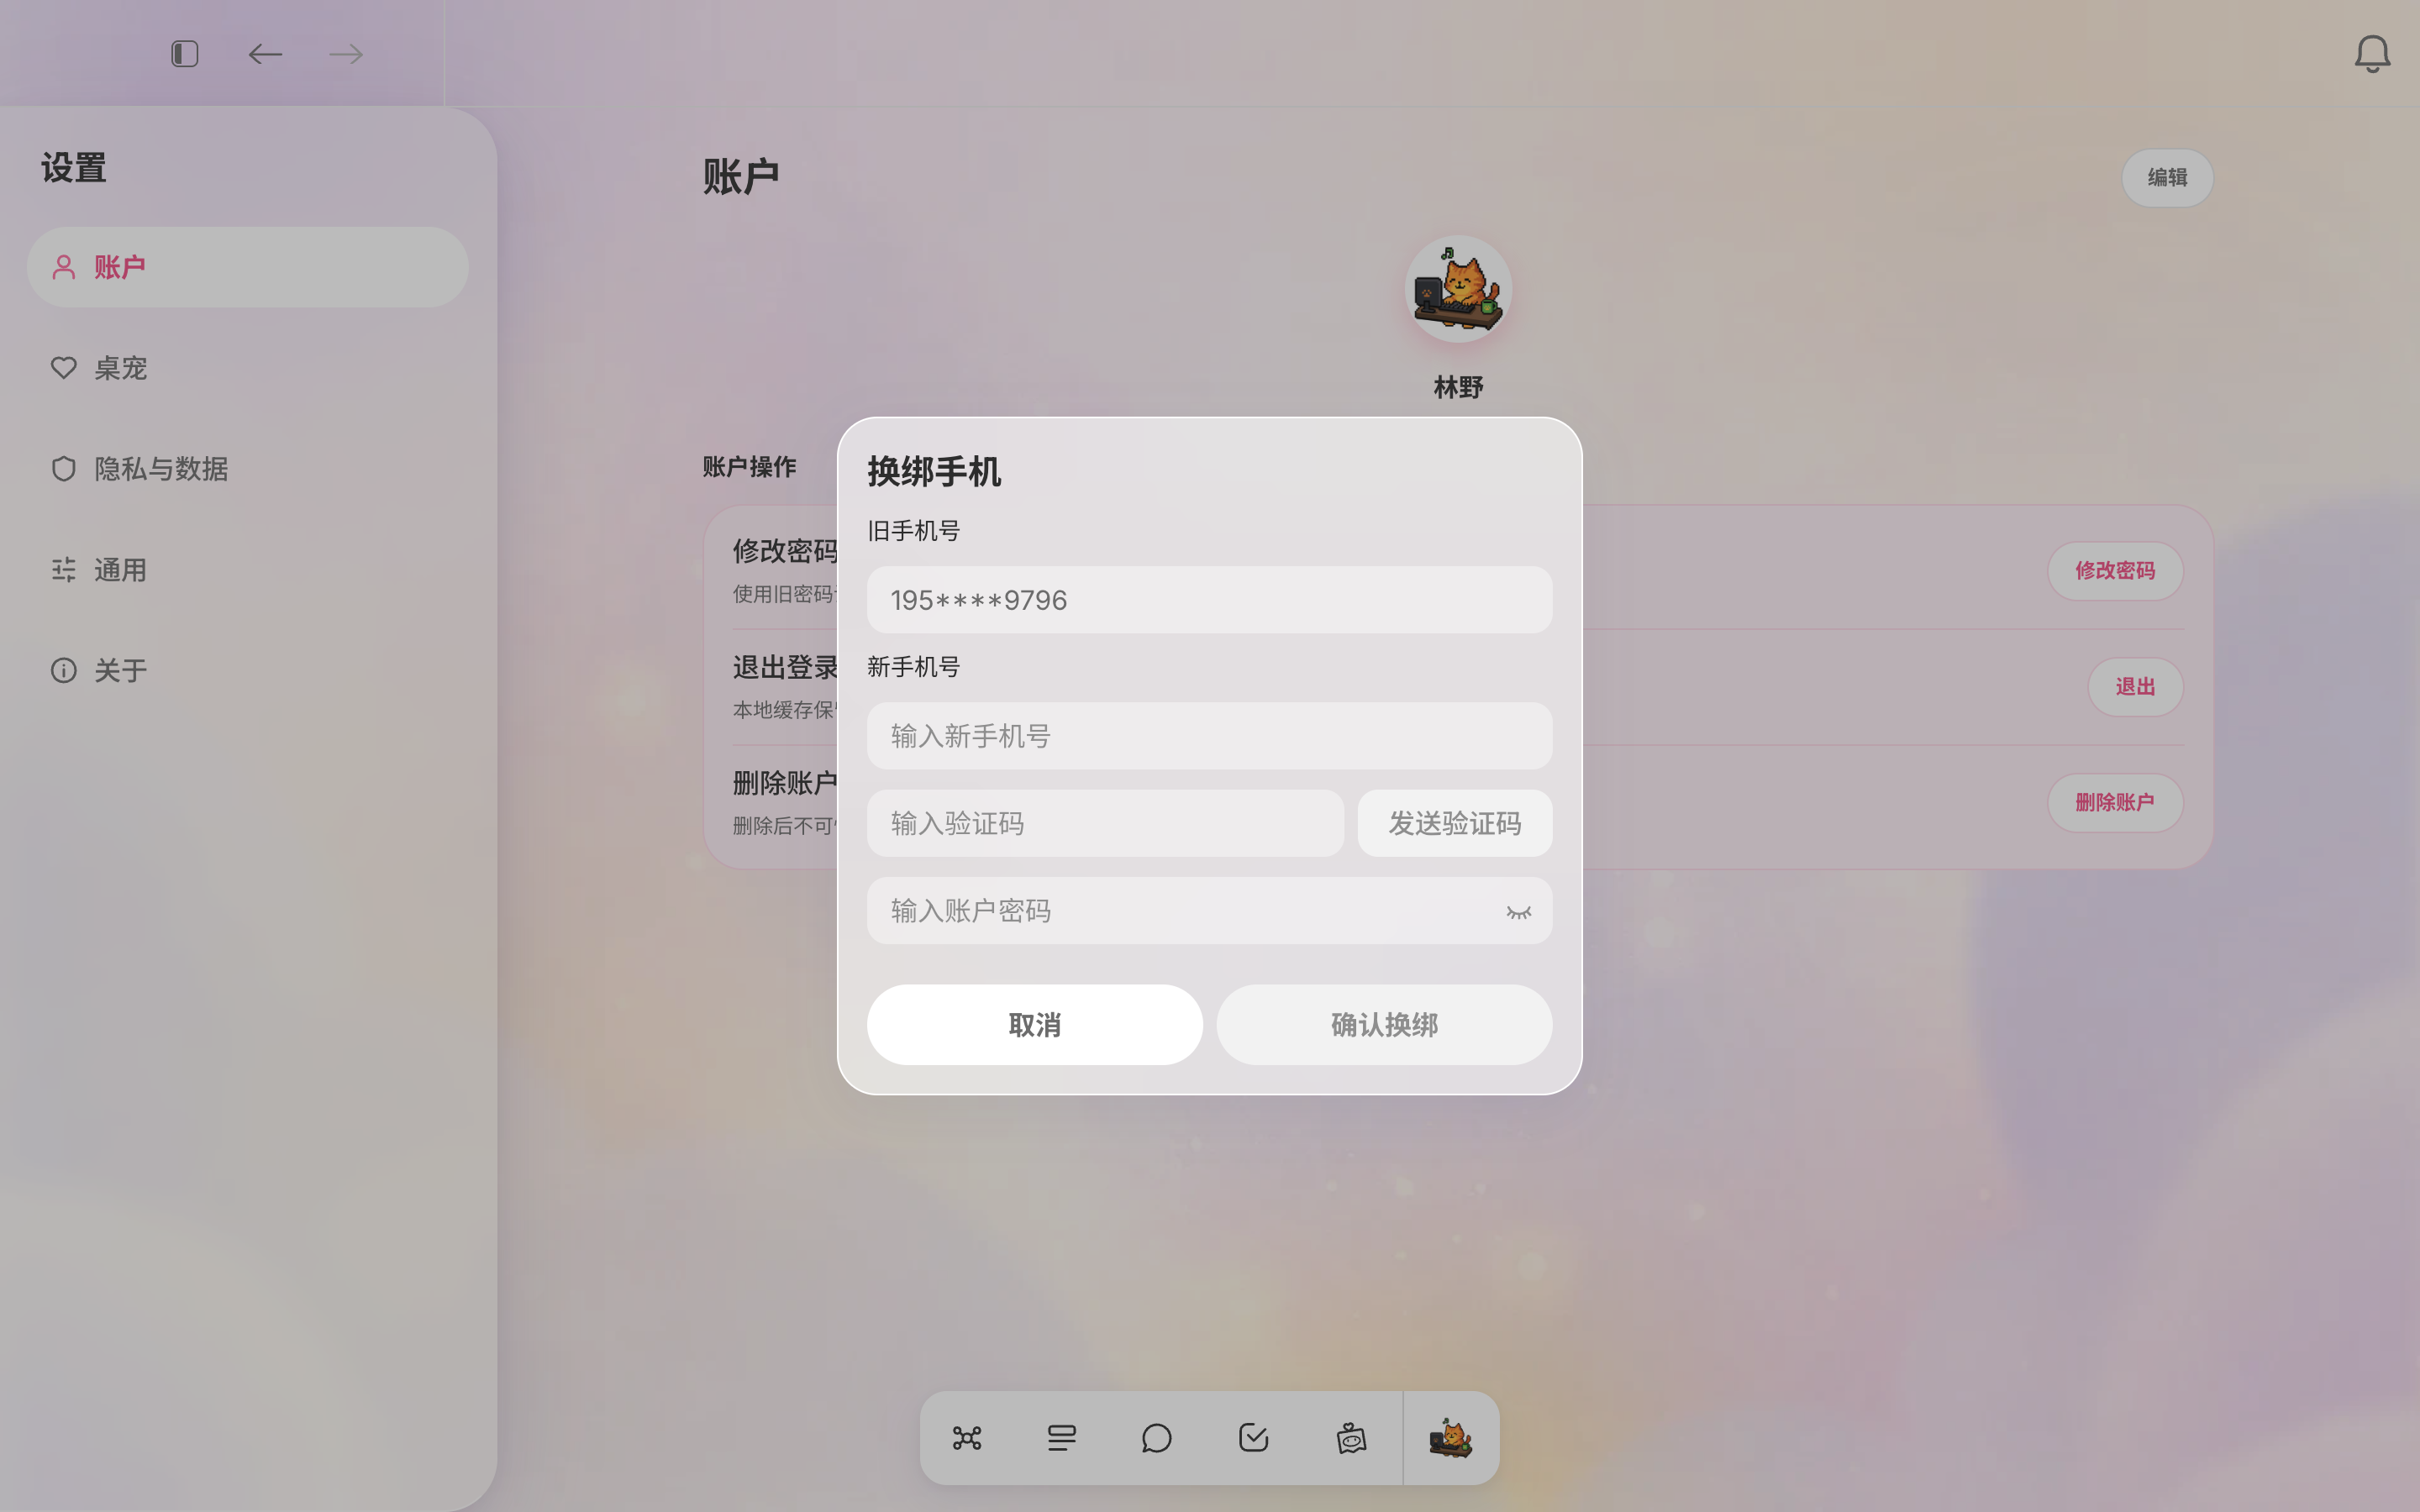
Change your phone number or email
Select Change next to Phone or Email. Your existing contact is shown and cannot be edited. Enter the new phone number or email, verification code, and account password, then select “Confirm change.” Codes cannot be resent within 60 seconds, with up to five sends per day. Five consecutive incorrect codes for the same contact trigger a 30-second lockout. If the new contact is already linked to another account, a message appears and the change stops. Once it succeeds, the dialog closes and the old contact is no longer valid for this account.
View & copy your account ID
Account ID in Account Security is your unique online identifier. It is read-only and does not change with your profile or sign-in methods. Select Copy to copy the full ID; the button briefly shows Copied. If the ID cannot be loaded, the row shows “--” and offers a retry option.
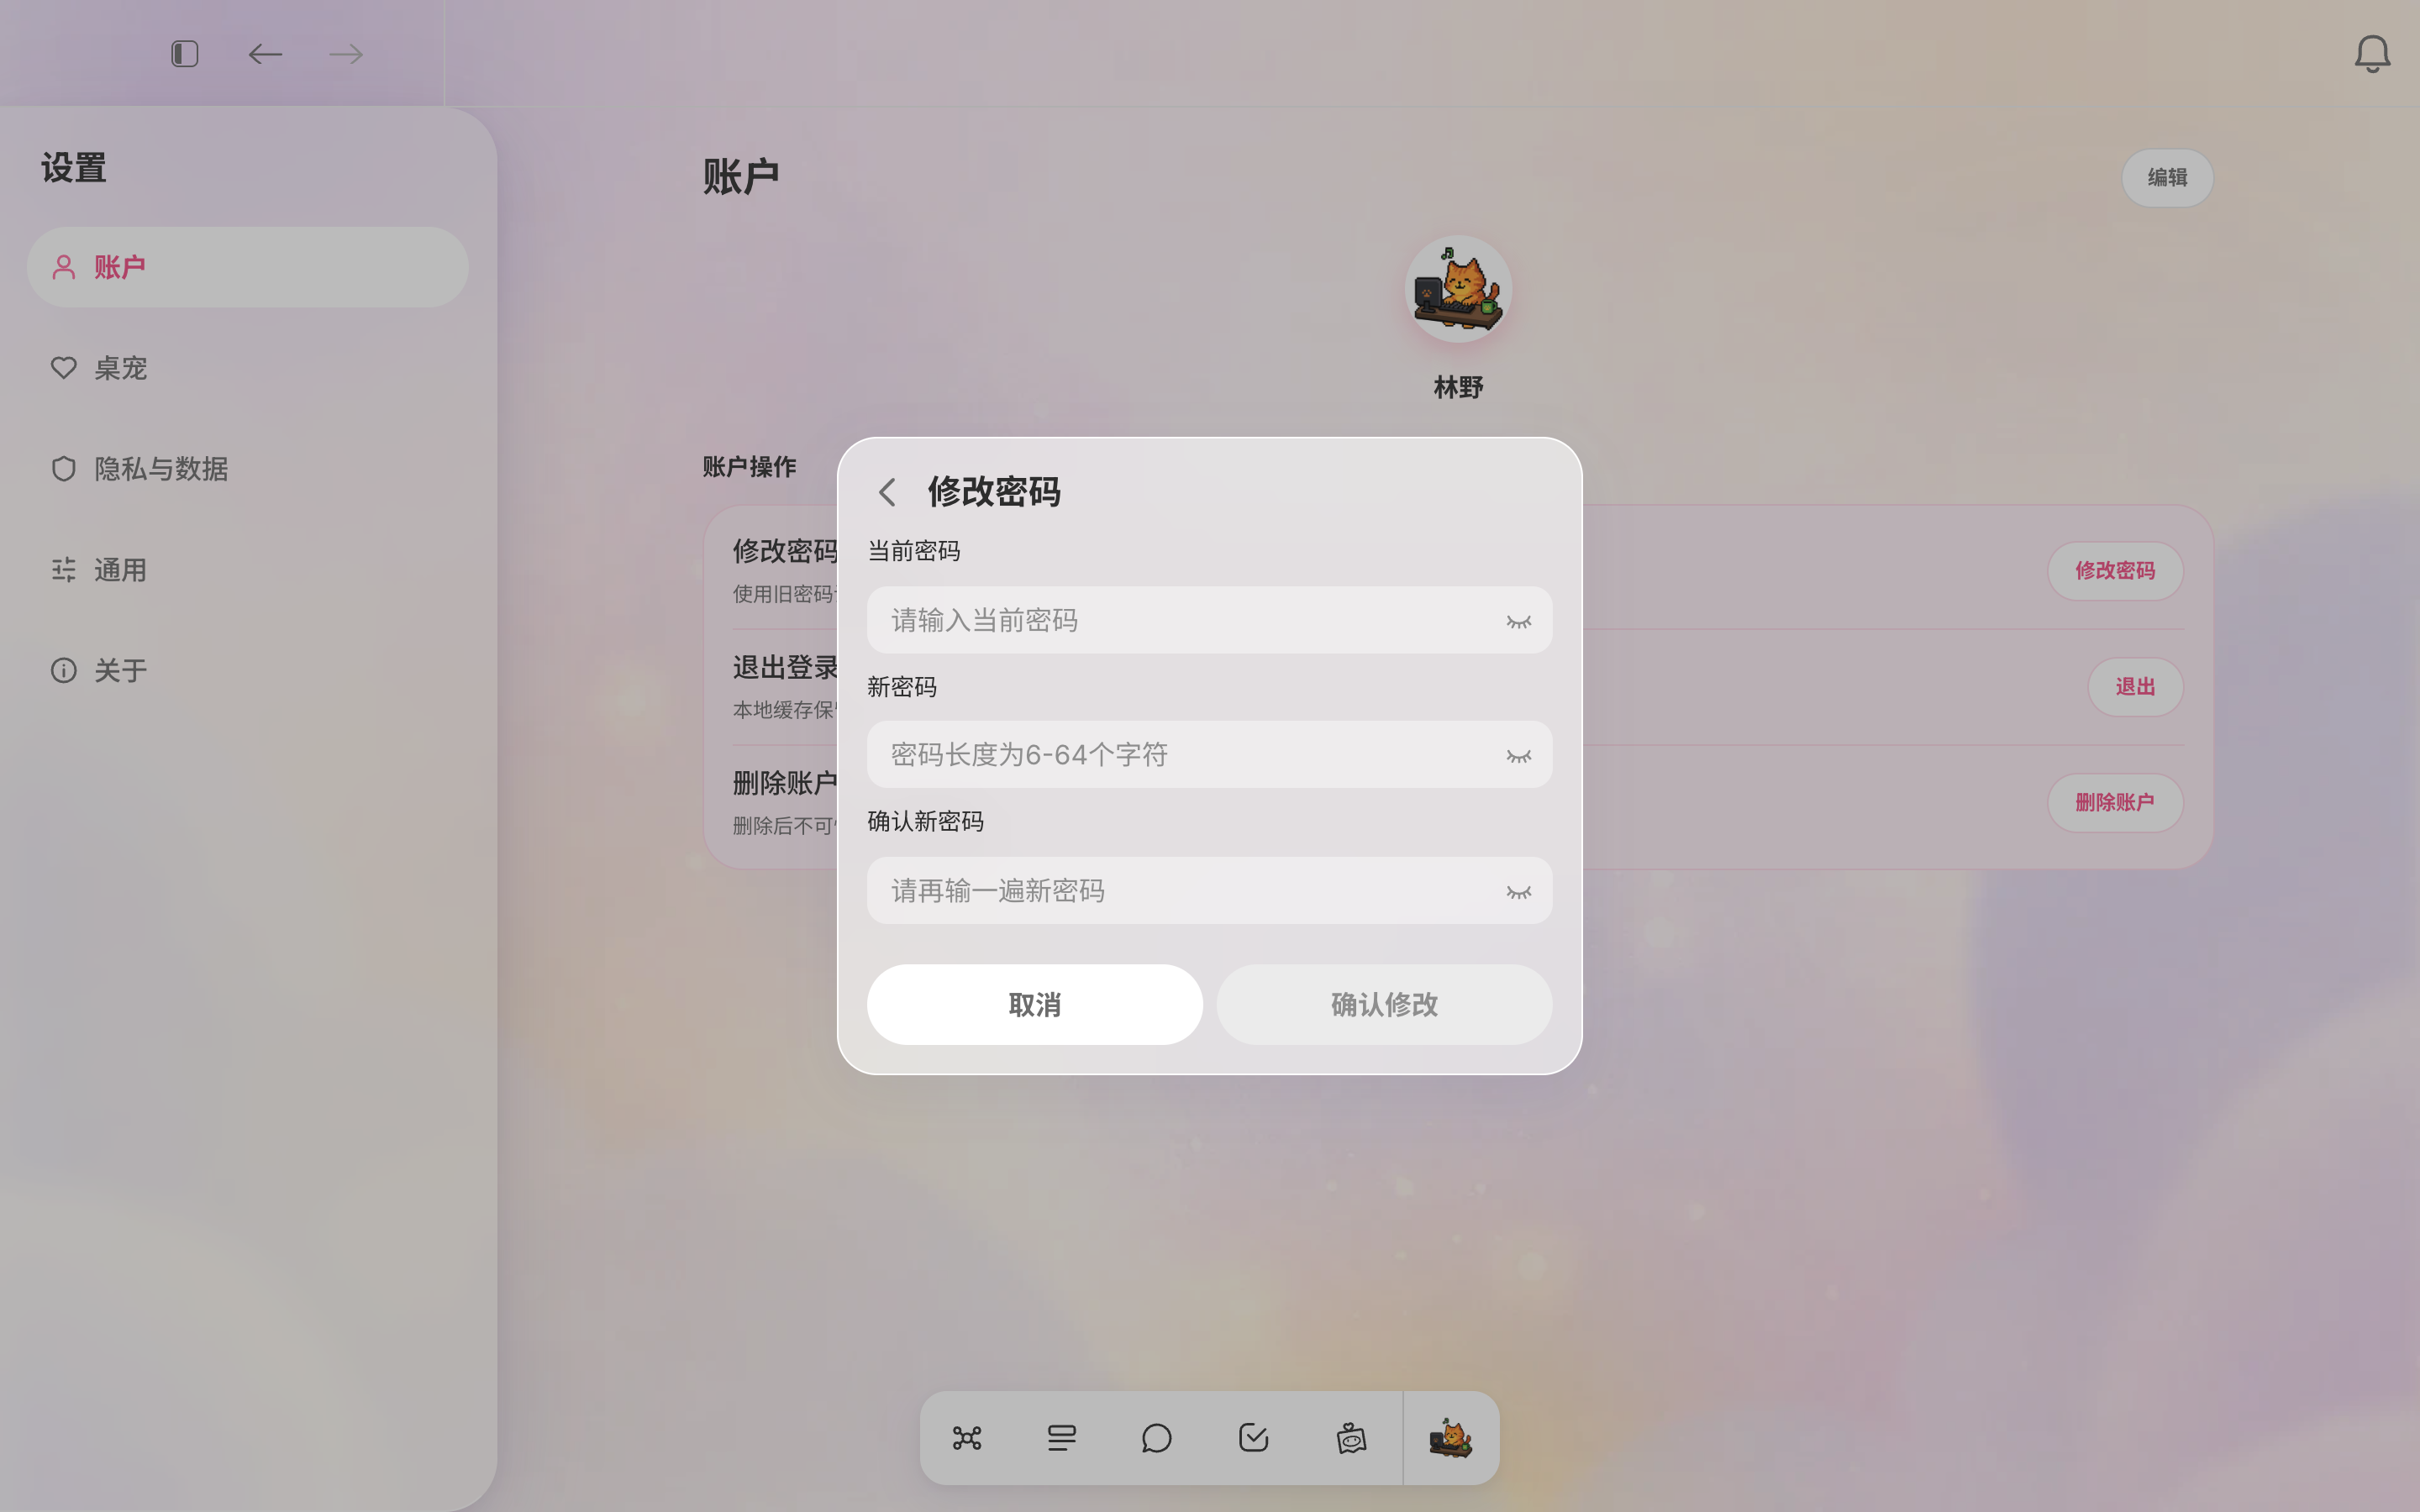
Change your sign-in password
Select Change next to Sign-in password, then enter your current password, new password, and confirmation. The new password must be 6–64 characters, match its confirmation, and differ from your current password. Fields and buttons are disabled while submitting to prevent duplicate requests. If the current password is incorrect, your new password entries are preserved so you can retry. On success, you return to your profile with a “Password changed successfully” message.
Link & unlink WeChat
If WeChat is not linked, select Link next to WeChat to display a QR code. Scan it in WeChat to link your account. The code expires after 300 seconds and can be refreshed. You can then use that WeChat account to sign in to your existing Akasi account; no new account is created and no data is moved. If WeChat is already linked to another account, a conflict message appears and the process stops without overwriting the existing link.
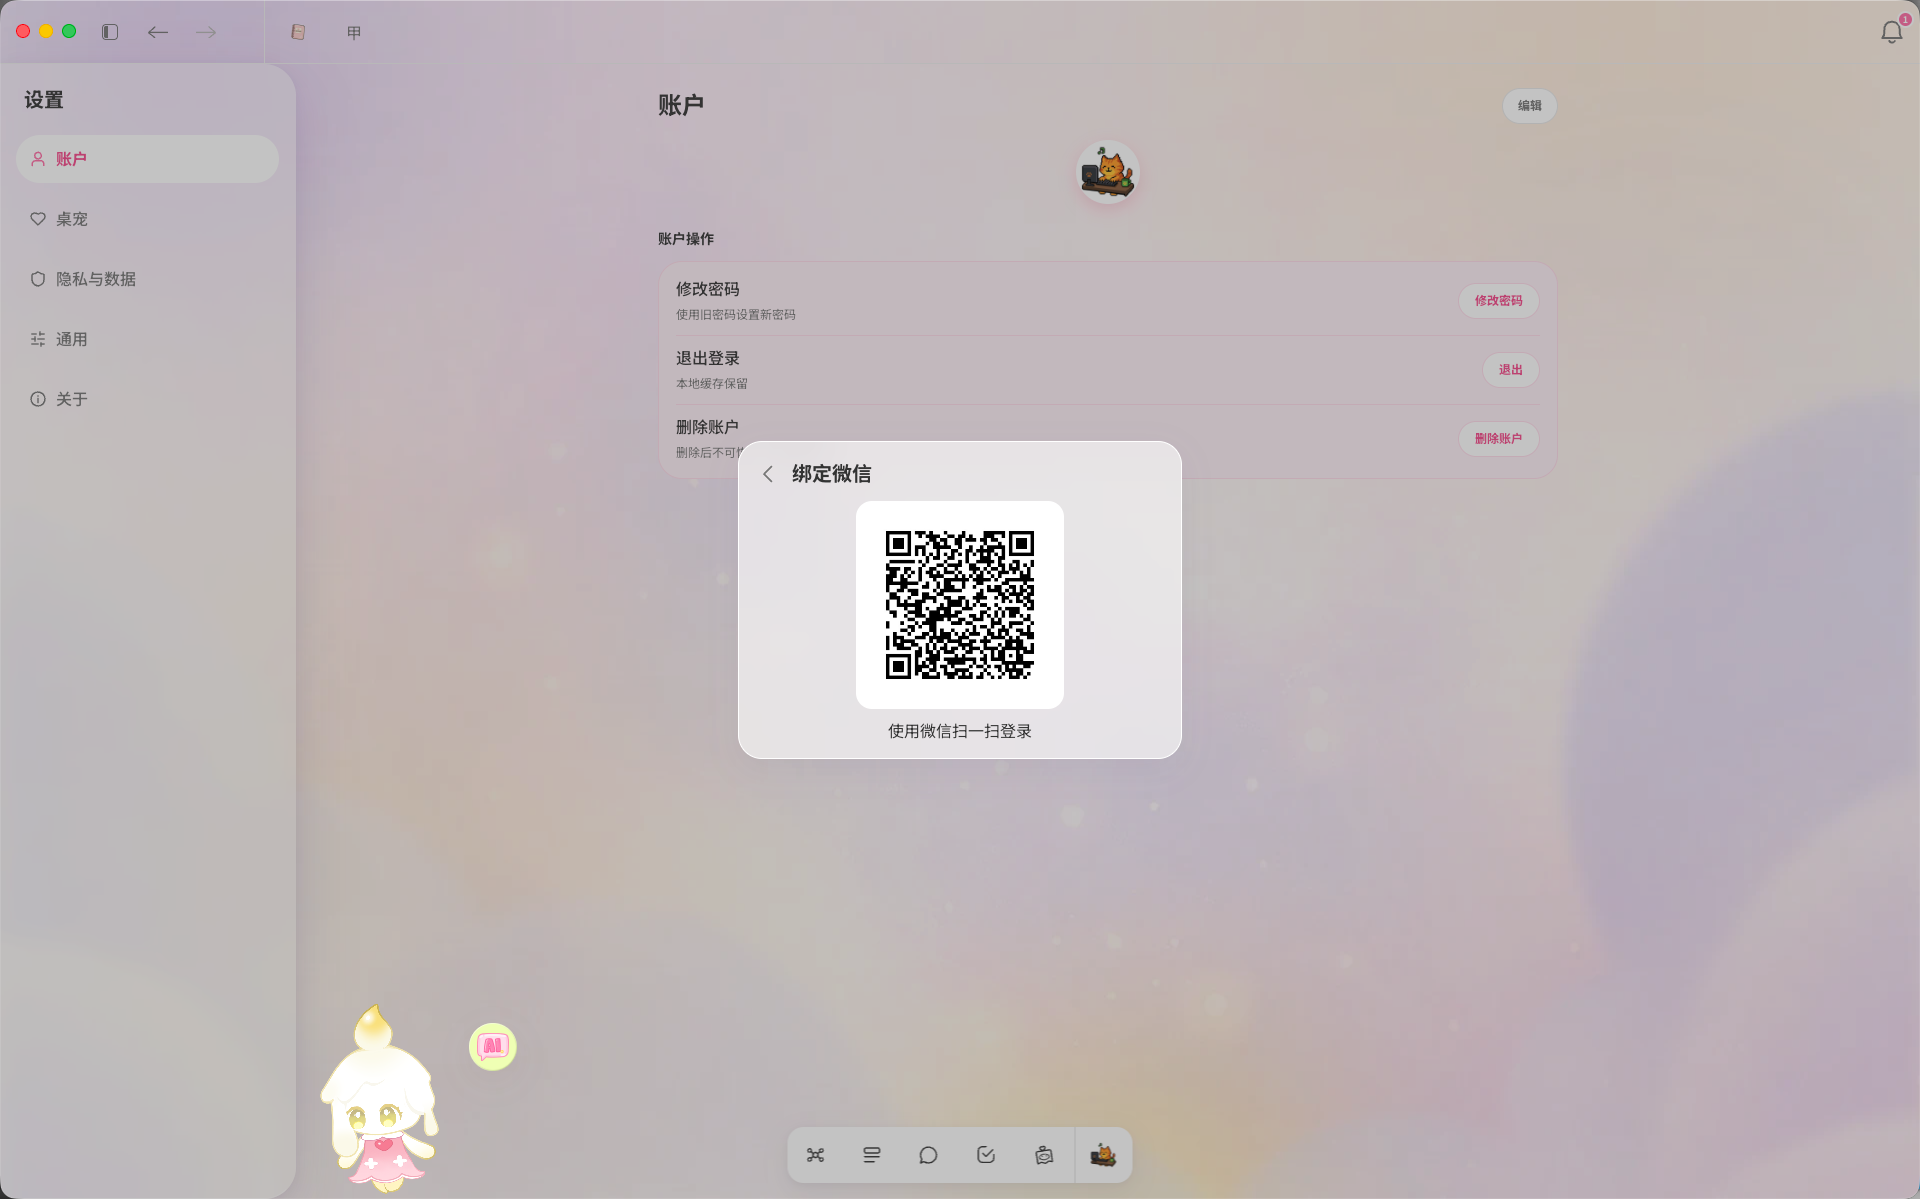
Once linked, the same button becomes Unlink. Select it and confirm to remove the link. This removes only that sign-in method; it does not delete your account, profile, or knowledge. You can still sign in with your phone number, email, or password. If the connection drops during unlinking, the existing link remains in place.
Contact
RedNote
Bilibili
WeChat Support
Changelog
V1.0
- The full Akasi desktop experience launches with Home (knowledge graph and Quick Note), Library, AI Chat, Tasks, companions, Personal Radio, and Settings.
V2.0
Sign-in: Separate sign-in and registration flows; invite-only registration with a required code; a single field for phone or email; WeChat QR code sign-in and first-time account choices; password recovery and manual support requests; and safeguards for sending and verifying codes.
Home: Read-only canvas previews; Spark Jar and Spark collection (automatic drops and companion pickup); calendar and tasks; and unified Personal Radio management with four formats, three lengths, and multiple sources.
Library: Library Home and note focus views, grouped companion suggestions, and canvas editing.
Chat: Podcast cards share the same content across the app, with improvements to the conversation experience.
Tasks: Improved task management.
Companion: Fireflies, the shop, and the wardrobe.
Settings: Improved account security, including WeChat linking and relinking, password changes, and other preferences.
New-user questionnaire: Starts automatically after registration and personalizes onboarding based on your answers.
V3.0
Login: Signing in creates an account automatically (with a verification code or your first WeChat QR sign-in); confirmation that you are at least 18 when creating an account; set a password afterward.
Home: Improved mind map and quick note experience.
Library: Organize with a single instruction and one confirmation; drag files onto your companion to create notes; move and delete items in bulk with undo; preview and read Office files, PDFs, and e-books with your reading position saved; export notes; Library experience improvements.
Chat: Shared conversations between the companion chat window and the main window (switch, create, and search); voice input; thumbs-up and thumbs-down feedback on answers; chat improvements including unread indicators, more accurate answers, and task creation from a single instruction.
Tasks: Sidebar and AI chat on the Tasks page; task improvements including reminders with acknowledgment, notification sounds, and more accurate date recognition.
Companion: A dedicated spot in the main window; a compact form that still supports bubbles, reminders, and file drops; new animations that respond to petting and your actions, plus drinking water while idle; redemption codes; an enlarged diary view and a draggable AI icon.
Settings: Trash with 30-day retention, restore, and permanent deletion; automatic software updates.
General: The bottom toolbar stays visible; quick screenshots with annotations and saving to Library; rename items and create folders when saving to Library; right-click copy and paste; always-visible scrollbars.